<?xml version="1.0" encoding="utf-8"?><feed xmlns="http://www.w3.org/2005/Atom" ><generator uri="https://jekyllrb.com/" version="3.10.0">Jekyll</generator><link href="https://blog.rhysgoodwin.com/feed.xml" rel="self" type="application/atom+xml" /><link href="https://blog.rhysgoodwin.com/" rel="alternate" type="text/html" /><updated>2025-03-09T05:54:47+00:00</updated><id>https://blog.rhysgoodwin.com/feed.xml</id><title type="html">blog.rhysgoodwin.com</title><subtitle>:triangular_ruler: Jekyll theme for building a personal site, blog, project documentation, or portfolio.</subtitle><author><name>Rhys Goodwin</name></author><entry><title type="html">Elitedesk 800 G6 Mini BIOS Password Removal</title><link href="https://blog.rhysgoodwin.com/it/hp-elite-800-bios-password-removal/" rel="alternate" type="text/html" title="Elitedesk 800 G6 Mini BIOS Password Removal" /><published>2025-02-02T00:00:00+00:00</published><updated>2025-02-02T00:00:00+00:00</updated><id>https://blog.rhysgoodwin.com/it/hp-elite-800-bios-password-removal</id><content type="html" xml:base="https://blog.rhysgoodwin.com/it/hp-elite-800-bios-password-removal/"><![CDATA[<p>Kia ora folks,
I bought this machine 2nd hand off Trademe and it sat for several months before I got around to using it, at which point I discovered it had a BIOS password. I queried the seller but didn’t get a reply.</p>

<p><a href="/content/uploads/2025/02/02/4.elite800g6.png"><img src="/content/uploads/2025/02/02/4.elite800g6.png" alt="" width="450" /></a></p>

<p>It is <a href="https://www.badcaps.net/forum/troubleshooting-hardware-devices-and-electronics-theory/troubleshooting-desktop-motherboards-graphics-cards-and-pc-peripherals/bios-schematic-requests/99026-hp-elitedesk-805-g6-mini-pc">well known</a> that the password can be removed by dumping, modifying and re-flashing the BIOS chip with an external EPROM programmer, but then I found this tweet, so full credit for this one goes to <a href="https://x.com/anotheryeenbean/status/1757285531644256428">@anotheryeenbean</a>.</p>

<p><a href="/content/uploads/2025/02/02/0.anotheryeenbean.png"><img src="/content/uploads/2025/02/02/0.anotheryeenbean.png" alt="" width="450" /></a></p>

<p>I reached out to Alice for more info but didn’t hear anything back and was too impatient, so decided to risk it. It seems to have worked so I’m documenting it more fully here. Use at your own risk of course! Not sure if it will work on the small-form-factor or tower models. Those may have a password reset jumper anyway?</p>

<p>Not sure if it will cause any issues further down the track, but from what I can tell everything is intact in terms of IDs and Windows activation was not impacted.</p>

<p>Also worth noting when doing anything with these HP Elitedesk machines, after full power loss, hard reset, and various other things, the machine will sit for ages with a black screen, powering itself on and off a few times doing self-tests etc. Just wait. Give it at least 3 mins before you decide it is failing to boot.</p>

<p>Here’s what I did.</p>

<ol>
  <li>I disconnected the power supply, got a jumper wire in place, holding one side on a ground point and the other on pin 2 of the GigaDevice flash chip. I believe this is the 16MB flash chip used by the sure start embedded controller, it’s not the main BIOS chip.</li>
</ol>

<p><a href="/content/uploads/2025/02/02/1.BIOS-chip.png"><img src="/content/uploads/2025/02/02/1.BIOS-chip.png" alt="" width="450" /></a></p>

<p><a href="/content/uploads/2025/02/02/2.ground-pin-2.png"><img src="/content/uploads/2025/02/02/2.ground-pin-2.png" alt="" width="450" /></a></p>

<ol start="2">
  <li>Reconnected the power supply and attempted to power on the machine while holding the jumper wire in place. The power light flashed red and white (I didn’t get the exact sequence).</li>
  <li>Removed the jumper and powered off the machine.</li>
  <li>It now fails to power on at all 😱. Disconnect the power supply and tried to power on to drain caps.</li>
  <li>Reconnect power supply and power on. Enter BIOS and everything is reset to factory. Good to go!</li>
</ol>

<p><a href="/content/uploads/2025/02/02/3.BIOSScreen.png"><img src="/content/uploads/2025/02/02/3.BIOSScreen.png" alt="" width="450" /></a></p>

<p>All set for the new mini-cluster build!</p>

<p><a href="/content/uploads/2025/02/02/5.cluster-ready.png"><img src="/content/uploads/2025/02/02/5.cluster-ready.png" alt="" width="450" /></a></p>

<p>Hope this helps someone, and big thanks to Alice, no idea how you discovered this!</p>]]></content><author><name>Rhys Goodwin</name></author><category term="it" /><category term="hp" /><category term="bios password" /><category term="eprom" /><category term="elitedesk" /><summary type="html"><![CDATA[Remove the BIOS password from an HP Elite 800 G6 without EPROM programer]]></summary></entry><entry><title type="html">3-Node Hyperconverged Ceph/OpenStack Cluster</title><link href="https://blog.rhysgoodwin.com/it/openstack-ceph-hyperconverged/" rel="alternate" type="text/html" title="3-Node Hyperconverged Ceph/OpenStack Cluster" /><published>2023-09-21T00:00:00+00:00</published><updated>2023-09-21T00:00:00+00:00</updated><id>https://blog.rhysgoodwin.com/it/Openstack-hyperconverged</id><content type="html" xml:base="https://blog.rhysgoodwin.com/it/openstack-ceph-hyperconverged/"><![CDATA[<p><a href="/content/uploads/2023/09/21/nodes-1.jpg"><img src="/content/uploads/2023/09/21/nodes-1.jpg" alt="" width="450" /></a></p>

<h1 id="overview">Overview</h1>
<p>This is a rough documentation of my OpenStack private cloud build for hosting my lab and other home services. I’m coming at this from zero experience in OpenStack, KVM, and Ceph. I’ve been learning this stuff pretty intensively for the last 3 months. My previous experience has all been in Microsoft Hyper-V and VMWare vSphere and I have moderate level Linux skills, so I’m by no means and expert, I’m just giving it a go.</p>

<p>These are mainly just notes for my own reference, rather than a full guide, but I’m sharing it for anyone else who might want to build something similar. Reach out if there’s anything you want me to clarify or expand on. Or if you spot something I’m doing wrong.</p>

<p><a href="/content/uploads/2023/09/21/skyline-instanaces.png"><img src="/content/uploads/2023/09/21/skyline-instanaces.png" alt="" width="450" /></a>
<a href="/content/uploads/2023/09/21/amt-console.png"><img src="/content/uploads/2023/09/21/amt-console.png" alt="" width="450" /></a></p>

<p>This was my 4th build from scratch. Each time I refined my notes a little more. Ideally such a solution should be deployed with Ansible or similar and I might get to that but for learning I think doing it all by hand is best.</p>

<p>
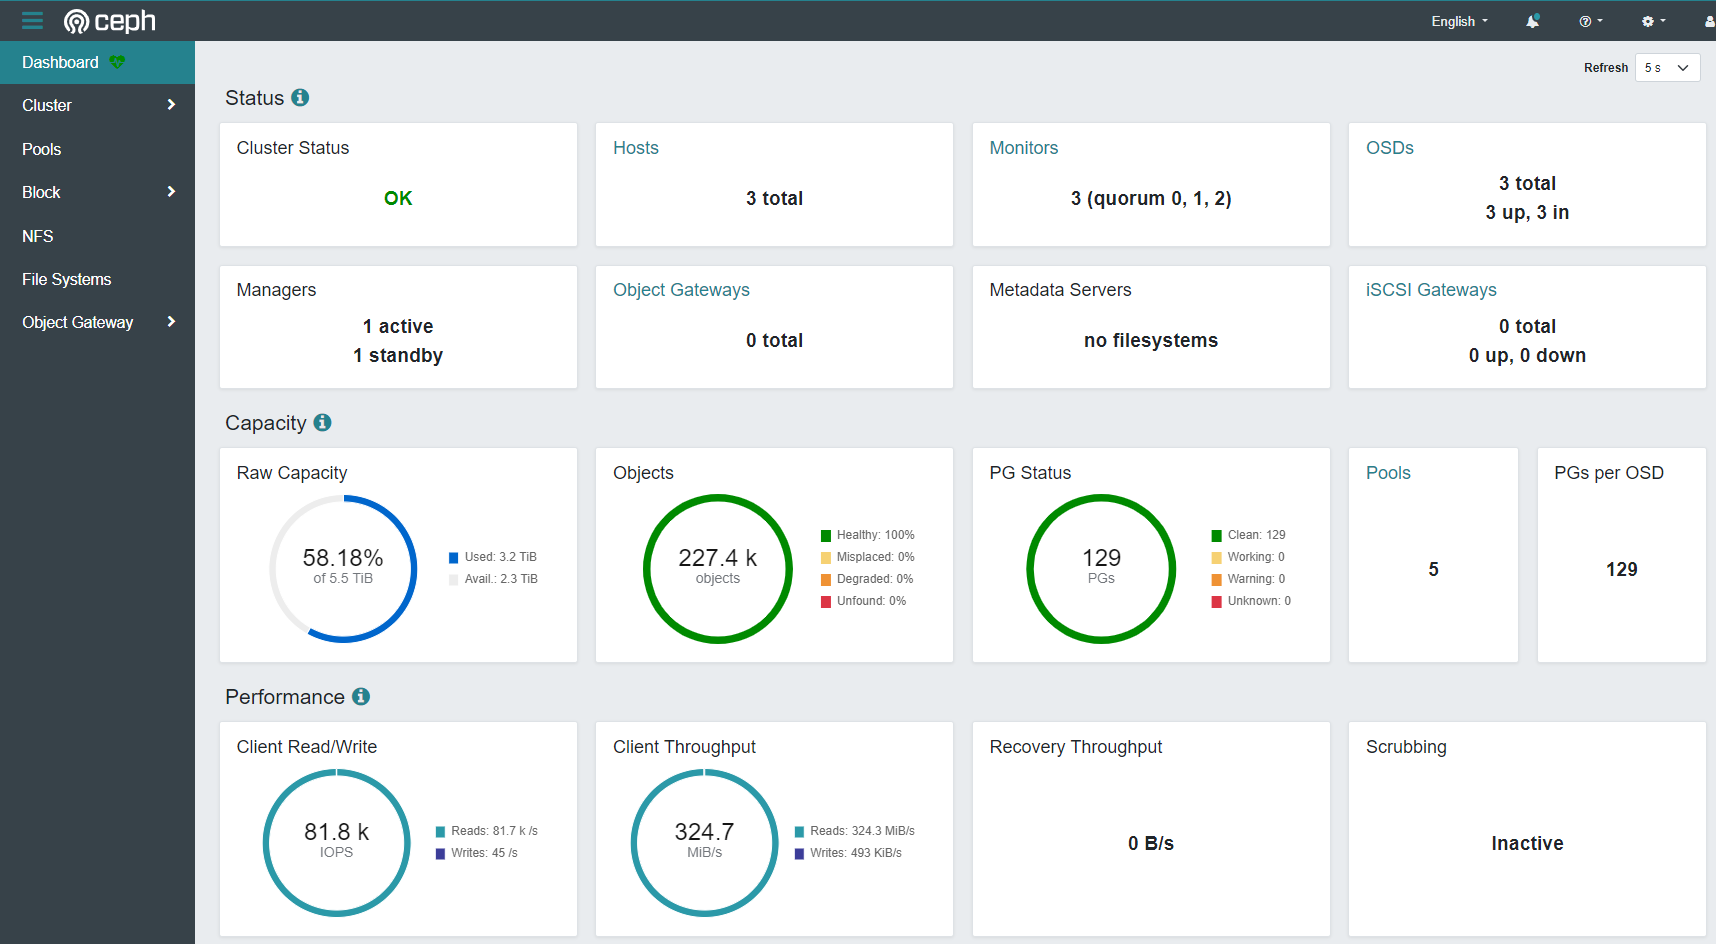
I was advised that OpenStack and Ceph were too complex and too resource intensive for this kind of build, but I’ve been pleasantly surprised just how well this thing runs. E.g. 21k IOPS of 4K random write, 80k 4k random read from within the VMs. With that said, I haven’t loaded it up yet with a lot of VMs yet. I’m hoping to be able to run about 50 VMs of various sizes.</p>

<p><strong>Disclaimer</strong> - I’m not very skilled in storage or disk performance so I just tried a bunch of different fio(Linux) and diskspd (Windows) tests until I got an impressive looking screenshot from the Ceph dashboard. The screenshot below is from <code class="language-plaintext highlighter-rouge">diskspd -c100b -b4K -o32 -F8 -T1b -s8b -W60 -d60 -Sh testfile.dat</code></p>

<p><a href="/content/uploads/2023/09/21/ceph.png"><img src="/content/uploads/2023/09/21/ceph.png" alt="" width="450" /></a></p>

<p>
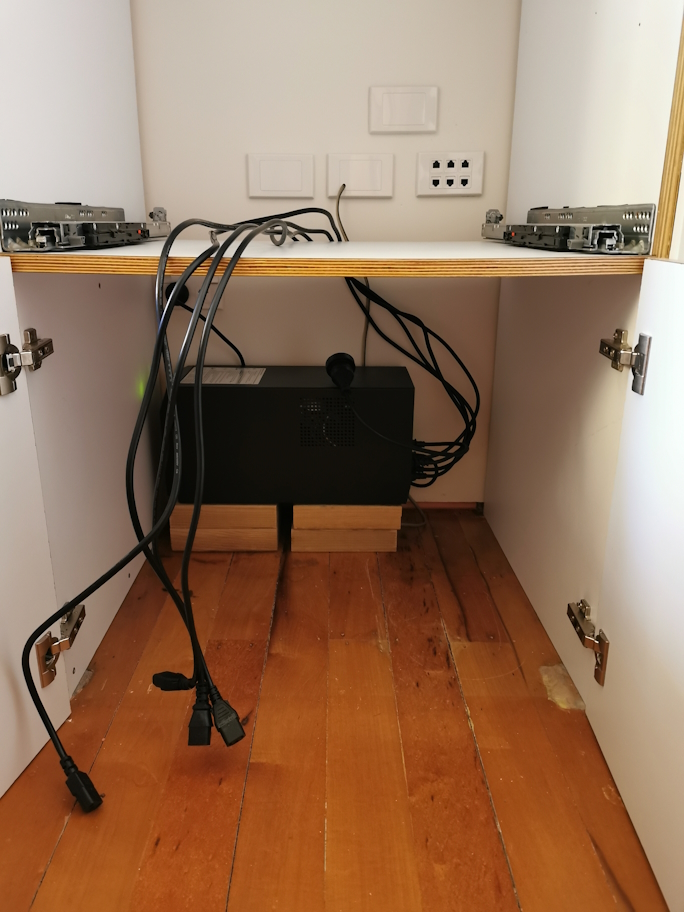
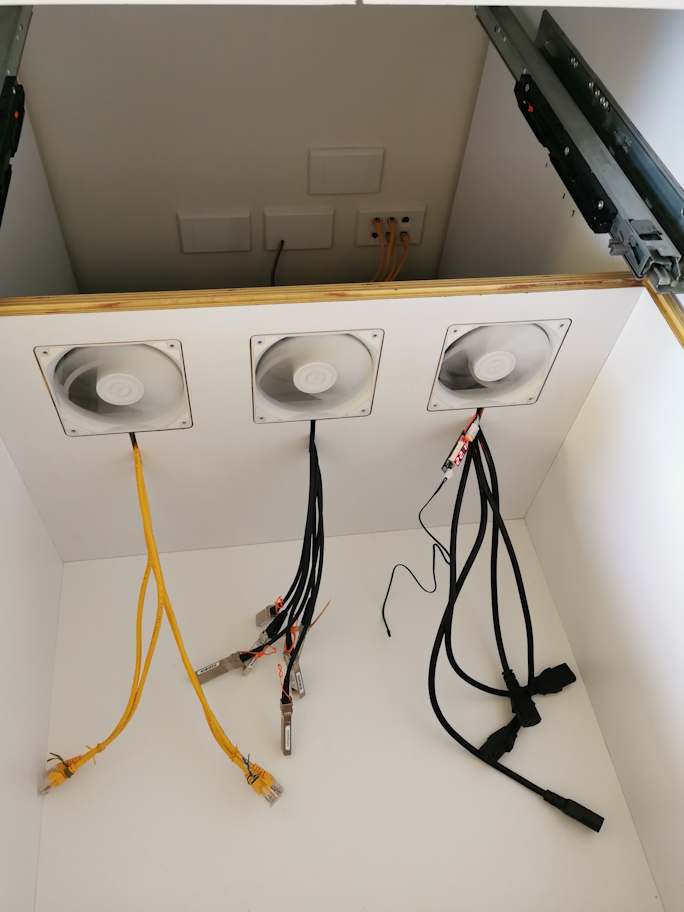
And of course, what good is a lab if it can’t keep your linen closet warm and dry?
<a href="/content/uploads/2023/09/21/drawer-1.jpg"><img src="/content/uploads/2023/09/21/drawer-1.jpg" alt="" width="450" /></a>
<a href="/content/uploads/2023/09/21/drawer-2.jpg"><img src="/content/uploads/2023/09/21/drawer-2.jpg" alt="" width="450" /></a>
<a href="/content/uploads/2023/09/21/drawer-3.jpg"><img src="/content/uploads/2023/09/21/drawer-3.jpg" alt="" width="450" /></a>
<a href="/content/uploads/2023/09/21/drawer-4.jpg"><img src="/content/uploads/2023/09/21/drawer-4.jpg" alt="" width="450" /></a>
<a href="/content/uploads/2023/09/21/drawer-5.jpg"><img src="/content/uploads/2023/09/21/drawer-5.jpg" alt="" width="450" /></a>
<a href="/content/uploads/2023/09/21/drawer-6.jpg"><img src="/content/uploads/2023/09/21/drawer-6.jpg" alt="" width="450" /></a>
<a href="/content/uploads/2023/09/21/drawer-7.jpg"><img src="/content/uploads/2023/09/21/drawer-7.jpg" alt="" width="450" /></a></p>

<h3 id="solution-overview">Solution Overview</h3>
<p><a href="/content/uploads/2023/09/21/Physical.png"><img src="/content/uploads/2023/09/21/Physical.png" alt="" /></a></p>
<ul>
  <li>
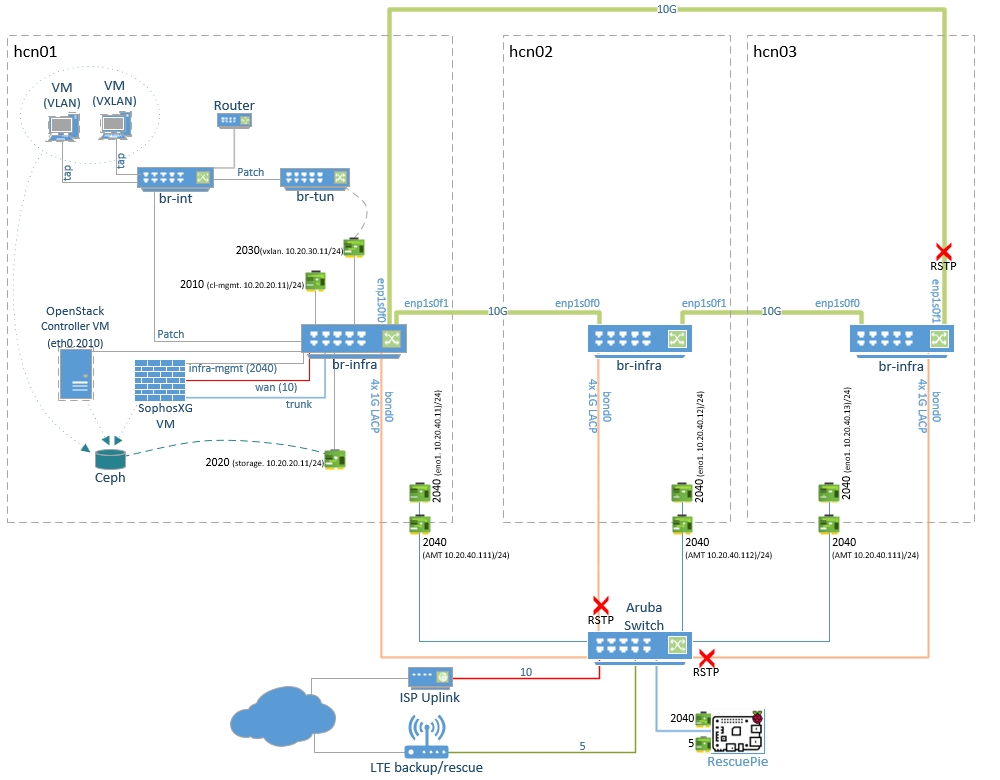
Each node (hcn01, hcn02, hcn03) is identical. In the diagram I’ve only shown the detail for hcn01</li>
  <li>The OpenStack controller VM and the and the firewall VM live on the storage cluster but outside of OpenStack as simple libvirt KVM VMs. These can be live migrated between hosts as needed for maintenance etc.
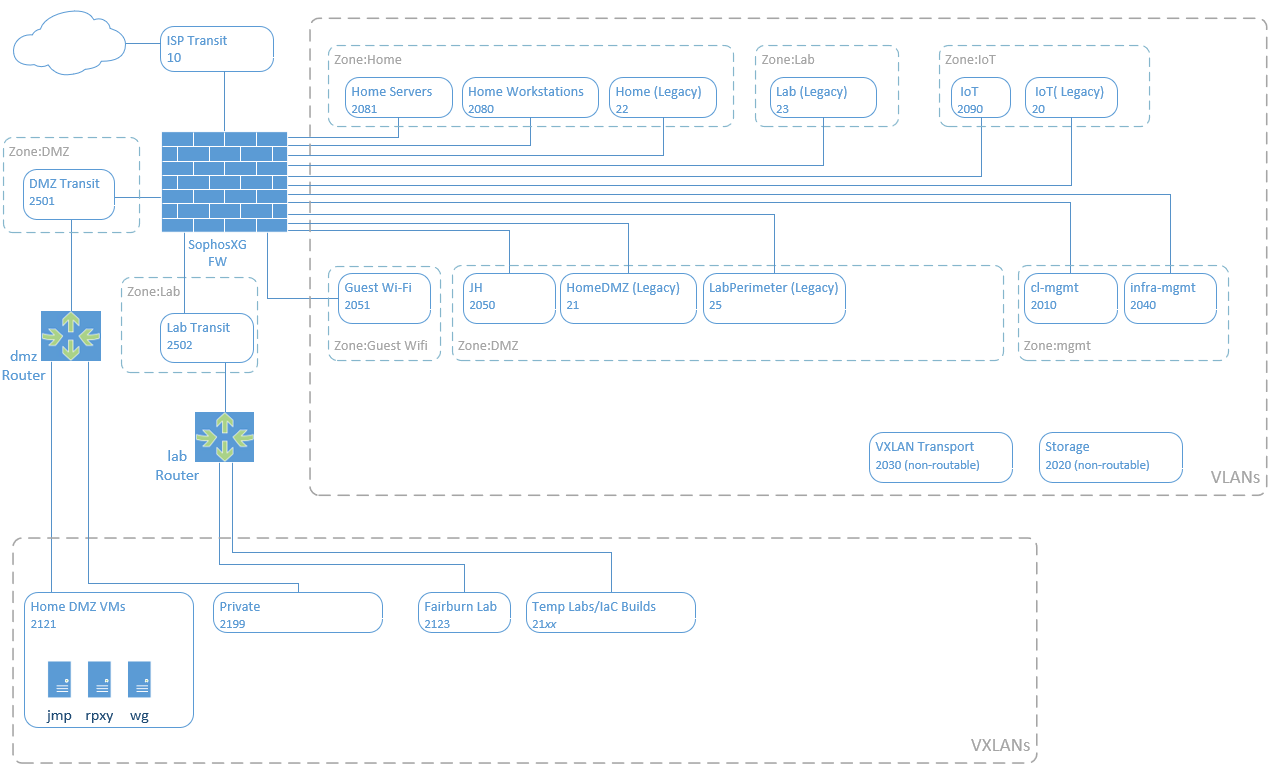
</li>
</ul>

<h3 id="logical-network">Logical Network</h3>
<p><a href="/content/uploads/2023/09/21/Logical.png"><img src="/content/uploads/2023/09/21/Logical.png" alt="" /></a></p>

<h2 id="project-goals">Project Goals</h2>
<ul>
  <li>Eliminate (or at least minimise) single points of failure</li>
  <li>Max 3 hosts - hence integrated storage and compute (hyper-converged)</li>
  <li>Sustain operation in event of full host failure</li>
  <li>Learn about OpenStack, Ceph and software defined networking</li>
  <li>Use Terraform for managing resources</li>
  <li>10G for cluster networking (No 10G switch, ring topology)</li>
  <li>Keep the linen dry</li>
</ul>

<h2 id="hardware-each-node-three-nodes">
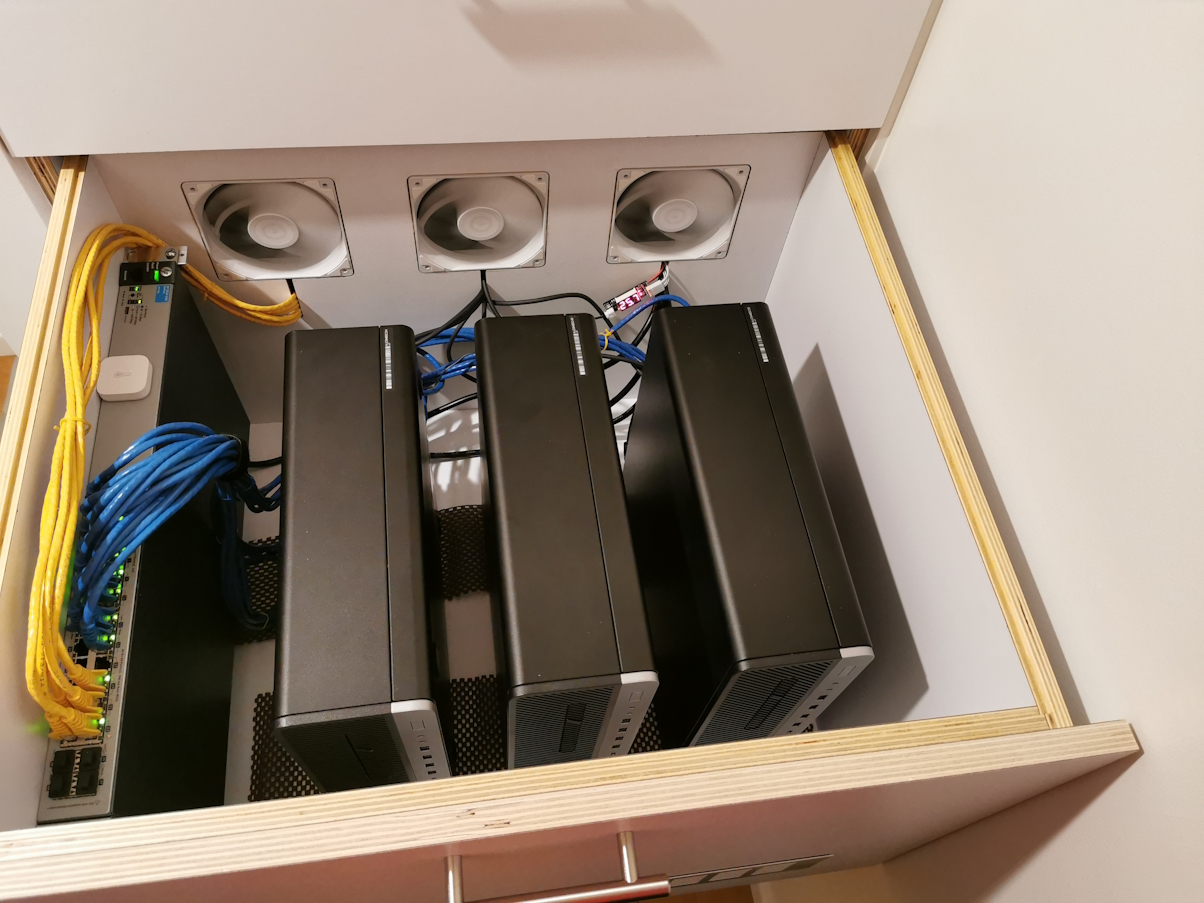
Hardware (Each node, three nodes)</h2>
<ul>
  <li>Hp Elitedesk G5 Small Form Factor</li>
  <li>Intel i7-9700 (8 Cores)</li>
  <li>64GB DDR4 (Expandable to 128GB)</li>
  <li>Broadcom Quad 1G NIC</li>
  <li>Intel X520 Dual 10G NIC (SFP+)</li>
  <li>256GB SATA SSD (OS)</li>
  <li>2TB Samsung 980 Pro NVME (Ceph OSD)</li>
  <li>2TB Samsung 870 EVO SATA (Ceph OSD)</li>
  <li>1 spare SATA and 1 Spare NVME for expansion</li>
</ul>

<h2 id="hosts-and-interfaces">Hosts and Interfaces</h2>
<p>All hosts are running ubuntu 22.04 LTS</p>
<h3 id="hcn01">hcn01</h3>
<p>First hyper-converged node. This is where the OpenStack controller VM will be built, it will be the primary for DNS and the central point for NTP but otherwise should end up pretty much identical to the hcn02 and hcn03</p>
<ul>
  <li>infra-mgmt. IP: 10.20.40.11/24 (VLAN: 2040)</li>
  <li>cl-mgmt. IP: 10.20.10.11/24 (VLAN: 2010)</li>
  <li>storage IP: 10.20.20.11/24 (VLAN: 2020)</li>
  <li>vxlan IP: 10.20.30.11/24 (VLAN: 2030)</li>
</ul>

<h3 id="hcn02">hcn02</h3>
<p>Second hyper-converged node</p>
<ul>
  <li>infra-mgmt. IP: 10.20.40.12/24 (VLAN: 2040)</li>
  <li>cl-mgmt. IP: 10.20.10.12/24 (VLAN: 2010)</li>
  <li>storage IP: 10.20.20.12/24 (VLAN: 2020)</li>
  <li>vxlan IP: 10.20.30.12/24 (VLAN: 2030)</li>
</ul>

<h3 id="hcn03">hcn03</h3>
<p>Third hyper-converged node</p>
<ul>
  <li>infra-mgmt. IP: 10.20.40.13/24 (VLAN: 2040)</li>
  <li>cl-mgmt. IP: 10.20.10.13/24 (VLAN: 2010)</li>
  <li>storage IP: 10.20.20.13/24 (VLAN: 2020)</li>
  <li>vxlan IP: 10.20.30.13/24 (VLAN: 2030)</li>
</ul>

<h3 id="hcc01">hcc01</h3>
<p>OpenStack Controller VM, running as a libvirt KVM VM outside of OpenStack, Stored on the Ceph cluster</p>
<ul>
  <li>cl-mgmt. IP: 10.20.10.10/24 (VLAN: 2010)</li>
</ul>

<h3 id="hcui01">hcui01</h3>
<p>OpenStack Skyline dashboard VM running in OpenStack</p>
<ul>
  <li>cl-mgmt. IP: 10.20.10.5/24 (VLAN: 2010)</li>
</ul>

<h3 id="10g-ring-topology">10G Ring Topology</h3>
<p>This is something I’ve always wanted to try. To avoid the need for a 10G switch the hosts are all connected to each other with a dual Intel X520 10Gb NICs using DAC cables. With Open vSwitch with RSTP enabled this works very well. Just don’t stop the Open vSwitch service on a host as this creates a wild broadcast storm which brings the entire network to its knees and sets the CPUs to 100%! Not sure if/how this can be mitigated should the Open vSwitch service crash, but so far, no issues.</p>

<p><strong>Question:</strong>  In theory it should be possible to use OpenFlow to control Open vSwitch rather than using RSTP which introduces the penalty of an extra hop for one of the noes. As per the diagram below, host hcn03 must go via hcn02 to reach hcn01. **Does anyone know how to set this up purely with Openflow?</p>

<h3 id="uplink-bond">Uplink Bond</h3>
<p>Each node has 4 1G NICs on a quad port card which are configured in an LACP bond to provide an uplink to the physical switch. Again, RSTP is enabled on the physical switch to prevent loops.</p>

<h2 id="high-level-build-steps">High-level Build Steps</h2>
<ul>
  <li>Prepare hardware
    <ul>
      <li>Update BIOS/firmware</li>
      <li>Set identical BIOS settings across all hosts</li>
      <li>
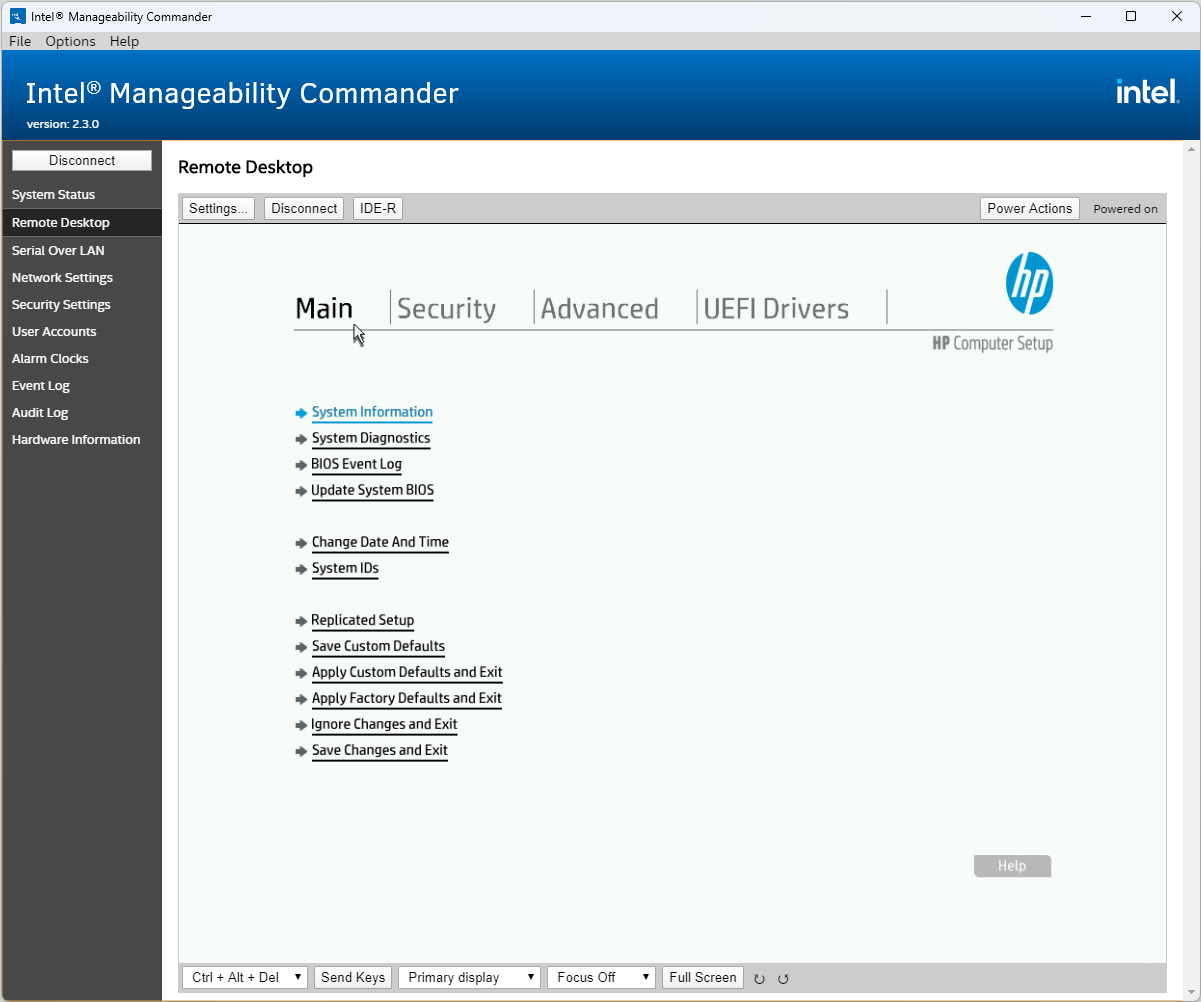
Configure Intel ME AMT for out-of-band console</li>
    </ul>
  </li>
  <li>Build base OS (Ubuntu 22.04)
    <ul>
      <li>Configure chrony time sync</li>
      <li>Configure passwordless root between nodes</li>
      <li>Install and configure bind DNS (We want to use FQDNs for most things)</li>
      <li>Configure host networking
        <ul>
          <li>Create open vSwitch bridges and host interfaces</li>
        </ul>
      </li>
    </ul>
  </li>
  <li>Install Ceph and bootstrap cluster</li>
  <li>Create VM for OpenStack controller VM:
    <ul>
      <li>Configure libvirt/KVM to work with Ceph</li>
      <li>Create Ceph pool and image</li>
      <li>Deploy controller VM</li>
    </ul>
  </li>
  <li>Install and Configure OpenStack
    <ul>
      <li>Configure controller VM</li>
      <li>Configure physical compute nodes</li>
    </ul>
  </li>
  <li>Create Dashboard VM in OpenStack
    <ul>
      <li>Install and configure Skyline Dashboard</li>
    </ul>
  </li>
</ul>

<h1 id="host-build">Host Build</h1>
<p><strong>Note:</strong> Connecting to Intel AMT KVM in &gt;S0 power state causes NIC to be at 10Mbps. Known issue, comes back to 1G after reboot. Workaround by connecting to console after power-up.</p>

<h2 id="install-ubuntu-2204-from-usb-all-nodes">Install Ubuntu 22.04 from USB [All Nodes]</h2>
<ul>
  <li>For the Intel AMT console to work during the installer we need to edit grub boot options at the installer grub menu by pressing ‘e’ to add <em>nomodeset</em> after “<em>vmlinuz</em>” on the “<em>linux</em>” line.</li>
  <li>Add static IP for the infra-mgmt interface on 10.20.40.0/24
    <ul>
      <li>default route and DNS pointing to the main firewall for internet access</li>
    </ul>
  </li>
</ul>

<h2 id="persist-nomodeset-all-nodes">Persist nomodeset [All Nodes]</h2>
<ul>
  <li>Configure the onboard 1G NIC for initial management and enable SSH</li>
  <li>After the install configure nomodeset in the grub config</li>
  <li>Edit /etc/default/grub:
    <ul>
      <li>Set <code class="language-plaintext highlighter-rouge">GRUB_CMDLINE_LINUX_DEFAULT="nomodeset"</code></li>
      <li>update-grub</li>
      <li>reboot</li>
    </ul>
  </li>
</ul>

<h2 id="set-hostname-all-nodes">Set hostname [All Nodes]</h2>
<ul>
  <li>Make sure the hostname is not the FQDN <code class="language-plaintext highlighter-rouge">hostnamectl set-hostname hcn01</code></li>
  <li>Edit /etc/hosts add the bare and FQDN hostname</li>
  <li>Remove the bare host name pointing to 127.0.0.1</li>
</ul>

<div class="language-plaintext highlighter-rouge"><div class="highlight"><pre class="highlight"><code>  127.0.0.1 localhost
  10.20.10.11 hcn01.i.rhysmg.nz hcn01

  # The following lines are desirable for IPv6 capable hosts
  ::1     ip6-localhost ip6-loopback
  fe00::0 ip6-localnet
  ff00::0 ip6-mcastprefix
  ff02::1 ip6-allnodes
  ff02::2 ip6-allrouters
</code></pre></div></div>

<ul>
  <li>Check with <code class="language-plaintext highlighter-rouge">hostname</code> &amp; <code class="language-plaintext highlighter-rouge">hostname -f</code></li>
</ul>

<h2 id="update-all-nodes">Update [All Nodes]</h2>
<p>apt update
apt upgrade</p>

<h2 id="bind-dns">Bind DNS</h2>
<p>We want to have a dedicated domain name and use FQDNs for all our services within the cluster. This also allows us to generate let’s encrypt certificates to secure our services with TLS. Bind9 will be used and hcn01 will be the primary and hcn02 and hcn03 will be secondary. 
I won’t go into much detail here, there are plenty of guides out there for setting up bind.
I might come back later and implement this so that it’s easy to switch primary/secondary around.</p>

<p>Install bind on all three nodes: <code class="language-plaintext highlighter-rouge">apt install bind9 bind9utils</code></p>

<h3 id="hcn01-primary">hcn01 (Primary)</h3>
<p>Configure global options /etc/bind/named.conf.options:</p>

<div class="language-plaintext highlighter-rouge"><div class="highlight"><pre class="highlight"><code>acl "trusted" {
        10.20.10.0/24;  #Cl-mgmt network
};

options {
	directory "/var/cache/bind";
	recursion yes;                 # enables recursive queries
        allow-recursion { trusted; };  # allows recursive queries from "trusted" clients
        listen-on { 10.20.10.11; };    # private IP address - listen on private network only
        allow-transfer { none; };      # disable zone transfers by default

        forwarders {
                8.8.8.8;
                8.8.4.4;
        };
      };
</code></pre></div></div>
<p>Include a conf file to define our zone(s) in /etc/bind/named.conf: <code class="language-plaintext highlighter-rouge">include "/etc/bind/named.conf.mydomains";</code></p>

<p>Define the infrastructure zone in /etc/bind/named.conf.mydomains:</p>

<div class="language-plaintext highlighter-rouge"><div class="highlight"><pre class="highlight"><code>zone "i.rhysmg.nz" {
        type primary;
        file "/etc/bind/db.i.rhysmg.nz";
	      allow-transfer { 10.20.10.11; 10.20.10.12; 10.20.10.13;};
        notify yes;
};
</code></pre></div></div>

<p>Define the infrastructure zone in /etc/bind/db.i.rhysmg.nz:</p>

<div class="language-plaintext highlighter-rouge"><div class="highlight"><pre class="highlight"><code>  $TTL	604800
  @ IN  SOA	hcn01.i.rhysmg.nz. admin.i.rhysmg.nz. (
        11        ; Serial
        604800    ; Refresh
        86400     ; Retry
        2419200   ; Expire
        604800 )  ; Negative Cache TTL
  ;
    IN      NS    hcn01.i.rhysmg.nz.
    IN      NS    hcn02.i.rhysmg.nz.
    IN      NS    hcn03.i.rhysmg.nz.

  hcui01.i.rhysmg.nz.       IN  A	10.20.10.5
  hcc01.i.rhysmg.nz.        IN  A	10.20.10.10
  hcn01.i.rhysmg.nz.        IN  A	10.20.10.11
  hcn02.i.rhysmg.nz.        IN  A	10.20.10.12
  hcn03.i.rhysmg.nz.        IN  A	10.20.10.13
</code></pre></div></div>
<h3 id="hcn02--hcn03-bind-secondary">hcn02 &amp; hcn03 (Bind secondary)</h3>
<p>Configure global options /etc/bind/named.conf.options:</p>

<div class="language-plaintext highlighter-rouge"><div class="highlight"><pre class="highlight"><code>acl "trusted" {
        10.20.10.0/24;  #Cl-mgmt network
};

options {
	directory "/var/cache/bind";
	recursion yes;                 # enables recursive queries
        allow-recursion { trusted; };  # allows recursive queries from "trusted" clients
        listen-on { 10.20.10.12; };    # private IP address - listen on private network only
        allow-transfer { none; };      # disable zone transfers by default
        dnssec-validation no;
        forwarders {
                10.20.10.254; # Main Firewall/DNS server which hosts other zones in the network
        };
      };
</code></pre></div></div>
<p>Include a conf file to define our zone(s) in /etc/bind/named.conf: <code class="language-plaintext highlighter-rouge">include "/etc/bind/named.conf.mydomains";</code></p>

<p>Define the infrastructure zone in /etc/bind/named.conf.mydomains:</p>

<div class="language-plaintext highlighter-rouge"><div class="highlight"><pre class="highlight"><code>zone "i.rhysmg.nz" {
        type secondary;
        file "db.i.rhysmg.nz";
	      masters { 10.20.10.11;};
};
</code></pre></div></div>

<p>On all hosts: <code class="language-plaintext highlighter-rouge">systemctl restart bind9</code></p>

<p>At this point I established DNS forwarding from my main DNS server for the i.rhysmg.nz domain so I can use names from my management workstation. We’ll configure our hosts to use their own DNS service in the next step.</p>

<h2 id="networking-all-nodes">Networking [All Nodes]</h2>
<h3 id="netplan">Netplan</h3>
<p>Create a new netplan (this example is for hcn03)</p>

<div class="language-yaml highlighter-rouge"><div class="highlight"><pre class="highlight"><code><span class="s">rm /etc/netplan/00-installer-config.yaml</span>
<span class="s">vi /etc/netplan/00-hcn.yaml</span>
<span class="na">network</span><span class="pi">:</span>
  <span class="na">ethernets</span><span class="pi">:</span>
    <span class="na">eno1</span><span class="pi">:</span>
      <span class="na">addresses</span><span class="pi">:</span>
      <span class="pi">-</span> <span class="s">10.20.40.13/24</span>
      <span class="na">routes</span><span class="pi">:</span>
      <span class="pi">-</span> <span class="na">to</span><span class="pi">:</span> <span class="s">default</span>
        <span class="na">via</span><span class="pi">:</span> <span class="s">10.20.40.254</span>
      <span class="na">nameservers</span><span class="pi">:</span>
        <span class="na">addresses</span><span class="pi">:</span> <span class="pi">[</span><span class="nv">10.20.40.254</span><span class="pi">]</span>        
    <span class="na">cl-mgmt</span><span class="pi">:</span>
      <span class="na">dhcp4</span><span class="pi">:</span> <span class="no">false</span>
      <span class="na">addresses</span><span class="pi">:</span> <span class="pi">[</span><span class="nv">10.20.10.13/24</span><span class="pi">]</span>
    <span class="na">storage</span><span class="pi">:</span>
      <span class="na">dhcp4</span><span class="pi">:</span> <span class="no">false</span>
      <span class="na">addresses</span><span class="pi">:</span> <span class="pi">[</span><span class="nv">10.20.20.13/24</span><span class="pi">]</span>
    <span class="na">vxlendpoint</span><span class="pi">:</span>
      <span class="na">dhcp4</span><span class="pi">:</span> <span class="no">false</span>
      <span class="na">addresses</span><span class="pi">:</span> <span class="pi">[</span><span class="nv">10.20.30.13/24</span><span class="pi">]</span>
    <span class="na">enp1s0f0</span><span class="pi">:</span> <span class="pi">{}</span>
    <span class="na">enp1s0f1</span><span class="pi">:</span> <span class="pi">{}</span>
    <span class="na">enp3s0f0</span><span class="pi">:</span> <span class="pi">{}</span>
    <span class="na">enp3s0f1</span><span class="pi">:</span> <span class="pi">{}</span>
    <span class="na">enp3s0f2</span><span class="pi">:</span> <span class="pi">{}</span>
    <span class="na">enp3s0f3</span><span class="pi">:</span> <span class="pi">{}</span>
  <span class="na">bonds</span><span class="pi">:</span>
    <span class="na">bond0</span><span class="pi">:</span>
      <span class="na">interfaces</span><span class="pi">:</span>
      <span class="pi">-</span> <span class="s">enp3s0f0</span>
      <span class="pi">-</span> <span class="s">enp3s0f1</span>
      <span class="pi">-</span> <span class="s">enp3s0f2</span>
      <span class="pi">-</span> <span class="s">enp3s0f3</span>
      <span class="na">parameters</span><span class="pi">:</span>
        <span class="na">lacp-rate</span><span class="pi">:</span> <span class="s">fast</span>
        <span class="na">mode</span><span class="pi">:</span> <span class="s">802.3ad</span>
        <span class="na">transmit-hash-policy</span><span class="pi">:</span> <span class="s">layer2</span>
  <span class="na">version</span><span class="pi">:</span> <span class="m">2</span>
<span class="s">netplan apply</span>
</code></pre></div></div>
<h3 id="interfaces">Interfaces</h3>
<ul>
  <li>eno1 is the 1G onboard NIC on native VLAN 2040 (infra-mgmt). We use this for initial setup/mgmt. but it will ultimately be used as an emergency mgmt. interface should the host become inaccessible on the main cl-mgmt interface. e.g. if there was an issue with the Open vSwitch.</li>
  <li>cl-mgmt for general cluster communication. This is the main interface for the host.</li>
  <li>storage is for Ceph backend storage replication traffic</li>
  <li>vxlendpoint is transport for VXLAN software defined self-service networks
<strong>Note:</strong> cl-mgmt, storage, and vxlendpoint are defined above although they don’t exist yet. They will be created as internal interfaces on the Open vSwitch bridge.</li>
  <li>There are firewall interfaces in the cl-mgmt and infra-mgmt VLANs for internet/DNS services</li>
  <li>The 4x 1Gb NICs on the Broadcom card are added to an LACP (802.3ad) bond and the physical HP switch has matching config</li>
  <li>Neither the bond nor the two 10G NICs have IP addresses they are just for physical uplinks in the Open vSwitch as below</li>
</ul>

<h3 id="open-vswitch">Open vSwitch</h3>
<div class="language-bash highlighter-rouge"><div class="highlight"><pre class="highlight"><code>apt <span class="nb">install </span>openvswitch-switch
</code></pre></div></div>

<h4 id="br-infra-vswitch">br-infra vSwitch</h4>
<p>This is the main vSwitch for physical connectivity both between the other hosts in the 10G ring topology and uplink to the physical switch via the 4x1Gb bond.</p>

<p><strong>NOTE:</strong> enabling RSTP on this switch and the physical switch is critical, otherwise you’ll end up with a wicked 10G broadcast storm. This must be done <em>before</em> adding any physical interfaces (ask me how I know).</p>

<p>The RSTP priority of the vSwitch on each node is set lower (higher precedence) than the physical switch to ensure traffic which can stay within the 10G ring does so</p>

<p>Virtual interfaces cl-mgmt, storage, and vxlendpoint are created from this bridge as virtual internal interfaces on the host OS</p>

<div class="language-bash highlighter-rouge"><div class="highlight"><pre class="highlight"><code>ovs-vsctl add-br br-infra
ovs-vsctl <span class="nb">set </span>Bridge br-infra <span class="nv">rstp_enable</span><span class="o">=</span><span class="nb">true </span>other_config:rstp-priority<span class="o">=</span>8192
ovs-vsctl add-port br-infra cl-mgmt <span class="nv">tag</span><span class="o">=</span>2010 <span class="nt">--</span> <span class="nb">set </span>interface cl-mgmt <span class="nb">type</span><span class="o">=</span>internal
ovs-vsctl add-port br-infra storage <span class="nv">tag</span><span class="o">=</span>2020 <span class="nt">--</span> <span class="nb">set </span>interface storage <span class="nb">type</span><span class="o">=</span>internal
ovs-vsctl add-port br-infra vxlendpoint <span class="nv">tag</span><span class="o">=</span>2030 <span class="nt">--</span> <span class="nb">set </span>interface vxlendpoint <span class="nb">type</span><span class="o">=</span>internal
ovs-vsctl add-port br-infra enp1s0f0
ovs-vsctl add-port br-infra enp1s0f1
ovs-vsctl add-port br-infra bond0

systemctl restart openvswitch-switch

ovs-vsctl show
ovs-appctl rstp/show
</code></pre></div></div>

<h3 id="update-netplan">Update Netplan</h3>
<p>Update the netplan on all nodes and put the default route and the nameservers on the cl-mgmt IP. From now on we’ll be using the cl-mgmt interface for management, the infra-mgmt interface is only for emergency.</p>

<p>Note that I have used a policy-based route on the infra-mgmt interface (eno1). It has its own default gateway to avoid asymmetric routing.</p>

<p>The first nameserver points to itself and the other nodes as second and third.</p>

<p>The updated netplan example is for hcn03</p>

<div class="language-yaml highlighter-rouge"><div class="highlight"><pre class="highlight"><code><span class="na">network</span><span class="pi">:</span>
  <span class="na">ethernets</span><span class="pi">:</span>
    <span class="na">eno1</span><span class="pi">:</span>
      <span class="na">addresses</span><span class="pi">:</span>
      <span class="pi">-</span> <span class="s">10.20.40.13/24</span>
      <span class="na">routes</span><span class="pi">:</span>
      <span class="pi">-</span> <span class="na">to</span><span class="pi">:</span> <span class="s">10.20.40.0/24</span>
        <span class="na">scope</span><span class="pi">:</span> <span class="s">link</span>
        <span class="na">table</span><span class="pi">:</span> <span class="m">100</span>
      <span class="pi">-</span> <span class="na">to</span><span class="pi">:</span> <span class="s">default</span>
        <span class="na">via</span><span class="pi">:</span> <span class="s">10.20.40.254</span>
        <span class="na">table</span><span class="pi">:</span> <span class="m">100</span>
      <span class="na">routing-policy</span><span class="pi">:</span>
      <span class="pi">-</span> <span class="na">from</span><span class="pi">:</span> <span class="s">10.20.40.13/32</span>
        <span class="na">table</span><span class="pi">:</span> <span class="m">100</span>
    <span class="na">cl-mgmt</span><span class="pi">:</span>
      <span class="na">dhcp4</span><span class="pi">:</span> <span class="no">false</span>
      <span class="na">addresses</span><span class="pi">:</span> <span class="pi">[</span><span class="nv">10.20.10.13/24</span><span class="pi">]</span>
      <span class="na">routes</span><span class="pi">:</span>
      <span class="pi">-</span> <span class="na">to</span><span class="pi">:</span> <span class="s">default</span>
        <span class="na">via</span><span class="pi">:</span> <span class="s">10.20.10.254</span>
      <span class="na">nameservers</span><span class="pi">:</span>
        <span class="na">addresses</span><span class="pi">:</span>
        <span class="pi">-</span> <span class="s">10.20.10.13</span>
        <span class="pi">-</span> <span class="s">10.20.10.12</span>
        <span class="pi">-</span> <span class="s">10.20.10.11</span>
        <span class="na">search</span><span class="pi">:</span>
         <span class="pi">-</span> <span class="s">i.rhysmg.nz</span>
    <span class="na">storage</span><span class="pi">:</span>
      <span class="na">dhcp4</span><span class="pi">:</span> <span class="no">false</span>
      <span class="na">addresses</span><span class="pi">:</span> <span class="pi">[</span><span class="nv">10.20.20.13/24</span><span class="pi">]</span>
    <span class="na">vxlendpoint</span><span class="pi">:</span>
      <span class="na">dhcp4</span><span class="pi">:</span> <span class="no">false</span>
      <span class="na">addresses</span><span class="pi">:</span> <span class="pi">[</span><span class="nv">10.20.30.13/24</span><span class="pi">]</span>
    <span class="na">enp1s0f0</span><span class="pi">:</span> <span class="pi">{}</span>
    <span class="na">enp1s0f1</span><span class="pi">:</span> <span class="pi">{}</span>
    <span class="na">enp3s0f0</span><span class="pi">:</span> <span class="pi">{}</span>
    <span class="na">enp3s0f1</span><span class="pi">:</span> <span class="pi">{}</span>
    <span class="na">enp3s0f2</span><span class="pi">:</span> <span class="pi">{}</span>
    <span class="na">enp3s0f3</span><span class="pi">:</span> <span class="pi">{}</span>
  <span class="na">bonds</span><span class="pi">:</span>
    <span class="na">bond0</span><span class="pi">:</span>
      <span class="na">interfaces</span><span class="pi">:</span>
      <span class="pi">-</span> <span class="s">enp3s0f0</span>
      <span class="pi">-</span> <span class="s">enp3s0f1</span>
      <span class="pi">-</span> <span class="s">enp3s0f2</span>
      <span class="pi">-</span> <span class="s">enp3s0f3</span>
      <span class="na">parameters</span><span class="pi">:</span>
        <span class="na">lacp-rate</span><span class="pi">:</span> <span class="s">fast</span>
        <span class="na">mode</span><span class="pi">:</span> <span class="s">802.3ad</span>
        <span class="na">transmit-hash-policy</span><span class="pi">:</span> <span class="s">layer2</span>
  <span class="na">version</span><span class="pi">:</span> <span class="m">2</span>
</code></pre></div></div>

<h2 id="chrony-ntp">Chrony NTP</h2>
<p>Time sync is of course critical to the operation of several components in the cluster, especially storage. I’ve found chrony to be reliable and super simple to configure. I prefer to use FQDNs for most things, but for something as critical as time sync I prefer to take DNS out of the picture.</p>

<p>Install chrony on all hosts:</p>

<div class="language-yaml highlighter-rouge"><div class="highlight"><pre class="highlight"><code><span class="s">apt install chrony</span>
</code></pre></div></div>
<p>hcn01 goes out to the internet for NTP, hcn02 and hcn3 point to hcn01:</p>

<p>Add this to hcn01:</p>

<div class="language-conf highlighter-rouge"><div class="highlight"><pre class="highlight"><code><span class="c">#Allow local clients on the cl-mgmt vlan
</span><span class="n">allow</span> <span class="m">10</span>.<span class="m">20</span>.<span class="m">10</span>.<span class="m">0</span>/<span class="m">24</span>
</code></pre></div></div>
<p>On the other two nodes comment out the default pool/servers and add the cl-mgmt IP of hcn01</p>

<div class="language-conf highlighter-rouge"><div class="highlight"><pre class="highlight"><code><span class="n">server</span> <span class="m">10</span>.<span class="m">20</span>.<span class="m">10</span>.<span class="m">11</span> <span class="n">iburst</span>
</code></pre></div></div>
<p>Check each host with <code class="language-plaintext highlighter-rouge">chronyc sources</code></p>

<h2 id="passwordless-root-between-hosts">Passwordless root between hosts</h2>
<p>I use one shared SSH key pair for root on all nodes, you might prefer a separate pair for each</p>
<ul>
  <li>On hcn01 create a key pair with <code class="language-plaintext highlighter-rouge">ssh-keygen -t ed25519 -C "root shared"</code> (no passphrase)</li>
  <li>Add the public key to authorized_keys: <br />
<code class="language-plaintext highlighter-rouge">cat /root/.ssh/id_ed25519.pub &gt;&gt;/root/.ssh/authorized_keys</code></li>
  <li>On the other two nodes manually add the public key to /root/.ssh/authorized_keys</li>
  <li>On hcn01 copy the entire root .ssh directory to the other two hosts
    <div class="language-bash highlighter-rouge"><div class="highlight"><pre class="highlight"><code>scp <span class="nt">-r</span> /root/.ssh hcn02:/root/
scp <span class="nt">-r</span> /root/.ssh hcn02:/root/
</code></pre></div>    </div>
  </li>
  <li>From each host SSH to the other two hosts to confirm passwordless root ssh is working</li>
</ul>

<h1 id="ceph">Ceph</h1>
<p>Now we get to the fun bit…I’m running Ceph Quincy 17.2.6. 18.2.0 is just released but not packaged yet for Ubuntu 22.04</p>

<p>If needed clean up OSD disks on all hosts from previous builds</p>

<div class="language-bash highlighter-rouge"><div class="highlight"><pre class="highlight"><code>lvm lvdisplay
lvm vgremove ceph-be76f71f-d88b-4f58-af5a-1ec904ace250
wipefs <span class="nt">-a</span> /dev/nvme0n1
</code></pre></div></div>
<p>Install cephadm on all hosts</p>

<div class="language-bash highlighter-rouge"><div class="highlight"><pre class="highlight"><code>apt <span class="nb">install</span> <span class="nt">-y</span> cephadm ceph-common
</code></pre></div></div>
<p>On hcn01 create a <code class="language-plaintext highlighter-rouge">cephbootstrap.conf</code> config file:</p>

<div class="language-ini highlighter-rouge"><div class="highlight"><pre class="highlight"><code><span class="nn">[global]</span>
<span class="py">public_network</span> <span class="p">=</span> <span class="s">10.20.10.0/24</span>
<span class="py">cluster_network</span> <span class="p">=</span> <span class="s">10.20.20.0/24</span>
</code></pre></div></div>
<p>bootstrap the cluster from hcn01:</p>

<div class="language-bash highlighter-rouge"><div class="highlight"><pre class="highlight"><code>cephadm bootstrap <span class="nt">--config</span> cephbootstrap.conf <span class="nt">--mon-ip</span> 10.20.10.11
</code></pre></div></div>

<p><strong>NOTE:</strong> Capture the initial dashboard admin password from the console</p>

<p>Copy the Ceph SSH key to the other two hosts:</p>

<div class="language-bash highlighter-rouge"><div class="highlight"><pre class="highlight"><code>ssh-copy-id <span class="nt">-f</span> <span class="nt">-i</span> /etc/ceph/ceph.pub root@hcn02
ssh-copy-id <span class="nt">-f</span> <span class="nt">-i</span> /etc/ceph/ceph.pub root@hcn03
</code></pre></div></div>
<p>Add the other hosts to the cluster:</p>

<div class="language-bash highlighter-rouge"><div class="highlight"><pre class="highlight"><code>ceph orch host add hcn02 <span class="nt">--labels</span> _admin
ceph orch host add hcn03 <span class="nt">--labels</span> _admin
</code></pre></div></div>
<p>Set memory for ceph: (i.e. 64Gb x 0.1 = 6.4 GB). This maybe too low but I’ll see ho wit goes</p>

<div class="language-bash highlighter-rouge"><div class="highlight"><pre class="highlight"><code>ceph config <span class="nb">set </span>mgr mgr/cephadm/autotune_memory_target_ratio 0.1
ceph config <span class="nb">set </span>osd osd_memory_target_autotune <span class="nb">true</span>
</code></pre></div></div>
<p>Add all OSDs:</p>

<div class="language-bash highlighter-rouge"><div class="highlight"><pre class="highlight"><code>ceph orch apply osd <span class="nt">--all-available-devices</span>
</code></pre></div></div>
<p>Go take a look in the webui to see that OSDs have been created <a href="https://hcn01.i.rhysmg.nz:8443/">https://hcn01.i.rhysmg.nz:8443/</a>. Continue once all three OSDs are online.</p>

<p>Allow pools to be deleted. Maybe turn this off again later.</p>

<div class="language-bash highlighter-rouge"><div class="highlight"><pre class="highlight"><code>ceph config <span class="nb">set </span>mon  mon_allow_pool_delete <span class="nb">true</span>
</code></pre></div></div>
<p>Check the OSDs are on the cluster network:</p>

<div class="language-bash highlighter-rouge"><div class="highlight"><pre class="highlight"><code>ceph osd metadata 0 | <span class="nb">grep </span>addr
</code></pre></div></div>
<p>Set the class for the NVME disks:</p>

<div class="language-bash highlighter-rouge"><div class="highlight"><pre class="highlight"><code>ceph osd crush rm-device-class osd.0
ceph osd crush rm-device-class osd.1
ceph osd crush set-device-class nvme0 osd.0
ceph osd crush set-device-class nvme0 osd.1
ceph osd crush set-device-class nvme0 osd.2
</code></pre></div></div>
<p>Create a crush rule for this set of disks:</p>

<div class="language-bash highlighter-rouge"><div class="highlight"><pre class="highlight"><code>ceph osd crush rule create-replicated replicated_rule_nvme0 default host nvme0
</code></pre></div></div>
<p><strong>NOTE:</strong> Ceph will report packet drops on the br-int interface. Apparently this is because this interface is down therefor drops broadcast packets as expected, so this alarm can be safely ignored: <a href="https://platform9.com/kb/openstack/br-int-packet-loss-observed">https://platform9.com/kb/openstack/br-int-packet-loss-observed</a></p>

<h1 id="libvirt--ceph-all-nodes">Libvirt / Ceph [All Nodes]</h1>
<p>In this step we set up libvirt to work with Ceph so that we can create the OpenStack Controller VM on the storage cluster but outside of OpenStack</p>

<p>First we install all the required packages, then create a Ceph pool to place non-openstack-managed VMs and a user/secret which libvirt will use to access this pool. Then we configure libvit to use the pool</p>

<p>Install libvirt packages:</p>

<div class="language-bash highlighter-rouge"><div class="highlight"><pre class="highlight"><code>apt <span class="nb">install </span>qemu-kvm libvirt-daemon-system libvirt-clients bridge-utils virtinst libvirt-daemon-driver-storage-rbd <span class="nt">-y</span>
systemctl restart  libvirtd
</code></pre></div></div>
<p>On hcn01 setup libvirt for Ceph Access.<br />
Credit: <a href="https://blog.modest-destiny.com/posts/kvm-libvirt-add-ceph-rbd-pool/">https://blog.modest-destiny.com/posts/kvm-libvirt-add-ceph-rbd-pool/</a></p>

<div class="language-bash highlighter-rouge"><div class="highlight"><pre class="highlight"><code>  <span class="nb">export </span><span class="nv">CEPH_PGS</span><span class="o">=</span><span class="s2">"128"</span>
  <span class="nb">export </span><span class="nv">CEPH_USER</span><span class="o">=</span><span class="s2">"libvirt"</span>
  <span class="nb">export </span><span class="nv">CEPH_POOL</span><span class="o">=</span><span class="s2">"infra-pool"</span>
  <span class="nb">export </span><span class="nv">CEPH_RADOS_HOST</span><span class="o">=</span><span class="s2">"localhost"</span>
  <span class="nb">export </span><span class="nv">CEPH_RADOS_PORT</span><span class="o">=</span><span class="s2">"6789"</span>
  <span class="nb">export </span><span class="nv">VIRT_SCRT_UUID</span><span class="o">=</span><span class="s2">"</span><span class="si">$(</span>uuidgen<span class="si">)</span><span class="s2">"</span>
  <span class="nb">export </span><span class="nv">VIRT_SCRT_PATH</span><span class="o">=</span><span class="s2">"/tmp/libvirt-secret.xml"</span>
  <span class="nb">export </span><span class="nv">VIRT_POOL_PATH</span><span class="o">=</span><span class="s2">"/tmp/libvirt-rbd-pool.xml"</span>
  ceph osd pool create <span class="k">${</span><span class="nv">CEPH_POOL</span><span class="k">}</span> <span class="k">${</span><span class="nv">CEPH_PGS</span><span class="k">}</span> <span class="k">${</span><span class="nv">CEPH_PGS</span><span class="k">}</span>
  rbd pool init <span class="k">${</span><span class="nv">CEPH_POOL</span><span class="k">}</span>

  ceph auth get-or-create <span class="s2">"client.</span><span class="k">${</span><span class="nv">CEPH_USER</span><span class="k">}</span><span class="s2">"</span> mon <span class="s2">"profile rbd"</span> osd <span class="s2">"profile rbd pool=</span><span class="k">${</span><span class="nv">CEPH_POOL</span><span class="k">}</span><span class="s2">"</span>

  <span class="nb">cat</span> <span class="o">&gt;</span> <span class="s2">"</span><span class="k">${</span><span class="nv">VIRT_SCRT_PATH</span><span class="k">}</span><span class="s2">"</span> <span class="o">&lt;&lt;</span><span class="no">EOF</span><span class="sh">
  &lt;secret ephemeral='no' private='no'&gt;
    &lt;uuid&gt;</span><span class="k">${</span><span class="nv">VIRT_SCRT_UUID</span><span class="k">}</span><span class="sh">&lt;/uuid&gt;
    &lt;usage type='ceph'&gt;
      &lt;name&gt;client.</span><span class="k">${</span><span class="nv">CEPH_USER</span><span class="k">}</span><span class="sh"> secret&lt;/name&gt;
    &lt;/usage&gt;
  &lt;/secret&gt;
</span><span class="no">  EOF

</span>  virsh secret-define <span class="nt">--file</span> <span class="s2">"</span><span class="k">${</span><span class="nv">VIRT_SCRT_PATH</span><span class="k">}</span><span class="s2">"</span>
  virsh secret-set-value <span class="nt">--secret</span> <span class="s2">"</span><span class="k">${</span><span class="nv">VIRT_SCRT_UUID</span><span class="k">}</span><span class="s2">"</span> <span class="nt">--base64</span> <span class="s2">"</span><span class="si">$(</span>ceph auth get-key client.<span class="k">${</span><span class="nv">CEPH_USER</span><span class="k">}</span><span class="si">)</span><span class="s2">"</span>

  <span class="nb">cat</span> <span class="o">&gt;</span> <span class="s2">"</span><span class="k">${</span><span class="nv">VIRT_POOL_PATH</span><span class="k">}</span><span class="s2">"</span> <span class="o">&lt;&lt;</span><span class="no">EOF</span><span class="sh">
  &lt;pool type="rbd"&gt;
    &lt;name&gt;</span><span class="k">${</span><span class="nv">CEPH_POOL</span><span class="k">}</span><span class="sh">&lt;/name&gt;
    &lt;source&gt;
      &lt;name&gt;</span><span class="k">${</span><span class="nv">CEPH_POOL</span><span class="k">}</span><span class="sh">&lt;/name&gt;
      &lt;host name='hcn01' port='6789' /&gt;
      &lt;host name='hcn02' port='6789' /&gt;
      &lt;host name='hcn03' port='6789' /&gt;
      &lt;auth username='</span><span class="k">${</span><span class="nv">CEPH_USER</span><span class="k">}</span><span class="sh">' type='ceph'&gt;
        &lt;secret uuid='</span><span class="k">${</span><span class="nv">VIRT_SCRT_UUID</span><span class="k">}</span><span class="sh">'/&gt;
      &lt;/auth&gt;
    &lt;/source&gt;
  &lt;/pool&gt;
</span><span class="no">  EOF

</span>  virsh pool-define <span class="s2">"</span><span class="k">${</span><span class="nv">VIRT_POOL_PATH</span><span class="k">}</span><span class="s2">"</span>
  virsh pool-autostart <span class="s2">"</span><span class="k">${</span><span class="nv">CEPH_POOL</span><span class="k">}</span><span class="s2">"</span>
  virsh pool-start <span class="s2">"</span><span class="k">${</span><span class="nv">CEPH_POOL</span><span class="k">}</span><span class="s2">"</span>
</code></pre></div></div>
<p>Copy the secret and the pool definition to the other hosts:</p>

<div class="language-bash highlighter-rouge"><div class="highlight"><pre class="highlight"><code>scp /tmp/libvirt-secret.xml hcn02:/root/
scp /tmp/libvirt-rbd-pool.xml hcn02:/root/
scp /tmp/libvirt-secret.xml hcn03:/root/
scp /tmp/libvirt-rbd-pool.xml hcn03:/root/
</code></pre></div></div>
<p>Configure the secret and the pool on the other hosts: (Get the UUID from the secret file)</p>

<div class="language-bash highlighter-rouge"><div class="highlight"><pre class="highlight"><code>virsh secret-define <span class="nt">--file</span> libvirt-secret.xml
virsh secret-set-value <span class="nt">--secret</span> <span class="s2">"0ea17f3f-42b6-424b-a9cc-fed685e607db"</span> <span class="nt">--base64</span> <span class="s2">"</span><span class="si">$(</span>ceph auth get-key client.libvirt<span class="si">)</span><span class="s2">"</span>
virsh pool-define <span class="s2">"libvirt-rbd-pool.xml"</span>
virsh pool-autostart <span class="s2">"infra-pool"</span>
virsh pool-start <span class="s2">"infra-pool"</span>
</code></pre></div></div>

<h1 id="openstack-controller-vm">OpenStack Controller VM</h1>
<h2 id="vm-creation">VM Creation</h2>
<p>In this stage we will create a VM to run the OpenStack control plane. This is a chicken/egg situation. We’re building OpenStack to run our VMs but we need a VM to run OpenStack, therefore this VM lives outside of OpenStack.</p>

<p>Create a volume (Ceph block image):</p>

<div class="language-bash highlighter-rouge"><div class="highlight"><pre class="highlight"><code>virsh vol-create-as <span class="s2">"infra-pool"</span> <span class="s2">"hcc01"</span> <span class="nt">--capacity</span> <span class="s2">"120G"</span> <span class="nt">--format</span> raw
</code></pre></div></div>
<p>If you need to delete a volume for some reason:</p>

<div class="language-bash highlighter-rouge"><div class="highlight"><pre class="highlight"><code>virsh vol-delete <span class="nt">--pool</span> infra-pool <span class="nt">--vol</span> hcc01
</code></pre></div></div>
<p>Download the ubuntu 22.04 iso image. I moved the image to /tmp because libvirt has some default apparmor that stops it reading the home dir?</p>

<div class="language-bash highlighter-rouge"><div class="highlight"><pre class="highlight"><code>wget https://mirror.fsmg.org.nz/ubuntu-releases/22.04/ubuntu-22.04.3-live-server-amd64.iso
<span class="nb">mv </span>ubuntu-22.04.3-live-server-amd64.iso /tmp/
</code></pre></div></div>
<p>Create the VM. This will start the install from ISO and will connect the VM to the cl-mgmt vlan on br-infra bridge</p>

<div class="language-bash highlighter-rouge"><div class="highlight"><pre class="highlight"><code>virt-install                                                                                  <span class="se">\</span>
  <span class="nt">--connect</span> qemu:///system                                                                    <span class="se">\</span>
  <span class="nt">--virt-type</span> kvm                                                                             <span class="se">\</span>
  <span class="nt">--name</span> <span class="s2">"hcc01"</span>                                                                              <span class="se">\</span>
  <span class="nt">--vcpus</span><span class="o">=</span><span class="s2">"2"</span> <span class="nt">--memory</span> <span class="s2">"4096"</span>                                                                 <span class="se">\</span>
  <span class="nt">--disk</span> <span class="s2">"vol=infra-pool/hcc01"</span>                                                               <span class="se">\</span>
  <span class="nt">--boot</span> uefi                                                                                 <span class="se">\</span>
  <span class="nt">--noautoconsole</span>                                                                             <span class="se">\</span>
  <span class="nt">--cdrom</span> <span class="s2">"/tmp/ubuntu-22.04.3-live-server-amd64.iso"</span>                                         <span class="se">\</span>
  <span class="nt">--os-variant</span> <span class="s2">"ubuntu22.04"</span>                                                                  <span class="se">\</span>
  <span class="nt">--graphics</span> vnc,listen<span class="o">=</span>0.0.0.0                                                               <span class="se">\</span>
  <span class="nt">--network</span><span class="o">=</span>bridge:br-infra,model<span class="o">=</span>virtio,virtualport_type<span class="o">=</span>openvswitch,target.dev<span class="o">=</span>hcc01-clmgmt <span class="se">\</span>
  <span class="nt">--xml</span> <span class="s1">'./devices/interface[1]/vlan/tag/@id=2010'</span> <span class="se">\</span>
  <span class="nt">--autostart</span>
</code></pre></div></div>
<p>Connect to VM with VNC and complete Ubuntu install.</p>

<div class="language-bash highlighter-rouge"><div class="highlight"><pre class="highlight"><code>virsh vncdisplay hcc01
</code></pre></div></div>
<h2 id="controller-os-build">Controller OS Build</h2>
<ul>
  <li>Set static ip on cl-mgmt network: 10.20.10.10/24
    <ul>
      <li>Set gateway to main firewall 10.20.10.254</li>
      <li>Set DNS to 10.20.10.11,10.20.10.1210.20.10.13</li>
      <li>Seach domains i.rhysmg.nz</li>
    </ul>
  </li>
</ul>

<p><strong>Note:</strong> When the VM first reboots after install it might shutdown, start it up again with:</p>

<div class="language-bash highlighter-rouge"><div class="highlight"><pre class="highlight"><code>virsh list <span class="nt">--all</span>
virsh start hcc01
</code></pre></div></div>

<ul>
  <li>Set /etc/hosts file as per other nodes above</li>
  <li>Add the shared root public key to authorized keys</li>
  <li>Copy the root .ssh directory to hcc01 from another host. (NOTE: the Ceph public key can be removed from authorized_keys on hcc01)</li>
  <li>Test passwordless root to and from all hosts</li>
  <li>apt update / upgrade</li>
  <li>install chrony and point to hcn01 (IP address) as above</li>
</ul>

<h2 id="ceph-setup-for-controller">Ceph Setup for Controller</h2>
<p>This lets us manage Ceph from the controller node and is also required for OpenStack Glance and Cinder to access Ceph</p>

<p>On the controller generate a minimal Ceph config, copy the admin keyring and install ceph packages.</p>

<div class="language-bash highlighter-rouge"><div class="highlight"><pre class="highlight"><code><span class="nb">mkdir</span> /etc/ceph/
ssh hcn01 <span class="s2">"ceph config generate-minimal-conf"</span> | <span class="nb">sudo tee</span> /etc/ceph/ceph.conf
ssh hcn01 <span class="s2">"ceph auth get-or-create client.admin"</span> | <span class="nb">sudo tee</span> /etc/ceph/ceph.client.admin.keyring
<span class="nb">chmod </span>660 /etc/ceph/ceph.client.admin.keyring
apt <span class="nb">install </span>ceph-common python3-rbd python3-rados
</code></pre></div></div>
<p>Run <code class="language-plaintext highlighter-rouge">ceph health</code> to make sure you can access the cluster.</p>

<h2 id="test-live-migration">Test live migration</h2>
<p>Make sure you can live migrate the controller VM from host to host</p>

<div class="language-bash highlighter-rouge"><div class="highlight"><pre class="highlight"><code>virsh list <span class="nt">--all</span>
virsh migrate hcc01 <span class="nt">--live</span>  qemu+ssh://hcn02/system
virsh list <span class="nt">--all</span>
</code></pre></div></div>
<p>Then from hcn02 <strong>MIGRATE IT BACK AGAIN! (see warning below)</strong></p>

<div class="language-bash highlighter-rouge"><div class="highlight"><pre class="highlight"><code>virsh list <span class="nt">--all</span>
virsh don<span class="s1">'t migrate hcc01 --live qemu+ssh://hcn01/system
virsh list --all
</span></code></pre></div></div>

<p><strong>==========WARNING==========</strong> <br />
When we built the VM we set it to auto-start. If you migrate it to hcn02 and leave it running there then reboot hcn01, hcn01 will auto-start that VM. It doesn’t know that hcn02 is already running it. I will be writing to the same Ceph image as hcn02, there is no built-in mechanisms to prevent this. No, running the same VM from two different hosts will NOT provide high availability 😂! It will however kuzer your image. Ask me how I know. Libvirt expects that this kind of safety is handled by an orchestrator. E.g. OpenStack.</p>

<p>I think it’s probably better to use the following, so that the VM is only persisted on one host at a time, but I haven’t tried this yet:</p>

<div class="language-bash highlighter-rouge"><div class="highlight"><pre class="highlight"><code>virsh migrate hcc01 <span class="nt">--live</span> <span class="nt">--persistent</span> <span class="nt">--undefinesource</span> qemu+ssh://hcn03/system
</code></pre></div></div>
<p><strong>===========================</strong></p>

<h1 id="openstack">OpenStack</h1>
<p>Now we get into the meat of it - the OpenStack install. This has been cobbled together from various OpenStack and Ceph guides.</p>

<p>Create a DNS A record pointing to the controller VM. This just de-couples the OpenStack endpoints from the server name in case we want to swap out the controller VM one day or implement a load balancer</p>

<div class="language-bash highlighter-rouge"><div class="highlight"><pre class="highlight"><code>osc.i.rhysmg.nz.          IN  A 10.20.10.10
</code></pre></div></div>

<h2 id="add-openstack-repo-all-nodes">Add OpenStack Repo [All Nodes]</h2>
<p>Add OpenStack repo for Ubuntu 22.04 and install the OpenStack client</p>

<div class="language-bash highlighter-rouge"><div class="highlight"><pre class="highlight"><code>add-apt-repository cloud-archive:antelope
apt <span class="nb">install </span>python3-openstackclient
</code></pre></div></div>

<h2 id="install-pre-req-components-on-controller-node">Install Pre-req components on controller node</h2>

<p>Install and configure MariaDB</p>

<div class="language-bash highlighter-rouge"><div class="highlight"><pre class="highlight"><code>apt <span class="nb">install </span>mariadb-server python3-pymysql
</code></pre></div></div>
<p>Edit /etc/mysql/mariadb.conf.d/99-openstack.cnf</p>

<div class="language-ini highlighter-rouge"><div class="highlight"><pre class="highlight"><code><span class="nn">[mysqld]</span>
<span class="py">bind-address</span> <span class="p">=</span> <span class="s">10.20.10.10</span>
<span class="py">default-storage-engine</span> <span class="p">=</span> <span class="s">innodb</span>
<span class="py">innodb_file_per_table</span> <span class="p">=</span> <span class="s">on</span>
<span class="py">max_connections</span> <span class="p">=</span> <span class="s">4096</span>
<span class="py">collation-server</span> <span class="p">=</span> <span class="s">utf8_general_ci</span>
<span class="py">character-set-server</span> <span class="p">=</span> <span class="s">utf8</span>
</code></pre></div></div>
<p>Run secure install script (all default)</p>

<div class="language-bash highlighter-rouge"><div class="highlight"><pre class="highlight"><code>mysql_secure_installation
</code></pre></div></div>

<h3 id="install-rabbit-message-queue-service">Install Rabbit Message Queue Service</h3>

<div class="language-bash highlighter-rouge"><div class="highlight"><pre class="highlight"><code>apt <span class="nb">install </span>rabbitmq-server
rabbitmqctl add_user openstack RABBIT_PASS
rabbitmqctl set_permissions openstack <span class="s2">".*"</span> <span class="s2">".*"</span> <span class="s2">".*"</span>
</code></pre></div></div>

<h3 id="install-memcached">Install Memcached</h3>

<div class="language-bash highlighter-rouge"><div class="highlight"><pre class="highlight"><code>apt <span class="nb">install </span>memcached python3-memcache
</code></pre></div></div>
<p>Edit <code class="language-plaintext highlighter-rouge">/etc/memcached.conf</code> and set the <code class="language-plaintext highlighter-rouge">-l</code> option with: <code class="language-plaintext highlighter-rouge">-l 10.10.20.10</code> to make memcahced listen on cl-mgmt interface</p>

<p>I understand there is some work to properly secure memcached. I might come back to that at some point.</p>

<div class="language-bash highlighter-rouge"><div class="highlight"><pre class="highlight"><code>systemctl restart memcached 
</code></pre></div></div>

<h3 id="install-etcd">Install Etcd</h3>

<div class="language-bash highlighter-rouge"><div class="highlight"><pre class="highlight"><code>apt <span class="nb">install </span>etcd
</code></pre></div></div>
<p>Edit /etc/default/etcd</p>

<div class="language-ini highlighter-rouge"><div class="highlight"><pre class="highlight"><code><span class="py">ETCD_NAME</span><span class="p">=</span><span class="s">"osc"</span>
<span class="py">ETCD_DATA_DIR</span><span class="p">=</span><span class="s">"/var/lib/etcd"</span>
<span class="py">ETCD_INITIAL_CLUSTER_STATE</span><span class="p">=</span><span class="s">"new"</span>
<span class="py">ETCD_INITIAL_CLUSTER_TOKEN</span><span class="p">=</span><span class="s">"etcd-cluster-01"</span>
<span class="py">ETCD_INITIAL_CLUSTER</span><span class="p">=</span><span class="s">"osc=http://osc.i.rhysmg.nz:2380"</span>
<span class="py">ETCD_INITIAL_ADVERTISE_PEER_URLS</span><span class="p">=</span><span class="s">"http://osc.i.rhysmg.nz:2380"</span>
<span class="py">ETCD_ADVERTISE_CLIENT_URLS</span><span class="p">=</span><span class="s">"http://osc.i.rhysmg.nz:2379"</span>
<span class="py">ETCD_LISTEN_PEER_URLS</span><span class="p">=</span><span class="s">"http://10.20.10.10:2380"</span>
<span class="py">ETCD_LISTEN_CLIENT_URLS</span><span class="p">=</span><span class="s">"http://10.20.10.10:2379"</span>
</code></pre></div></div>

<div class="language-bash highlighter-rouge"><div class="highlight"><pre class="highlight"><code>systemctl <span class="nb">enable </span>etcd
systemctl restart etcd
</code></pre></div></div>

<h2 id="openstack-services">OpenStack Services</h2>
<p>Now we start with the OpenStack components.</p>

<h3 id="install-keystone-controller">Install Keystone (Controller)</h3>
<p>https://docs.openstack.org/keystone/latest/install/keystone-install-ubuntu.html</p>

<div class="language-bash highlighter-rouge"><div class="highlight"><pre class="highlight"><code>mysql
</code></pre></div></div>

<div class="language-bash highlighter-rouge"><div class="highlight"><pre class="highlight"><code>CREATE DATABASE keystone<span class="p">;</span>   
GRANT ALL PRIVILEGES ON keystone.<span class="k">*</span> TO <span class="s1">'keystone'</span>@<span class="s1">'localhost'</span> IDENTIFIED BY <span class="s1">'KEYSTONE_DBPASS'</span><span class="p">;</span>   
GRANT ALL PRIVILEGES ON keystone.<span class="k">*</span> TO <span class="s1">'keystone'</span>@<span class="s1">'%'</span> IDENTIFIED BY <span class="s1">'KEYSTONE_DBPASS'</span><span class="p">;</span>   
</code></pre></div></div>

<div class="language-bash highlighter-rouge"><div class="highlight"><pre class="highlight"><code>apt <span class="nb">install </span>keystone
</code></pre></div></div>
<p>Edit /etc/keystone/keystone.conf:</p>

<div class="language-ini highlighter-rouge"><div class="highlight"><pre class="highlight"><code><span class="nn">[database]</span>
<span class="py">connection</span> <span class="p">=</span> <span class="s">mysql+pymysql://keystone:KEYSTONE_DBPASS@osc.i.rhysmg.nz/keystone</span>

<span class="nn">[token]</span>
<span class="py">provider</span> <span class="p">=</span> <span class="s">fernet</span>
</code></pre></div></div>

<div class="language-bash highlighter-rouge"><div class="highlight"><pre class="highlight"><code>su <span class="nt">-s</span> /bin/sh <span class="nt">-c</span> <span class="s2">"keystone-manage db_sync"</span> keystone
keystone-manage fernet_setup <span class="nt">--keystone-user</span> keystone <span class="nt">--keystone-group</span> keystone
keystone-manage credential_setup <span class="nt">--keystone-user</span> keystone <span class="nt">--keystone-group</span> keystone

keystone-manage bootstrap <span class="nt">--bootstrap-password</span> ADMIN_PWD <span class="se">\</span>
  <span class="nt">--bootstrap-admin-url</span> http://osc.i.rhysmg.nz:5000/v3/ <span class="se">\</span>
  <span class="nt">--bootstrap-internal-url</span> http://osc.i.rhysmg.nz:5000/v3/ <span class="se">\</span>
  <span class="nt">--bootstrap-public-url</span> http://osc.i.rhysmg.nz:5000/v3/ <span class="se">\</span>
  <span class="nt">--bootstrap-region-id</span> Auckland
</code></pre></div></div>
<p>Edit /etc/apache2/apache2.conf:</p>

<div class="language-conf highlighter-rouge"><div class="highlight"><pre class="highlight"><code><span class="n">ServerName</span> <span class="n">osc</span>.<span class="n">i</span>.<span class="n">rhysmg</span>.<span class="n">nz</span>
<span class="n">service</span> <span class="n">apache2</span> <span class="n">restart</span>
</code></pre></div></div>
<p>At this point create an rc file so we can authenticate with keystone:</p>

<p>create admin-openrc:</p>

<div class="language-bash highlighter-rouge"><div class="highlight"><pre class="highlight"><code><span class="nb">export </span><span class="nv">OS_PROJECT_DOMAIN_NAME</span><span class="o">=</span>Default
<span class="nb">export </span><span class="nv">OS_USER_DOMAIN_NAME</span><span class="o">=</span>Default
<span class="nb">export </span><span class="nv">OS_PROJECT_NAME</span><span class="o">=</span>admin
<span class="nb">export </span><span class="nv">OS_USERNAME</span><span class="o">=</span>admin
<span class="nb">export </span><span class="nv">OS_PASSWORD</span><span class="o">=</span>ADMIN_PASS
<span class="nb">export </span><span class="nv">OS_AUTH_URL</span><span class="o">=</span>http://osc.i.rhysmg.nz:5000/v3
<span class="nb">export </span><span class="nv">OS_IDENTITY_API_VERSION</span><span class="o">=</span>3
<span class="nb">export </span><span class="nv">OS_IMAGE_API_VERSION</span><span class="o">=</span>2
</code></pre></div></div>
<p>Source this openrc script:</p>

<div class="language-bash highlighter-rouge"><div class="highlight"><pre class="highlight"><code><span class="nb">source </span>admin-openrc
</code></pre></div></div>

<h3 id="create-initial-openstack-objects">Create initial OpenStack objects</h3>
<p>Create a project (tenant) for services</p>

<div class="language-bash highlighter-rouge"><div class="highlight"><pre class="highlight"><code>openstack project create <span class="nt">--domain</span> default <span class="nt">--description</span> <span class="s2">"Service Project"</span> service
</code></pre></div></div>
<p>Here you can create yourself and user and a playpen project.</p>

<div class="language-bash highlighter-rouge"><div class="highlight"><pre class="highlight"><code>openstack project create <span class="nt">--domain</span> default <span class="nt">--description</span> <span class="s2">"Fairburn Project"</span> fairburn
openstack user create <span class="nt">--domain</span> default <span class="nt">--password-prompt</span> rhys
openstack role add <span class="nt">--project</span> fairburn <span class="nt">--user</span> rhys admin
</code></pre></div></div>

<p>Create a service role. This is all about this: <a href="https://docs.openstack.org/cinder/latest/configuration/block-storage/service-token.html">https://docs.openstack.org/cinder/latest/configuration/block-storage/service-token.html</a>
Before doing this, volume detach was failing. We’ll add this role to the cinder and nova openstack identities later</p>

<div class="language-bash highlighter-rouge"><div class="highlight"><pre class="highlight"><code>openstack role create service
</code></pre></div></div>

<h3 id="install-glance-controller">Install Glance (Controller)</h3>

<div class="language-bash highlighter-rouge"><div class="highlight"><pre class="highlight"><code>mysql
</code></pre></div></div>

<div class="language-sql highlighter-rouge"><div class="highlight"><pre class="highlight"><code><span class="k">CREATE</span> <span class="k">DATABASE</span> <span class="n">glance</span><span class="p">;</span>
<span class="k">GRANT</span> <span class="k">ALL</span> <span class="k">PRIVILEGES</span> <span class="k">ON</span> <span class="n">glance</span><span class="p">.</span><span class="o">*</span> <span class="k">TO</span> <span class="s1">'glance'</span><span class="o">@</span><span class="s1">'localhost'</span> <span class="n">IDENTIFIED</span> <span class="k">BY</span> <span class="s1">'GLANCE_DBPASS'</span><span class="p">;</span>
<span class="k">GRANT</span> <span class="k">ALL</span> <span class="k">PRIVILEGES</span> <span class="k">ON</span> <span class="n">glance</span><span class="p">.</span><span class="o">*</span> <span class="k">TO</span> <span class="s1">'glance'</span><span class="o">@</span><span class="s1">'%'</span> <span class="n">IDENTIFIED</span> <span class="k">BY</span> <span class="s1">'GLANCE_DBPASS'</span><span class="p">;</span>
</code></pre></div></div>

<div class="language-bash highlighter-rouge"><div class="highlight"><pre class="highlight"><code>openstack user create <span class="nt">--domain</span> default <span class="nt">--password-prompt</span> glance
openstack role add <span class="nt">--project</span> service <span class="nt">--user</span> glance admin
openstack service create <span class="nt">--name</span> glance <span class="nt">--description</span> <span class="s2">"OpenStack Image"</span> image
openstack endpoint create <span class="nt">--region</span> Auckland image public http://osc.i.rhysmg.nz:9292
openstack endpoint create <span class="nt">--region</span> Auckland image internal http://osc.i.rhysmg.nz:9292
openstack endpoint create <span class="nt">--region</span> Auckland image admin http://osc.i.rhysmg.nz:9292
apt <span class="nb">install </span>glance
</code></pre></div></div>

<h3 id="ceph-setup-for-glance">Ceph setup for Glance</h3>
<p>Create a Ceph pool and user for glance</p>

<div class="language-bash highlighter-rouge"><div class="highlight"><pre class="highlight"><code>ceph osd pool create images
rbd pool init images
ceph auth get-or-create client.glance mon <span class="s1">'profile rbd'</span> osd <span class="s1">'profile rbd pool=images'</span> mgr <span class="s1">'profile rbd pool=images'</span>
ceph auth get-or-create client.glance | <span class="nb">tee</span> /etc/ceph/ceph.client.glance.keyring
<span class="nb">chown </span>glance:glance /etc/ceph/ceph.client.glance.keyring
<span class="nb">chmod </span>660 /etc/ceph/ceph.client.glance.keyring
</code></pre></div></div>

<h3 id="resume-glance-setup">Resume Glance setup</h3>
<p>edit /etc/glance/glance-api.conf:</p>

<div class="language-ini highlighter-rouge"><div class="highlight"><pre class="highlight"><code><span class="nn">[DEFAULT]</span>
<span class="py">show_image_direct_url</span> <span class="p">=</span> <span class="s">True</span>

<span class="nn">[database]</span>
<span class="py">connection</span> <span class="p">=</span> <span class="s">mysql+pymysql://glance:GLANCE_DBPASS@osc.i.rhysmg.nz/glance</span>

<span class="nn">[glance_store]</span>
<span class="py">stores</span> <span class="p">=</span> <span class="s">rbd</span>
<span class="py">default_store</span> <span class="p">=</span> <span class="s">rbd</span>
<span class="py">rbd_store_pool</span> <span class="p">=</span> <span class="s">images</span>
<span class="py">rbd_store_user</span> <span class="p">=</span> <span class="s">glance</span>
<span class="py">rbd_store_ceph_conf</span> <span class="p">=</span> <span class="s">/etc/ceph/ceph.conf</span>
<span class="py">rbd_store_chunk_size</span> <span class="p">=</span> <span class="s">8</span>

<span class="nn">[keystone_authtoken]</span>
<span class="py">www_authenticate_uri</span> <span class="p">=</span> <span class="s">http://osc.i.rhysmg.nz:5000</span>
<span class="py">auth_url</span> <span class="p">=</span> <span class="s">http://osc.i.rhysmg.nz:5000</span>
<span class="py">memcached_servers</span> <span class="p">=</span> <span class="s">osc.i.rhysmg.nz:11211</span>
<span class="py">auth_type</span> <span class="p">=</span> <span class="s">password</span>
<span class="py">project_domain_name</span> <span class="p">=</span> <span class="s">Default</span>
<span class="py">user_domain_name</span> <span class="p">=</span> <span class="s">Default</span>
<span class="py">project_name</span> <span class="p">=</span> <span class="s">service</span>
<span class="py">username</span> <span class="p">=</span> <span class="s">glance</span>
<span class="py">password</span> <span class="p">=</span> 

<span class="s">[paste_deploy]</span>
<span class="py">flavor</span> <span class="p">=</span> <span class="s">keystone</span>

<span class="c">#[oslo_limit]
#auth_url = http://osc.i.rhysmg.nz:5000
#auth_type = password
#user_domain_id = default
#username = MY_SERVICE
#system_scope = all
#password = MY_PASSWORD
#endpoint_id = ENDPOINT_ID
#region_name = RegionOne
</span></code></pre></div></div>
<p>I did not complete the [oslo_limit] config (commeted out above) as I think this is related to quotas which I’m not interested in at the moment</p>

<div class="language-bash highlighter-rouge"><div class="highlight"><pre class="highlight"><code>su <span class="nt">-s</span> /bin/sh <span class="nt">-c</span> <span class="s2">"glance-manage db_sync"</span> glance
systemctl restart glance-api
</code></pre></div></div>

<h3 id="placement-service-controller">Placement Service (Controller)</h3>
<div class="language-bash highlighter-rouge"><div class="highlight"><pre class="highlight"><code>mysql
</code></pre></div></div>

<div class="language-sql highlighter-rouge"><div class="highlight"><pre class="highlight"><code><span class="k">CREATE</span> <span class="k">DATABASE</span> <span class="n">placement</span><span class="p">;</span>
<span class="k">GRANT</span> <span class="k">ALL</span> <span class="k">PRIVILEGES</span> <span class="k">ON</span> <span class="n">placement</span><span class="p">.</span><span class="o">*</span> <span class="k">TO</span> <span class="s1">'placement'</span><span class="o">@</span><span class="s1">'localhost'</span> <span class="n">IDENTIFIED</span> <span class="k">BY</span> <span class="s1">'PLACEMENT_DBPASS'</span><span class="p">;</span>
<span class="k">GRANT</span> <span class="k">ALL</span> <span class="k">PRIVILEGES</span> <span class="k">ON</span> <span class="n">placement</span><span class="p">.</span><span class="o">*</span> <span class="k">TO</span> <span class="s1">'placement'</span><span class="o">@</span><span class="s1">'%'</span> <span class="n">IDENTIFIED</span> <span class="k">BY</span> <span class="s1">'PLACEMENT_DBPASS'</span><span class="p">;</span>
</code></pre></div></div>

<div class="language-bash highlighter-rouge"><div class="highlight"><pre class="highlight"><code>openstack user create <span class="nt">--domain</span> default <span class="nt">--password-prompt</span> placement
openstack role add <span class="nt">--project</span> service <span class="nt">--user</span> placement admin
openstack service create <span class="nt">--name</span> placement <span class="nt">--description</span> <span class="s2">"Placement API"</span> placement
openstack endpoint create <span class="nt">--region</span> Auckland placement public http://osc.i.rhysmg.nz:8778
openstack endpoint create <span class="nt">--region</span> Auckland placement internal http://osc.i.rhysmg.nz:8778
openstack endpoint create <span class="nt">--region</span> Auckland placement admin http://osc.i.rhysmg.nz:8778

</code></pre></div></div>
<p>edit /etc/placement/placement.conf:</p>

<div class="language-ini highlighter-rouge"><div class="highlight"><pre class="highlight"><code><span class="nn">[api]</span>
<span class="py">auth_strategy</span> <span class="p">=</span> <span class="s">keystone</span>

<span class="nn">[keystone_authtoken]</span>
<span class="py">auth_url</span> <span class="p">=</span> <span class="s">http://osc.i.rhysmg.nz:5000/v3</span>
<span class="py">memcached_servers</span> <span class="p">=</span> <span class="s">osc:11211</span>
<span class="py">auth_type</span> <span class="p">=</span> <span class="s">password</span>
<span class="py">project_domain_name</span> <span class="p">=</span> <span class="s">Default</span>
<span class="py">user_domain_name</span> <span class="p">=</span> <span class="s">Default</span>
<span class="py">project_name</span> <span class="p">=</span> <span class="s">service</span>
<span class="py">username</span> <span class="p">=</span> <span class="s">placement</span>
<span class="py">password</span> <span class="p">=</span> <span class="s">PLACEMENT_PASS</span>

<span class="nn">[placement_database]</span>
<span class="py">connection</span> <span class="p">=</span> <span class="s">mysql+pymysql://placement:PLACEMENT_DBPASS@osc.i.rhysmg.nz/placement</span>
</code></pre></div></div>

<div class="language-bash highlighter-rouge"><div class="highlight"><pre class="highlight"><code>apt <span class="nb">install </span>placement-api
su <span class="nt">-s</span> /bin/sh <span class="nt">-c</span> <span class="s2">"placement-manage db sync"</span> placement
systemctl restart apache2 
</code></pre></div></div>

<h3 id="install-nova-api-controller">Install Nova API (Controller)</h3>
<p>https://docs.openstack.org/nova/latest/install/controller-install-ubuntu.html</p>

<div class="language-bash highlighter-rouge"><div class="highlight"><pre class="highlight"><code>mysql
</code></pre></div></div>

<div class="language-sql highlighter-rouge"><div class="highlight"><pre class="highlight"><code><span class="k">CREATE</span> <span class="k">DATABASE</span> <span class="n">nova_api</span><span class="p">;</span>
<span class="k">CREATE</span> <span class="k">DATABASE</span> <span class="n">nova</span><span class="p">;</span>
<span class="k">CREATE</span> <span class="k">DATABASE</span> <span class="n">nova_cell0</span><span class="p">;</span>
<span class="k">GRANT</span> <span class="k">ALL</span> <span class="k">PRIVILEGES</span> <span class="k">ON</span> <span class="n">nova_api</span><span class="p">.</span><span class="o">*</span> <span class="k">TO</span> <span class="s1">'nova'</span><span class="o">@</span><span class="s1">'localhost'</span> <span class="n">IDENTIFIED</span> <span class="k">BY</span> <span class="s1">'NOVA_DBPASS'</span><span class="p">;</span>
<span class="k">GRANT</span> <span class="k">ALL</span> <span class="k">PRIVILEGES</span> <span class="k">ON</span> <span class="n">nova_api</span><span class="p">.</span><span class="o">*</span> <span class="k">TO</span> <span class="s1">'nova'</span><span class="o">@</span><span class="s1">'%'</span> <span class="n">IDENTIFIED</span> <span class="k">BY</span> <span class="s1">'NOVA_DBPASS'</span><span class="p">;</span>
<span class="k">GRANT</span> <span class="k">ALL</span> <span class="k">PRIVILEGES</span> <span class="k">ON</span> <span class="n">nova</span><span class="p">.</span><span class="o">*</span> <span class="k">TO</span> <span class="s1">'nova'</span><span class="o">@</span><span class="s1">'localhost'</span> <span class="n">IDENTIFIED</span> <span class="k">BY</span> <span class="s1">'NOVA_DBPASS'</span><span class="p">;</span>
<span class="k">GRANT</span> <span class="k">ALL</span> <span class="k">PRIVILEGES</span> <span class="k">ON</span> <span class="n">nova</span><span class="p">.</span><span class="o">*</span> <span class="k">TO</span> <span class="s1">'nova'</span><span class="o">@</span><span class="s1">'%'</span> <span class="n">IDENTIFIED</span> <span class="k">BY</span> <span class="s1">'NOVA_DBPASS'</span><span class="p">;</span>
<span class="k">GRANT</span> <span class="k">ALL</span> <span class="k">PRIVILEGES</span> <span class="k">ON</span> <span class="n">nova_cell0</span><span class="p">.</span><span class="o">*</span> <span class="k">TO</span> <span class="s1">'nova'</span><span class="o">@</span><span class="s1">'localhost'</span> <span class="n">IDENTIFIED</span> <span class="k">BY</span> <span class="s1">'NOVA_DBPASS'</span><span class="p">;</span>
<span class="k">GRANT</span> <span class="k">ALL</span> <span class="k">PRIVILEGES</span> <span class="k">ON</span> <span class="n">nova_cell0</span><span class="p">.</span><span class="o">*</span> <span class="k">TO</span> <span class="s1">'nova'</span><span class="o">@</span><span class="s1">'%'</span> <span class="n">IDENTIFIED</span> <span class="k">BY</span> <span class="s1">'NOVA_DBPASS'</span><span class="p">;</span>
</code></pre></div></div>

<div class="language-bash highlighter-rouge"><div class="highlight"><pre class="highlight"><code>openstack user create <span class="nt">--domain</span> default <span class="nt">--password-prompt</span> nova
openstack role add <span class="nt">--project</span> service <span class="nt">--user</span> nova admin
openstack role add <span class="nt">--user</span> nova <span class="nt">--project</span> service service
openstack service create <span class="nt">--name</span> nova <span class="nt">--description</span> <span class="s2">"OpenStack Compute"</span> compute
openstack endpoint create <span class="nt">--region</span> Auckland compute public http://osc.i.rhysmg.nz:8774/v2.1
openstack endpoint create <span class="nt">--region</span> Auckland compute internal http://osc.i.rhysmg.nz:8774/v2.1
openstack endpoint create <span class="nt">--region</span> Auckland compute admin http://osc.i.rhysmg.nz:8774/v2.1
apt <span class="nb">install </span>nova-api nova-conductor nova-novncproxy nova-scheduler
</code></pre></div></div>
<p>Edit /etc/nova/nova.conf:</p>

<div class="language-ini highlighter-rouge"><div class="highlight"><pre class="highlight"><code><span class="nn">[DEFAULT]</span>
<span class="py">lock_path</span> <span class="p">=</span> <span class="s">/var/lock/nova</span>
<span class="py">state_path</span> <span class="p">=</span> <span class="s">/var/lib/nova</span>
<span class="py">transport_url</span> <span class="p">=</span> <span class="s">rabbit://openstack:RABBIT_PASS@osc.i.rhysmg.nz:5672/</span>
<span class="py">my_ip</span> <span class="p">=</span> <span class="s">10.0.0.11</span>

<span class="nn">[api]</span>
<span class="py">auth_strategy</span> <span class="p">=</span> <span class="s">keystone</span>

<span class="nn">[api_database]</span>
<span class="py">connection</span> <span class="p">=</span> <span class="s">mysql+pymysql://nova:NOVA_DBPASS@osc.i.rhysmg.nz/nova_api</span>

<span class="nn">[database]</span>
<span class="py">connection</span> <span class="p">=</span> <span class="s">mysql+pymysql://nova:NOVA_DBPASS@osc.i.rhysmg.nz/nova</span>

<span class="nn">[keystone_authtoken]</span>
<span class="py">www_authenticate_uri</span> <span class="p">=</span> <span class="s">http://osc.i.rhysmg.nz:5000/</span>
<span class="py">auth_url</span> <span class="p">=</span> <span class="s">http://osc.i.rhysmg.nz:5000/</span>
<span class="py">memcached_servers</span> <span class="p">=</span> <span class="s">osc:11211</span>
<span class="py">auth_type</span> <span class="p">=</span> <span class="s">password</span>
<span class="py">project_domain_name</span> <span class="p">=</span> <span class="s">Default</span>
<span class="py">user_domain_name</span> <span class="p">=</span> <span class="s">Default</span>
<span class="py">project_name</span> <span class="p">=</span> <span class="s">service</span>
<span class="py">username</span> <span class="p">=</span> <span class="s">nova</span>
<span class="py">password</span> <span class="p">=</span> <span class="s">NOVA_PASS</span>

<span class="nn">[oslo_concurrency]</span>
<span class="py">lock_path</span> <span class="p">=</span> <span class="s">/var/lib/nova/tmp</span>

<span class="nn">[placement]</span>
<span class="py">region_name</span> <span class="p">=</span> <span class="s">Auckland</span>
<span class="py">project_domain_name</span> <span class="p">=</span> <span class="s">Default</span>
<span class="py">project_name</span> <span class="p">=</span> <span class="s">service</span>
<span class="py">auth_type</span> <span class="p">=</span> <span class="s">password</span>
<span class="py">user_domain_name</span> <span class="p">=</span> <span class="s">Default</span>
<span class="py">auth_url</span> <span class="p">=</span> <span class="s">http://osc.i.rhysmg.nz:5000/v3</span>
<span class="py">username</span> <span class="p">=</span> <span class="s">placement</span>
<span class="py">password</span> <span class="p">=</span> <span class="s">PLACEMENT_PASS</span>

<span class="nn">[service_user]</span>
<span class="py">send_service_user_token</span> <span class="p">=</span> <span class="s">true</span>
<span class="py">auth_url</span> <span class="p">=</span> <span class="s">http://osc.i.rhysmg.nz:5000/identity</span>
<span class="py">auth_strategy</span> <span class="p">=</span> <span class="s">keystone</span>
<span class="py">auth_type</span> <span class="p">=</span> <span class="s">password</span>
<span class="py">project_domain_name</span> <span class="p">=</span> <span class="s">Default</span>
<span class="py">project_name</span> <span class="p">=</span> <span class="s">service</span>
<span class="py">user_domain_name</span> <span class="p">=</span> <span class="s">Default</span>
<span class="py">username</span> <span class="p">=</span> <span class="s">nova</span>
<span class="py">password</span> <span class="p">=</span> <span class="s">NOVA_PASS</span>

<span class="nn">[vnc]</span>
<span class="py">enabled</span> <span class="p">=</span> <span class="s">true</span>
<span class="py">server_listen</span> <span class="p">=</span> <span class="s">$my_ip</span>
<span class="py">server_proxyclient_address</span> <span class="p">=</span> <span class="s">$my_ip</span>

<span class="nn">[scheduler]</span>
<span class="py">discover_hosts_in_cells_interval</span> <span class="p">=</span> <span class="s">300</span>

</code></pre></div></div>
<p>Due to a packaging bug, remove the <code class="language-plaintext highlighter-rouge">log_dir</code> option from the [DEFAULT] section.</p>

<div class="language-bash highlighter-rouge"><div class="highlight"><pre class="highlight"><code>su <span class="nt">-s</span> /bin/sh <span class="nt">-c</span> <span class="s2">"nova-manage api_db sync"</span> nova
su <span class="nt">-s</span> /bin/sh <span class="nt">-c</span> <span class="s2">"nova-manage cell_v2 map_cell0"</span> nova
su <span class="nt">-s</span> /bin/sh <span class="nt">-c</span> <span class="s2">"nova-manage cell_v2 create_cell --name=cell1 --verbose"</span> nova
su <span class="nt">-s</span> /bin/sh <span class="nt">-c</span> <span class="s2">"nova-manage db sync"</span> nova

systemctl restart nova-api
systemctl restart nova-scheduler
systemctl restart nova-conductor
systemctl restart nova-novncproxy

</code></pre></div></div>

<h2 id="nova-compute-setup-all-three-compute-nodes">Nova Compute Setup (<strong>All three compute nodes</strong>)</h2>
<p>https://docs.openstack.org/nova/latest/install/compute-install-ubuntu.html
https://docs.openstack.org/nova/latest/configuration/config.html</p>

<div class="language-bash highlighter-rouge"><div class="highlight"><pre class="highlight"><code>apt <span class="nb">install </span>nova-compute libvirt-clients <span class="nt">-y</span>

</code></pre></div></div>
<p>Edit /etc/nova/nova.conf:
The only thing that needs to be chanaged for each node is the IP address in $my_ip</p>

<div class="language-ini highlighter-rouge"><div class="highlight"><pre class="highlight"><code><span class="nn">[DEFAULT]</span>
<span class="py">lock_path</span> <span class="p">=</span> <span class="s">/var/lock/nova</span>
<span class="py">state_path</span> <span class="p">=</span> <span class="s">/var/lib/nova</span>
<span class="py">transport_url</span> <span class="p">=</span> <span class="s">rabbit://openstack:RABBIT_PASS@osc.i.rhysmg.nz</span>
<span class="py">my_ip</span> <span class="p">=</span> <span class="s">10.20.10.11</span>

<span class="nn">[api]</span>
<span class="py">auth_strategy</span> <span class="p">=</span> <span class="s">keystone</span>

<span class="nn">[keystone_authtoken]</span>
<span class="py">www_authenticate_uri</span> <span class="p">=</span> <span class="s">http://osc.i.rhysmg.nz:5000/</span>
<span class="py">auth_url</span> <span class="p">=</span> <span class="s">http://osc.i.rhysmg.nz:5000/</span>
<span class="py">memcached_servers</span> <span class="p">=</span> <span class="s">osc:11211</span>
<span class="py">auth_type</span> <span class="p">=</span> <span class="s">password</span>
<span class="py">project_domain_name</span> <span class="p">=</span> <span class="s">Default</span>
<span class="py">user_domain_name</span> <span class="p">=</span> <span class="s">Default</span>
<span class="py">project_name</span> <span class="p">=</span> <span class="s">service</span>
<span class="py">username</span> <span class="p">=</span> <span class="s">nova</span>
<span class="py">password</span> <span class="p">=</span> <span class="s">NOVA_PASS</span>

<span class="nn">[libvirt]</span>
<span class="py">cpu_mode</span> <span class="p">=</span> <span class="s">host-passthrough</span>
<span class="py">rbd_user</span> <span class="p">=</span> <span class="s">cinder</span>
<span class="py">rbd_secret_uuid</span> <span class="p">=</span> <span class="s">&lt;update later&gt;</span>
<span class="py">images_type</span> <span class="p">=</span> <span class="s">rbd</span>
<span class="py">images_rbd_pool</span> <span class="p">=</span> <span class="s">vms</span>
<span class="py">images_rbd_ceph_conf</span> <span class="p">=</span> <span class="s">/etc/ceph/ceph.conf</span>
<span class="py">disk_cachemodes</span><span class="p">=</span><span class="s">"network=writeback"</span>
<span class="py">hw_disk_discard</span> <span class="p">=</span> <span class="s">unmap</span>
<span class="py">live_migration_scheme</span> <span class="p">=</span> <span class="s">ssh</span>

<span class="nn">[oslo_concurrency]</span>
<span class="py">lock_path</span> <span class="p">=</span> <span class="s">/var/lib/nova/tmp</span>

<span class="nn">[placement]</span>
<span class="py">region_name</span> <span class="p">=</span> <span class="s">Auckland</span>
<span class="py">project_domain_name</span> <span class="p">=</span> <span class="s">Default</span>
<span class="py">project_name</span> <span class="p">=</span> <span class="s">service</span>
<span class="py">auth_type</span> <span class="p">=</span> <span class="s">password</span>
<span class="py">user_domain_name</span> <span class="p">=</span> <span class="s">Default</span>
<span class="py">auth_url</span> <span class="p">=</span> <span class="s">http://osc.i.rhysmg.nz:5000/v3</span>
<span class="py">username</span> <span class="p">=</span> <span class="s">placement</span>
<span class="py">password</span> <span class="p">=</span> <span class="s">PLACEMENT_PASS</span>


<span class="nn">[service_user]</span>
<span class="py">send_service_user_token</span> <span class="p">=</span> <span class="s">true</span>
<span class="py">auth_url</span> <span class="p">=</span> <span class="s">http://osc.i.rhysmg.nz/identity</span>
<span class="py">auth_strategy</span> <span class="p">=</span> <span class="s">keystone</span>
<span class="py">auth_type</span> <span class="p">=</span> <span class="s">password</span>
<span class="py">project_domain_name</span> <span class="p">=</span> <span class="s">Default</span>
<span class="py">project_name</span> <span class="p">=</span> <span class="s">service</span>
<span class="py">user_domain_name</span> <span class="p">=</span> <span class="s">Default</span>
<span class="py">username</span> <span class="p">=</span> <span class="s">nova</span>
<span class="py">password</span> <span class="p">=</span> <span class="s">NOVA_PASS</span>


<span class="nn">[vnc]</span>
<span class="py">enabled</span> <span class="p">=</span> <span class="s">true</span>
<span class="py">server_listen</span> <span class="p">=</span> <span class="s">0.0.0.0</span>
<span class="py">server_proxyclient_address</span> <span class="p">=</span> <span class="s">$my_ip</span>
<span class="py">novncproxy_base_url</span> <span class="p">=</span> <span class="s">http://osc.i.rhysmg.nz:6080/vnc_auto.html</span>


<span class="nn">[workarounds]</span>
<span class="py">skip_cpu_compare_on_dest</span> <span class="p">=</span> <span class="s">true</span>
</code></pre></div></div>

<p>Note, workaround for live migration above may be solved in a latter version. But I know my CPUs are identical.</p>

<p>Restart nova on the compute node <code class="language-plaintext highlighter-rouge">systemctl restart nova-compute</code></p>

<p>Finally, <strong>On the controller</strong> add the compute nodes to Opentack and ensure they are all up:</p>

<div class="language-bash highlighter-rouge"><div class="highlight"><pre class="highlight"><code>su <span class="nt">-s</span> /bin/sh <span class="nt">-c</span> <span class="s2">"nova-manage cell_v2 discover_hosts --verbose"</span> nova
openstack compute service list
</code></pre></div></div>

<p>Configure passwordless ssh must be configured for the <strong>nova</strong> user:
On each host: ‘usermod -s /bin/bash nova’</p>

<p>On hcn01:</p>

<div class="language-bash highlighter-rouge"><div class="highlight"><pre class="highlight"><code>su - nova 
ssh-keygen <span class="nt">-t</span> ed25519 <span class="nt">-C</span> 
edit /var/lib/nova/.ssh/authorized_keys and add the public key
<span class="nb">echo</span> <span class="s1">'StrictHostKeyChecking no'</span> <span class="o">&gt;&gt;</span> /var/lib/nova/.ssh/config
</code></pre></div></div>
<p>Now exit to root and copy the .ssh dir to the other hosts</p>

<div class="language-bash highlighter-rouge"><div class="highlight"><pre class="highlight"><code>scp <span class="nt">-r</span> /var/lib/nova/.ssh remote-host:/var/lib/nova/
</code></pre></div></div>
<p>Make sure the /var/lib/nova/.ssh and it’s contents are owned by nova:nova on all hosts. Test with <code class="language-plaintext highlighter-rouge">su - nova</code> on each host and ensure passwordless ssh to and from all hosts as the nova user.</p>

<h2 id="neutron-setup-on-controller">Neutron Setup on Controller</h2>
<p>https://docs.openstack.org/neutron/latest/install/install-ubuntu.html
https://docs.openstack.org/neutron/latest/configuration/config.html</p>

<div class="language-bash highlighter-rouge"><div class="highlight"><pre class="highlight"><code>mysql
</code></pre></div></div>

<div class="language-sql highlighter-rouge"><div class="highlight"><pre class="highlight"><code><span class="k">CREATE</span> <span class="k">DATABASE</span> <span class="n">neutron</span><span class="p">;</span>
<span class="k">GRANT</span> <span class="k">ALL</span> <span class="k">PRIVILEGES</span> <span class="k">ON</span> <span class="n">neutron</span><span class="p">.</span><span class="o">*</span> <span class="k">TO</span> <span class="s1">'neutron'</span><span class="o">@</span><span class="s1">'localhost'</span> <span class="n">IDENTIFIED</span> <span class="k">BY</span> <span class="s1">'NEUTRON_DBPASS'</span><span class="p">;</span>
<span class="k">GRANT</span> <span class="k">ALL</span> <span class="k">PRIVILEGES</span> <span class="k">ON</span> <span class="n">neutron</span><span class="p">.</span><span class="o">*</span> <span class="k">TO</span> <span class="s1">'neutron'</span><span class="o">@</span><span class="s1">'%'</span> <span class="n">IDENTIFIED</span> <span class="k">BY</span> <span class="s1">'NEUTRON_DBPASS'</span><span class="p">;</span>
</code></pre></div></div>

<div class="language-bash highlighter-rouge"><div class="highlight"><pre class="highlight"><code>openstack user create <span class="nt">--domain</span> default <span class="nt">--password-prompt</span> neutron
openstack role add <span class="nt">--project</span> service <span class="nt">--user</span> neutron admin
openstack role add <span class="nt">--user</span> cinder <span class="nt">--project</span> service service
openstack service create <span class="nt">--name</span> neutron <span class="nt">--description</span> <span class="s2">"OpenStack Networking"</span> network
openstack endpoint create <span class="nt">--region</span> Auckland network public http://osc.i.rhysmg.nz:9696
openstack endpoint create <span class="nt">--region</span> Auckland network internal http://osc.i.rhysmg.nz:9696
openstack endpoint create <span class="nt">--region</span> Auckland network admin http://osc.i.rhysmg.nz:9696
apt <span class="nb">install </span>neutron-server neutron-plugin-ml2
</code></pre></div></div>
<p>Edit /etc/neutron/neutron.conf:</p>

<div class="language-ini highlighter-rouge"><div class="highlight"><pre class="highlight"><code><span class="nn">[DEFAULT]</span>
<span class="py">core_plugin</span> <span class="p">=</span> <span class="s">ml2</span>
<span class="py">transport_url</span> <span class="p">=</span> <span class="s">rabbit://openstack:RABBIT_PASS@osc.i.rhysmg.nz</span>
<span class="py">auth_strategy</span> <span class="p">=</span> <span class="s">keystone</span>
<span class="py">notify_nova_on_port_status_changes</span> <span class="p">=</span> <span class="s">true</span>
<span class="py">notify_nova_on_port_data_changes</span> <span class="p">=</span> <span class="s">true</span>
<span class="py">dhcp_agents_per_network</span> <span class="p">=</span> <span class="s">3</span>
<span class="py">l3_ha</span> <span class="p">=</span> <span class="s">True</span>

<span class="nn">[database]</span>
<span class="py">connection</span> <span class="p">=</span> <span class="s">mysql+pymysql://neutron:NEUTRON_DBPASS@osc.i.rhysmg.nz/neutron</span>

<span class="nn">[keystone_authtoken]</span>
<span class="py">www_authenticate_uri</span> <span class="p">=</span> <span class="s">http://osc.i.rhysmg.nz:5000</span>
<span class="py">auth_url</span> <span class="p">=</span> <span class="s">http://osc.i.rhysmg.nz:5000</span>
<span class="py">memcached_servers</span> <span class="p">=</span> <span class="s">osc:11211</span>
<span class="py">auth_type</span> <span class="p">=</span> <span class="s">password</span>
<span class="py">project_domain_name</span> <span class="p">=</span> <span class="s">Default</span>
<span class="py">user_domain_name</span> <span class="p">=</span> <span class="s">Default</span>
<span class="py">project_name</span> <span class="p">=</span> <span class="s">service</span>
<span class="py">username</span> <span class="p">=</span> <span class="s">neutron</span>
<span class="py">password</span> <span class="p">=</span> <span class="s">NEUTRON_PASS</span>

<span class="nn">[nova]</span>
<span class="py">auth_url</span> <span class="p">=</span> <span class="s">http://osc.i.rhysmg.nz:5000</span>
<span class="py">auth_type</span> <span class="p">=</span> <span class="s">password</span>
<span class="py">project_domain_name</span> <span class="p">=</span> <span class="s">Default</span>
<span class="py">user_domain_name</span> <span class="p">=</span> <span class="s">Default</span>
<span class="py">region_name</span> <span class="p">=</span> <span class="s">Auckland</span>
<span class="py">project_name</span> <span class="p">=</span> <span class="s">service</span>
<span class="py">username</span> <span class="p">=</span> <span class="s">nova</span>
<span class="py">password</span> <span class="p">=</span> <span class="s">NOVA_PASS</span>

<span class="nn">[oslo_concurrency]</span>
<span class="py">lock_path</span> <span class="p">=</span> <span class="s">/var/lib/neutron/tmp</span>
</code></pre></div></div>
<p>Edit /etc/neutron/plugins/ml2/ml2_conf.ini:</p>

<div class="language-ini highlighter-rouge"><div class="highlight"><pre class="highlight"><code><span class="nn">[ml2]</span>
<span class="py">type_drivers</span> <span class="p">=</span> <span class="s">vlan,vxlan</span>
<span class="py">tenant_network_types</span> <span class="p">=</span> <span class="s">vxlan</span>
<span class="py">mechanism_drivers</span> <span class="p">=</span> <span class="s">openvswitch,l2population</span>
<span class="py">extension_drivers</span> <span class="p">=</span> <span class="s">port_security</span>


<span class="nn">[ml2_type_vlan]</span>
<span class="py">network_vlan_ranges</span> <span class="p">=</span> <span class="s">infra</span>

<span class="nn">[ml2_type_vxlan]</span>
<span class="py">vni_ranges</span> <span class="p">=</span> <span class="s">1:1000</span>
</code></pre></div></div>

<p>Edit Nova config (On the controller still) /etc/nova/nova.conf:</p>

<div class="language-ini highlighter-rouge"><div class="highlight"><pre class="highlight"><code><span class="nn">[neutron]</span>
<span class="py">auth_url</span> <span class="p">=</span> <span class="s">http://osc.i.rhysmg.nz:5000</span>
<span class="py">auth_type</span> <span class="p">=</span> <span class="s">password</span>
<span class="py">project_domain_name</span> <span class="p">=</span> <span class="s">Default</span>
<span class="py">user_domain_name</span> <span class="p">=</span> <span class="s">Default</span>
<span class="py">region_name</span> <span class="p">=</span> <span class="s">Auckland</span>
<span class="py">project_name</span> <span class="p">=</span> <span class="s">service</span>
<span class="py">username</span> <span class="p">=</span> <span class="s">neutron</span>
<span class="py">password</span> <span class="p">=</span> <span class="s">NEUTRON_PASS</span>
<span class="py">service_metadata_proxy</span> <span class="p">=</span> <span class="s">true</span>
<span class="py">metadata_proxy_shared_secret</span> <span class="p">=</span> <span class="s">METADATA_SECRET</span>
</code></pre></div></div>

<div class="language-bash highlighter-rouge"><div class="highlight"><pre class="highlight"><code>su <span class="nt">-s</span> /bin/sh <span class="nt">-c</span> <span class="s2">"neutron-db-manage --config-file /etc/neutron/neutron.conf </span><span class="se">\</span><span class="s2">
  --config-file /etc/neutron/plugins/ml2/ml2_conf.ini upgrade head"</span> neutron

systemctl restart nova-api
systemctl restart neutron-server

</code></pre></div></div>

<h2 id="neutron-setup-on-the-network-nodes">Neutron Setup on the <strong>network nodes</strong></h2>
<p>(Also the compute nodes in our case)
We install the agents on all the compute nodes as we don’t have a dedicated network node, nor do we want network traffic to be handled by the controller node</p>

<div class="language-bash highlighter-rouge"><div class="highlight"><pre class="highlight"><code>apt <span class="nb">install </span>neutron-openvswitch-agent neutron-l3-agent neutron-dhcp-agent neutron-metadata-agent
</code></pre></div></div>
<p>Edit /etc/neutron/neutron.conf:</p>

<div class="language-ini highlighter-rouge"><div class="highlight"><pre class="highlight"><code><span class="nn">[DEFAULT]</span>
<span class="py">core_plugin</span> <span class="p">=</span> <span class="s">ml2</span>
<span class="py">transport_url</span> <span class="p">=</span> <span class="s">rabbit://openstack:RABBIT_PASS@osc.i.rhysmg.nz</span>
<span class="py">auth_strategy</span> <span class="p">=</span> <span class="s">keystone</span>
<span class="py">service_plugins</span> <span class="p">=</span> <span class="s">router</span>
<span class="py">dns_domain</span> <span class="p">=</span> <span class="s">i.rhysmg.nz</span>

<span class="nn">[keystone_authtoken]</span>
<span class="py">www_authenticate_uri</span> <span class="p">=</span> <span class="s">http://osc.i.rhysmg.nz:5000</span>
<span class="py">auth_url</span> <span class="p">=</span> <span class="s">http://osc.i.rhysmg.nz:5000</span>
<span class="py">memcached_servers</span> <span class="p">=</span> <span class="s">osc:11211</span>
<span class="py">auth_type</span> <span class="p">=</span> <span class="s">password</span>
<span class="py">project_domain_name</span> <span class="p">=</span> <span class="s">Default</span>
<span class="py">user_domain_name</span> <span class="p">=</span> <span class="s">Default</span>
<span class="py">project_name</span> <span class="p">=</span> <span class="s">service</span>
<span class="py">username</span> <span class="p">=</span> <span class="s">neutron</span>
<span class="py">password</span> <span class="p">=</span> <span class="s">NEUTRON_PASS</span>

<span class="nn">[oslo_concurrency]</span>
<span class="py">lock_path</span> <span class="p">=</span> <span class="s">/var/lib/neutron/tmp</span>
</code></pre></div></div>

<p>Edit /etc/neutron/plugins/ml2/openvswitch_agent.ini:
The only thing that needs to be changed for each node is the <code class="language-plaintext highlighter-rouge">local_ip</code></p>

<p>Note the <code class="language-plaintext highlighter-rouge">bridge_mappings = infra:br-infra</code> setting. This is where we connect OpenStack to the main physical uplink bridge (br-infra) which we created earlier. OpenStack then creates its own Open vSwitch bridges as per the diagram above, it’s in these bridges where all the networking magic happens.</p>

<div class="language-ini highlighter-rouge"><div class="highlight"><pre class="highlight"><code><span class="nn">[ovs]</span>
<span class="py">bridge_mappings</span> <span class="p">=</span> <span class="s">infra:br-infra</span>

<span class="py">local_ip</span> <span class="p">=</span> <span class="s">10.20.30.11</span>

<span class="nn">[agent]</span>
<span class="py">l2_population</span> <span class="p">=</span> <span class="s">true</span>
<span class="py">tunnel_types</span> <span class="p">=</span> <span class="s">vxlan</span>


<span class="nn">[securitygroup]</span>
<span class="py">firewall_driver</span> <span class="p">=</span> <span class="s">openvswitch</span>
<span class="py">enable_security_group</span> <span class="p">=</span> <span class="s">true</span>
</code></pre></div></div>
<p>Edit /etc/nova/nova.conf:</p>

<div class="language-ini highlighter-rouge"><div class="highlight"><pre class="highlight"><code><span class="nn">[neutron]</span>
<span class="py">auth_url</span> <span class="p">=</span> <span class="s">http://osc.i.rhysmg.nz:5000</span>
<span class="py">auth_type</span> <span class="p">=</span> <span class="s">password</span>
<span class="py">project_domain_name</span> <span class="p">=</span> <span class="s">Default</span>
<span class="py">user_domain_name</span> <span class="p">=</span> <span class="s">Default</span>
<span class="py">region_name</span> <span class="p">=</span> <span class="s">Auckland</span>
<span class="py">project_name</span> <span class="p">=</span> <span class="s">service</span>
<span class="py">username</span> <span class="p">=</span> <span class="s">neutron</span>
<span class="py">password</span> <span class="p">=</span> <span class="s">NEUTRON_PASS</span>
</code></pre></div></div>
<p>Edit /etc/neutron/l3_agent.ini:</p>

<div class="language-ini highlighter-rouge"><div class="highlight"><pre class="highlight"><code><span class="nn">[DEFAULT]</span>
<span class="py">interface_driver</span> <span class="p">=</span> <span class="s">openvswitch</span>

<span class="c"># For router HA
</span><span class="py">ha_vrrp_health_check_interval</span> <span class="p">=</span> <span class="s">5</span>
</code></pre></div></div>

<p>Edit /etc/neutron/dhcp_agent.ini:</p>

<div class="language-ini highlighter-rouge"><div class="highlight"><pre class="highlight"><code><span class="nn">[DEFAULT]</span>
<span class="py">interface_driver</span> <span class="p">=</span> <span class="s">openvswitch</span>
<span class="py">dhcp_driver</span> <span class="p">=</span> <span class="s">neutron.agent.linux.dhcp.Dnsmasq</span>
<span class="py">enable_isolated_metadata</span> <span class="p">=</span> <span class="s">true</span>
<span class="py">force_metadata</span> <span class="p">=</span> <span class="s">true</span>

<span class="py">dnsmasq_dns_servers</span> <span class="p">=</span> <span class="s">10.20.10.11,10.20.10.12,10.20.10.13</span>
</code></pre></div></div>

<p>Edit /etc/neutron/metadata_agent.ini:</p>

<div class="language-ini highlighter-rouge"><div class="highlight"><pre class="highlight"><code><span class="nn">[DEFAULT]</span>
<span class="py">nova_metadata_host</span> <span class="p">=</span> <span class="s">osc.i.rhysmg.nz</span>
<span class="py">metadata_proxy_shared_secret</span> <span class="p">=</span> <span class="s">METADATA_SECRET</span>
</code></pre></div></div>
<p>Restart neutron services on all three nodes</p>

<div class="language-bash highlighter-rouge"><div class="highlight"><pre class="highlight"><code>systemctl restart nova-compute
systemctl restart neutron-openvswitch-agent
systemctl restart neutron-dhcp-agent
systemctl restart neutron-metadata-agent
</code></pre></div></div>

<h2 id="cinder-setup-on-the-controller-node">Cinder setup on the controller node</h2>

<div class="language-bash highlighter-rouge"><div class="highlight"><pre class="highlight"><code>mysql
</code></pre></div></div>

<div class="language-sql highlighter-rouge"><div class="highlight"><pre class="highlight"><code><span class="k">CREATE</span> <span class="k">DATABASE</span> <span class="n">cinder</span><span class="p">;</span>
<span class="k">GRANT</span> <span class="k">ALL</span> <span class="k">PRIVILEGES</span> <span class="k">ON</span> <span class="n">cinder</span><span class="p">.</span><span class="o">*</span> <span class="k">TO</span> <span class="s1">'cinder'</span><span class="o">@</span><span class="s1">'localhost'</span> <span class="n">IDENTIFIED</span> <span class="k">BY</span> <span class="s1">'CINDER_DBPASS'</span><span class="p">;</span>
<span class="k">GRANT</span> <span class="k">ALL</span> <span class="k">PRIVILEGES</span> <span class="k">ON</span> <span class="n">cinder</span><span class="p">.</span><span class="o">*</span> <span class="k">TO</span> <span class="s1">'cinder'</span><span class="o">@</span><span class="s1">'%'</span> <span class="n">IDENTIFIED</span> <span class="k">BY</span> <span class="s1">'CINDER_DBPASS'</span><span class="p">;</span>
</code></pre></div></div>

<div class="language-bash highlighter-rouge"><div class="highlight"><pre class="highlight"><code>openstack user create <span class="nt">--domain</span> default <span class="nt">--password-prompt</span> cinder
openstack role add <span class="nt">--project</span> service <span class="nt">--user</span> cinder admin
openstack role add <span class="nt">--user</span> cinder <span class="nt">--project</span> service service
openstack service create <span class="nt">--name</span> cinderv3 <span class="nt">--description</span> <span class="s2">"OpenStack Block Storage"</span> volumev3
openstack endpoint create <span class="nt">--region</span> Auckland volumev3 public http://osc.i.rhysmg.nz:8776/v3/%<span class="se">\(</span>project_id<span class="se">\)</span>s
openstack endpoint create <span class="nt">--region</span> Auckland volumev3 internal http://osc.i.rhysmg.nz:8776/v3/%<span class="se">\(</span>project_id<span class="se">\)</span>s
openstack endpoint create <span class="nt">--region</span> Auckland volumev3 admin http://osc.i.rhysmg.nz:8776/v3/%<span class="se">\(</span>project_id<span class="se">\)</span>s
apt <span class="nb">install </span>cinder-api cinder-scheduler cinder-volume
</code></pre></div></div>

<h4 id="now-a-side-step-to-set-up-ceph-pools-and-authentication-for-cinder--nova">Now a side-step to set up Ceph pools and authentication for Cinder &amp; Nova</h4>

<div class="language-bash highlighter-rouge"><div class="highlight"><pre class="highlight"><code>ceph osd pool create volumes
ceph osd pool create vms
rbd pool init volumes
rbd pool init vms
</code></pre></div></div>
<p>On the controller create the user which will be used by cinder (This will be used later in the cinder section)</p>

<div class="language-bash highlighter-rouge"><div class="highlight"><pre class="highlight"><code>ceph auth get-or-create client.cinder mon <span class="s1">'profile rbd'</span> osd <span class="s1">'profile rbd pool=volumes, profile rbd pool=vms, profile rbd-read-only pool=images'</span> mgr <span class="s1">'profile rbd pool=volumes, profile rbd pool=vms'</span>

ceph auth get-or-create client.cinder <span class="o">&gt;</span>/etc/ceph/ceph.client.cinder.keyring

<span class="nb">chown </span>cinder:cinder /etc/ceph/ceph.client.cinder.keyring
<span class="nb">chmod </span>660 /etc/ceph/ceph.client.cinder.keyring
<span class="nb">chown </span>cinder:cinder /etc/ceph/ceph.client.cinder.keyring
</code></pre></div></div>
<p>Copy the Ceph cinder keyring to /etc/ceph on the compute nodes, set permissions, and set the owner to nova</p>

<div class="language-bash highlighter-rouge"><div class="highlight"><pre class="highlight"><code>ceph auth get-or-create client.cinder | ssh hcn01 <span class="nb">tee</span> /etc/ceph/ceph.client.cinder.keyring
ssh hcn01 <span class="nb">chown </span>nova:nova /etc/ceph/ceph.client.cinder.keyring
ssh hcn01 <span class="nb">chmod </span>660 /etc/ceph/ceph.client.cinder.keyring

ceph auth get-or-create client.cinder | ssh hcn02 <span class="nb">tee</span> /etc/ceph/ceph.client.cinder.keyring
ssh hcn02 <span class="nb">chown </span>nova:nova /etc/ceph/ceph.client.cinder.keyring
ssh hcn02 <span class="nb">chmod </span>660 /etc/ceph/ceph.client.cinder.keyring

ceph auth get-or-create client.cinder | ssh hcn03 <span class="nb">tee</span> /etc/ceph/ceph.client.cinder.keyring
ssh hcn03 <span class="nb">chown </span>nova:nova /etc/ceph/ceph.client.cinder.keyring
ssh hcn03 <span class="nb">chmod </span>660 /etc/ceph/ceph.client.cinder.keyring
</code></pre></div></div>
<p>Edit and add the following to /etc/ceph/ceph.conf on all the <strong>compute nodes</strong></p>

<div class="language-ini highlighter-rouge"><div class="highlight"><pre class="highlight"><code><span class="nn">[client]</span>
    <span class="err">rbd</span> <span class="py">cache</span> <span class="p">=</span> <span class="s">true</span>
    <span class="err">rbd</span> <span class="err">cache</span> <span class="err">writethrough</span> <span class="err">until</span> <span class="py">flush</span> <span class="p">=</span> <span class="s">true</span>
    <span class="c">#admin socket = /var/run/ceph/guests/$cluster-$type.$id.$pid.$cctid.asok
</span>    <span class="err">log</span> <span class="py">file</span> <span class="p">=</span> <span class="s">/var/log/qemu/qemu-guest-$pid.log</span>
    <span class="err">rbd</span> <span class="err">concurrent</span> <span class="err">management</span> <span class="py">ops</span> <span class="p">=</span> <span class="s">20</span>
</code></pre></div></div>
<p>Note: I commented out the admin socket for now, it’s causing an issue and I don’t understand it yet</p>

<p>Create dirs on each compute nodes</p>

<div class="language-bash highlighter-rouge"><div class="highlight"><pre class="highlight"><code><span class="nb">mkdir</span> <span class="nt">-p</span> /var/run/ceph/guests/ /var/log/qemu/
<span class="nb">chown </span>libvirt-qemu:libvirt-qemu /var/run/ceph/guests /var/log/qemu/
</code></pre></div></div>

<p>On hcn01 create a libvirt secrete XML for cinder.</p>

<p>Note, I’m using the Ceph cluster ID as the UUID, I think this is some kind of a default?</p>

<p>Create secret.cinder.xml:</p>

<div class="language-xml highlighter-rouge"><div class="highlight"><pre class="highlight"><code><span class="nt">&lt;secret</span> <span class="na">ephemeral=</span><span class="s">'no'</span> <span class="na">private=</span><span class="s">'no'</span><span class="nt">&gt;</span>
  <span class="nt">&lt;uuid&gt;</span>fd93fc22-2e5e-11ee-9452-e78e34109b9c<span class="nt">&lt;/uuid&gt;</span>
  <span class="nt">&lt;usage</span> <span class="na">type=</span><span class="s">'ceph'</span><span class="nt">&gt;</span>
    <span class="nt">&lt;name&gt;</span>client.cinder secret<span class="nt">&lt;/name&gt;</span>
  <span class="nt">&lt;/usage&gt;</span>
<span class="nt">&lt;/secret&gt;</span>
</code></pre></div></div>

<div class="language-bash highlighter-rouge"><div class="highlight"><pre class="highlight"><code>virsh secret-define <span class="nt">--file</span> cinder.secret.xml
virsh secret-set-value <span class="nt">--secret</span> <span class="s2">"327a788a-3daa-11ee-9092-0d04acbcec26"</span> <span class="nt">--base64</span> <span class="s2">"</span><span class="si">$(</span>ceph auth get-key client.cinder<span class="si">)</span><span class="s2">"</span>
</code></pre></div></div>
<p>Copy the secret file and repeat secret creation on the other two nodes</p>

<div class="language-bash highlighter-rouge"><div class="highlight"><pre class="highlight"><code>scp cinder.secret.xml hcn02:/root/rhys/
scp cinder.secret.xml hcn03:/root/rhys/
</code></pre></div></div>

<p>Update the UUID in nova.conf on the compute nodes and in cinder.conf on the controller. This might not be required since we used the cluster id as the secret uuid?</p>

<p>Restart nova on all nodes</p>

<div class="language-bash highlighter-rouge"><div class="highlight"><pre class="highlight"><code>systemctl restart nova-compute
</code></pre></div></div>

<h4 id="now-back-to-configuring-cinder-on-the-controller-node">Now back to configuring Cinder on the controller node</h4>
<p>Edit /etc/cinder/cinder.conf:</p>

<div class="language-ini highlighter-rouge"><div class="highlight"><pre class="highlight"><code><span class="nn">[DEFAULT]</span>
<span class="py">transport_url</span> <span class="p">=</span> <span class="s">rabbit://openstack:RABBIT_PASS@osc.i.rhysmg.nz</span>
<span class="py">auth_strategy</span> <span class="p">=</span> <span class="s">keystone</span>
<span class="py">my_ip</span> <span class="p">=</span> <span class="s">10.20.10.10</span>


<span class="nn">[database]</span>
<span class="py">connection</span> <span class="p">=</span> <span class="s">mysql+pymysql://cinder:CINDER_DBPASS@osc.i.rhysmg.nz/cinder</span>


<span class="nn">[keystone_authtoken]</span>
<span class="py">www_authenticate_uri</span> <span class="p">=</span> <span class="s">http://osc.i.rhysmg.nz:5000</span>
<span class="py">auth_url</span> <span class="p">=</span> <span class="s">http://osc.i.rhysmg.nz:5000</span>
<span class="py">memcached_servers</span> <span class="p">=</span> <span class="s">osc:11211</span>
<span class="py">auth_type</span> <span class="p">=</span> <span class="s">password</span>
<span class="py">project_domain_name</span> <span class="p">=</span> <span class="s">default</span>
<span class="py">user_domain_name</span> <span class="p">=</span> <span class="s">default</span>
<span class="py">project_name</span> <span class="p">=</span> <span class="s">service</span>
<span class="py">username</span> <span class="p">=</span> <span class="s">cinder</span>
<span class="py">password</span> <span class="p">=</span> <span class="s">CINDER_PASS</span>


<span class="nn">[oslo_concurrency]</span>
<span class="py">lock_path</span> <span class="p">=</span> <span class="s">/var/lib/cinder/tmp</span>
</code></pre></div></div>

<div class="language-bash highlighter-rouge"><div class="highlight"><pre class="highlight"><code>su <span class="nt">-s</span> /bin/sh <span class="nt">-c</span> <span class="s2">"cinder-manage db sync"</span> cinder
</code></pre></div></div>

<p><strong>Still on the controller</strong> edit /etc/nova/nova.conf:</p>

<div class="language-ini highlighter-rouge"><div class="highlight"><pre class="highlight"><code><span class="nn">[cinder]</span>
<span class="py">os_region_name</span> <span class="p">=</span> <span class="s">Auckland</span>
</code></pre></div></div>

<div class="language-bash highlighter-rouge"><div class="highlight"><pre class="highlight"><code>systemctl restart nova-api
systemctl restart apache2
systemctl restart cinder-volume
systemctl restart cinder-scheduler
</code></pre></div></div>

<h1 id="start-using-openstack">Start using OpenStack</h1>
<p>We’ve completed install of all the components. Now we need to start using OpenStack, including creating some base networks, images and test virtual machines. This will soon show up all the things we messed up along the way, at which point we need to dig into logs, retrace our steps, and make corrections. But first try a reboot of the controller and the compute nodes before doing too much digging.</p>

<h2 id="transit-network-new-provider-vlan-network">Transit network (New Provider VLAN Network)</h2>
<p>The first network we’ll create will be an external transit VLAN for routing self-service networks up to the main firewall. This firewall already has an interface on this VLAN and rules to allow internet access.</p>

<p>With the appropriate rules and routes on the firewall, this transit network also access into OpenStack self-service networks from the wider external networks.</p>

<p>Note how we connect this network to the physical provider network <code class="language-plaintext highlighter-rouge">infra</code> which is mapped to the br-infra Open vSwitch bridge in the file /etc/neutron/plugins/ml2/openvswitch_agent.ini <code class="language-plaintext highlighter-rouge">bridge_mappings = infra:br-infra</code></p>

<div class="language-bash highlighter-rouge"><div class="highlight"><pre class="highlight"><code>openstack network create <span class="nt">--share</span> <span class="nt">--provider-physical-network</span> infra <span class="nt">--provider-network-type</span> vlan <span class="nt">--provider-segment</span> 2501 <span class="nt">--external</span> ExtTransit
openstack subnet create <span class="nt">--subnet-range</span> 10.25.1.0/24 <span class="nt">--gateway</span> 10.25.1.254 <span class="nt">--network</span> ExtTransit <span class="nt">--no-dhcp</span> ExtTransit
</code></pre></div></div>

<p>Now we’ll create a router with has an interface in the external transit network we just created. 
<strong>Note:</strong> I’ve specified –disable-snat this is because I want all NAT work to be handled by my core firewall. Your situation might be different.</p>

<div class="language-bash highlighter-rouge"><div class="highlight"><pre class="highlight"><code>openstack router create CoreRouter
openstack router <span class="nb">set </span>CoreRouter <span class="nt">--external-gateway</span> ExtTransit <span class="nt">--disable-snat</span> <span class="nt">--fixed-ip</span> <span class="nv">subnet</span><span class="o">=</span>ExtTransit,ip-address<span class="o">=</span>10.25.1.1
</code></pre></div></div>

<h2 id="cl-mgmt-network">cl-mgmt network</h2>
<p>Next we’ll create a network attached to the cl-mgmt vlan so we can place our OpenStack dashboard VM on this network along with the physical compute nodes and the controller VM.</p>

<div class="language-bash highlighter-rouge"><div class="highlight"><pre class="highlight"><code>openstack network create <span class="nt">--share</span> <span class="nt">--provider-physical-network</span> infra <span class="nt">--provider-network-type</span> vlan <span class="nt">--provider-segment</span> 2010 cl-mgmt
openstack subnet create <span class="nt">--subnet-range</span> 10.20.10.0/24 <span class="nt">--gateway</span> 10.20.10.254 <span class="nt">--network</span> cl-mgmt <span class="nt">--no-dhcp</span> cl-mgmt
</code></pre></div></div>

<h2 id="first-vxlan-self-service-network">First VXLAN Self-service Network</h2>
<p>Now we switch users and projects and create a self-service (vxlan) network in the fairburn project.</p>

<p>Create a <code class="language-plaintext highlighter-rouge">rhys-openrc</code> script”</p>

<div class="language-bash highlighter-rouge"><div class="highlight"><pre class="highlight"><code><span class="nb">export </span><span class="nv">OS_PROJECT_DOMAIN_NAME</span><span class="o">=</span>Default
<span class="nb">export </span><span class="nv">OS_USER_DOMAIN_NAME</span><span class="o">=</span>Default
<span class="nb">export </span><span class="nv">OS_PROJECT_NAME</span><span class="o">=</span>fairburn
<span class="nb">export </span><span class="nv">OS_USERNAME</span><span class="o">=</span>rhys
<span class="nb">export </span><span class="nv">OS_PASSWORD</span><span class="o">=[</span>password]
<span class="nb">export </span><span class="nv">OS_AUTH_URL</span><span class="o">=</span>http://osc.i.rhysmg.nz:5000/v3
<span class="nb">export </span><span class="nv">OS_IDENTITY_API_VERSION</span><span class="o">=</span>3
<span class="nb">export </span><span class="nv">OS_IMAGE_API_VERSION</span><span class="o">=</span>2
</code></pre></div></div>
<ul>
  <li>Source the file:</li>
</ul>

<div class="language-bash highlighter-rouge"><div class="highlight"><pre class="highlight"><code><span class="nb">source </span>rhys-openrc
</code></pre></div></div>
<p>Create a self-service network, subnet, and router interface.</p>

<div class="language-bash highlighter-rouge"><div class="highlight"><pre class="highlight"><code>openstack network create fairburnlab
openstack subnet create <span class="nt">--network</span> fairburnlab <span class="nt">--gateway</span> 10.21.10.1 <span class="nt">--subnet-range</span> 10.21.10.0/24 fairburnlab
openstack router add subnet CoreRouter fairburnlab
</code></pre></div></div>

<h2 id="launch-a-test-instance">Launch a test instance</h2>
<p>Finally! We create a VM on our new infrastructure.</p>

<p><strong>NOTE:</strong> Flavors should have cpu sockets set to max 1, otherwise performance is BAD (at least in Windows)</p>

<p><strong>NOTE:</strong> We return the admin project/user for some of these steps then back to our own user again. I.e. the flavor and image are created in the admin project but the keypair and the instance will be created in the fairburn project.</p>

<div class="language-bash highlighter-rouge"><div class="highlight"><pre class="highlight"><code><span class="nb">.</span> admin-openrc
openstack flavor create <span class="nt">--vcpus</span> 2 <span class="nt">--ram</span> 1024 <span class="nt">--disk</span> 30 <span class="nt">--property</span> hw:cpu_sockets<span class="o">=</span>1 m1.small
openstack flavor create <span class="nt">--vcpus</span> 2 <span class="nt">--ram</span> 2024 <span class="nt">--disk</span> 60 <span class="nt">--property</span> hw:cpu_sockets<span class="o">=</span>1 m1.medium
openstack flavor create <span class="nt">--vcpus</span> 2 <span class="nt">--ram</span> 4096 <span class="nt">--disk</span> 120 <span class="nt">--property</span> hw:cpu_sockets<span class="o">=</span>1 m1.large
openstack flavor create <span class="nt">--vcpus</span> 4 <span class="nt">--ram</span> 8192 <span class="nt">--disk</span> 250 <span class="nt">--property</span> hw:cpu_sockets<span class="o">=</span>1 m1.xl

<span class="nb">.</span> rhys-openrc
wget https://github.com/rhysmg.keys
openstack keypair create <span class="nt">--public-key</span> ./rhysmg.keys github_rhysmg
openstack security group list
openstack security group rule create <span class="nt">--proto</span> icmp UUID_OF_DEFAULT_SECURITY_GROUP_FOR_THIS_PROJECT
openstack security group rule create <span class="nt">--proto</span> tcp <span class="nt">--dst-port</span> 22 UUID_OF_DEFAULT_SECURITY_GROUP_FOR_THIS_PROJECT


<span class="nb">.</span> admin-openrc
wget https://cloud-images.ubuntu.com/jammy/current/jammy-server-cloudimg-amd64.img
qemu-img convert <span class="nt">-f</span> qcow2 <span class="nt">-O</span> raw jammy-server-cloudimg-amd64.img jammy-server-cloudimg-amd64.raw

openstack image create <span class="nt">--disk-format</span> raw <span class="nt">--container-format</span> bare <span class="nt">--public</span> <span class="nt">--file</span> ./jammy-server-cloudimg-amd64.raw ubuntu-server-22.04

openstack image list
openstack network list
openstack security group list

<span class="nb">.</span> rhys-openrc
openstack server create <span class="nt">--flavor</span> m1.small <span class="nt">--image</span> be5a0b72-a78b-4b77-acee-487ff40b830d <span class="se">\</span>
  <span class="nt">--nic</span> net-id<span class="o">=</span>eab7dc39-5c2c-447d-b58f-0e86f599df9e <span class="nt">--security-group</span> 77cd0cc0-800d-4b2a-af31-5fba5b746186 <span class="se">\</span>
  <span class="nt">--key-name</span> github_rhysmg test01

openstack console url show test01
openstack server list
ssh 10.21.10.236
</code></pre></div></div>
<p>At this point you should be able SSH to the new VM.</p>

<p>If you are using an Ubuntu cloud image the default user is ‘ubuntu’ and there is no default password so you must SSH auth. If SSH auth doesn’t work it’s probably because the public key was not inserted correctly by cloud-init during the build, and this probably means there is a problem with the metadata service.</p>

<h2 id="note-on-dns-forwarding">Note on DNS Forwarding</h2>
<p>VMs in self-service networks point to the DHCP/DNS agent (dnsmasq) for their DNS service. Earlier we configured the DHCP agent to forward DNS queries to the bind9 DNS service running on our hosts, listening on the cl-mgmt network. The cl-mgmt network is not connected to the core router. Rather, its default gateway is the main firewall. The ExtTransit network has an interface on the CoreRouter and on the main firewall. So the DHCP agent will go up through the transit network through the main firewall to the DNS services on the cl-mgmt networks. This means the appropriate firewall rules must be configured to allow this. Likewise, the ACL in <code class="language-plaintext highlighter-rouge">/etc/bind/named.conf.options</code> on each node needs to be configured to accept queries from these networks. If you have SNAT enabled on your CoreRouter these queries will be sourced from the ExtTransit interface on the CoreRouter, if SNAT is disabled, it will be sourced from the DHCP aagent IP address for the given network. E.g. for the network 10.21.10.0/24 there are three DHCP agents running (one on each host) and their IPs are 10.21.10.2,3,4.</p>

<p>Next up, let’s test live migration. Check the current host of test01, do the live migration, check the host again:</p>

<div class="language-bash highlighter-rouge"><div class="highlight"><pre class="highlight"><code>openstack server show test01 |grep compute_host
openstack server migrate <span class="nt">--live-migration</span> test01
openstack server show test01 |grep compute_host
</code></pre></div></div>
<p>If this fails, and if <code class="language-plaintext highlighter-rouge">/var/log/nova/nova-compute.log</code> on the <strong>source</strong> host shows a <code class="language-plaintext highlighter-rouge">Live Migration failure: Cannot recv data: Host key verification failed</code> error this could be because the host key is not in the known_hosts file in the .ssd directory for root. Or it at least not recorded against the correct host name. For example, you might <code class="language-plaintext highlighter-rouge">ssh hcn01.i.rhysmg.nz</code> or <code class="language-plaintext highlighter-rouge">ssh 10.20.10.11</code> and accept the key, getting it saved to known_hosts file. But libvirt uses the <strong>bare host name</strong>, not the FQDN, and not the IP address, so you need to <code class="language-plaintext highlighter-rouge">ssh hcn01</code> and accept the key. Do this to and from all compute nodes. Strict host checking could be disabled but that’s not good practice, especially bad for the root user. 
Note that we also configured passwordless ssh for the nova user earlier. I’m not 100% clear on this yet but in some cases the nova user is performing SSH interactions between nodes, other times it’s the root user so both scenarios need to be configured and working.</p>

<h2 id="create-a-dashboard-vm">Create a dashboard VM</h2>
<p>Now we’ll create a VM on the cl-mgmt network for an OpenStack web GUI, in this case Skyline. Everyone? likes a nice shiny gui but really in the OpenStack world it’s a nice-to-have and not a substitute for the CLI. Hence, unlike the controller we don’t mind running this one within OpenStack itself, since if it’s unavailable, it’s not a big deal.</p>

<h3 id="vm-build">VM Build</h3>
<p>Below I first create a self-service network in the admin tenant. I’ll build the new dashboard VM on this network before moving it on the cl-mgmt network because cl-mgmt doens’t have DHCP or access to the metadata service. This is a clunky way to do it, i’ll refine this later.</p>

<p>Also add rules to allow SSH and ICMP via the default security group (in the admin project). Earlier we did this for the fairburn project.</p>

<div class="language-bash highlighter-rouge"><div class="highlight"><pre class="highlight"><code><span class="nb">.</span> admin-openrc

openstack network create admin_build
openstack subnet create <span class="nt">--network</span> admin_build <span class="nt">--gateway</span> 10.21.99.1 <span class="nt">--subnet-range</span> 10.21.99.0/24 admin_build
openstack router add subnet CoreRouter admin_build

openstack security group rule create <span class="nt">--proto</span> icmp 08bf355a-d1f1-404a-8c78-41cfe6160c6a 
openstack security group rule create <span class="nt">--proto</span> tcp <span class="nt">--dst-port</span> 22 08bf355a-d1f1-404a-8c78-41cfe6160c6a

openstack flavor list
openstack image list
openstack network list
openstack security group list
openstack server create <span class="nt">--flavor</span> m1.medium <span class="nt">--image</span> ubuntu-server-22.04 <span class="nt">--nic</span> net-id<span class="o">=</span>2af5135a-a5d0-40e7-b170-22ccb61465e8 <span class="nt">--security-group</span> 08bf355a-d1f1-404a-8c78-41cfe6160c6a <span class="nt">--key-name</span> github_rhysmg hcui01
openstack server list
</code></pre></div></div>

<p>Once the VM is running and we can connect to it on it’s self-service IP, we’ll add another network interface on the cl-mgmt network.</p>

<div class="language-bash highlighter-rouge"><div class="highlight"><pre class="highlight"><code>openstack port create <span class="nt">--network</span> 9bc46380-07be-4045-94ea-1c73c1db019d <span class="nt">--disable-port-security</span> <span class="nt">--fixed-ip</span> <span class="nv">subnet</span><span class="o">=</span>cl-mgmt,ip-address<span class="o">=</span>10.20.10.5 port_hcui01
openstack server add port hcui01 port_hcui01
</code></pre></div></div>
<p>Now running <code class="language-plaintext highlighter-rouge">ip link</code> within the hcui01 VM should show an additional interface which can be configured with netplan with a static address. E.g.</p>

<div class="language-yaml highlighter-rouge"><div class="highlight"><pre class="highlight"><code><span class="na">network</span><span class="pi">:</span>
    <span class="na">version</span><span class="pi">:</span> <span class="m">2</span>
    <span class="na">ethernets</span><span class="pi">:</span>
        <span class="na">ens3</span><span class="pi">:</span>
            <span class="na">dhcp4</span><span class="pi">:</span> <span class="no">true</span>
            <span class="na">match</span><span class="pi">:</span>
                <span class="na">macaddress</span><span class="pi">:</span> <span class="s">fa:16:3e:c8:b7:f7</span>
            <span class="na">set-name</span><span class="pi">:</span> <span class="s">ens3</span>
        <span class="na">ens7</span><span class="pi">:</span>
            <span class="na">dhcp4</span><span class="pi">:</span> <span class="no">false</span>
            <span class="na">addresses</span><span class="pi">:</span> <span class="pi">[</span><span class="nv">10.20.10.5/24</span><span class="pi">]</span>
            <span class="na">routes</span><span class="pi">:</span>
            <span class="pi">-</span> <span class="na">to</span><span class="pi">:</span> <span class="s">default</span>
              <span class="na">via</span><span class="pi">:</span> <span class="s">10.20.10.254</span>
            <span class="na">nameservers</span><span class="pi">:</span>
              <span class="na">addresses</span><span class="pi">:</span>
              <span class="pi">-</span> <span class="s">10.20.10.13</span>
              <span class="pi">-</span> <span class="s">10.20.10.11</span>
              <span class="pi">-</span> <span class="s">10.20.10.12</span>
            <span class="na">match</span><span class="pi">:</span>
                <span class="na">macaddress</span><span class="pi">:</span> <span class="s">fa:16:3e:88:63:d8</span>
            <span class="na">set-name</span><span class="pi">:</span> <span class="s">ens7</span>
</code></pre></div></div>
<p>Once the new interface is up and accessible, we can remove the port for the build network:</p>

<div class="language-bash highlighter-rouge"><div class="highlight"><pre class="highlight"><code>openstack port list
openstack server remove port hcui01 83b91264-4865-4a6b-8146-184c3ce693b1
</code></pre></div></div>
<p>Then update the netplan again to remove that interface from the OS</p>

<p>Now we have our dashboard VM on the cl-mgmt network it’s ready to configure.</p>

<h3 id="dashboard-os">Dashboard OS</h3>
<p>Configure /etc/hosts with the FQDN:</p>

<div class="language-ini highlighter-rouge"><div class="highlight"><pre class="highlight"><code><span class="err">127.0.0.1</span> <span class="err">localhost</span>
<span class="err">10.20.10.5</span> <span class="err">hcui01.i.rhysmg.nz</span> <span class="err">hcui01</span>
<span class="c"># The following lines are desirable for IPv6 capable hosts
</span><span class="err">::1</span> <span class="err">ip6-localhost</span> <span class="err">ip6-loopback</span>
<span class="err">fe00::0</span> <span class="err">ip6-localnet</span>
<span class="err">ff00::0</span> <span class="err">ip6-mcastprefix</span>
<span class="err">ff02::1</span> <span class="err">ip6-allnodes</span>
<span class="err">ff02::2</span> <span class="err">ip6-allrouters</span>
<span class="err">ff02::3</span> <span class="err">ip6-allhosts</span>
</code></pre></div></div>

<p>(Optional) configure passwordless ssh for root as we’ve done previously</p>

<p>Install chrony and point to hcn01 (IP Address) as above</p>

<div class="language-bash highlighter-rouge"><div class="highlight"><pre class="highlight"><code>apt update
apt upgrade
apt <span class="nb">install </span>chrony
</code></pre></div></div>

<h3 id="skyline-dashboard-install">Skyline Dashboard install</h3>

<div class="language-bash highlighter-rouge"><div class="highlight"><pre class="highlight"><code>apt <span class="nb">install </span>mariadb-server
mysql_secure_installation
mysql
</code></pre></div></div>

<div class="language-sql highlighter-rouge"><div class="highlight"><pre class="highlight"><code><span class="k">CREATE</span> <span class="k">DATABASE</span> <span class="n">skyline</span> <span class="k">DEFAULT</span> <span class="nb">CHARACTER</span> <span class="k">SET</span> <span class="n">utf8</span> <span class="k">DEFAULT</span> <span class="k">COLLATE</span> <span class="n">utf8_general_ci</span><span class="p">;</span>
<span class="k">GRANT</span> <span class="k">ALL</span> <span class="k">PRIVILEGES</span> <span class="k">ON</span> <span class="n">skyline</span><span class="p">.</span><span class="o">*</span> <span class="k">TO</span> <span class="s1">'skyline'</span><span class="o">@</span><span class="s1">'localhost'</span> <span class="n">IDENTIFIED</span> <span class="k">BY</span> <span class="s1">'SKYLINE_DBPASS'</span><span class="p">;</span>
<span class="k">GRANT</span> <span class="k">ALL</span> <span class="k">PRIVILEGES</span> <span class="k">ON</span> <span class="n">skyline</span><span class="p">.</span><span class="o">*</span> <span class="k">TO</span> <span class="s1">'skyline'</span><span class="o">@</span><span class="s1">'%'</span> <span class="n">IDENTIFIED</span> <span class="k">BY</span> <span class="s1">'SKYLINE_DBPASS'</span><span class="p">;</span>
</code></pre></div></div>

<p><strong>On the controller</strong> create an OpenStack user</p>

<div class="language-bash highlighter-rouge"><div class="highlight"><pre class="highlight"><code>openstack user create <span class="nt">--domain</span> default <span class="nt">--password-prompt</span> skyline
openstack role add <span class="nt">--project</span> service <span class="nt">--user</span> skyline admin
</code></pre></div></div>

<p><strong>Resume on dashboard host</strong></p>

<p>Install Docker:</p>
<div class="language-bash highlighter-rouge"><div class="highlight"><pre class="highlight"><code>apt <span class="nb">install </span>apt-transport-https ca-certificates curl software-properties-common
curl <span class="nt">-fsSL</span> https://download.docker.com/linux/ubuntu/gpg | <span class="nb">sudo </span>gpg <span class="nt">--dearmor</span> <span class="nt">-o</span> /usr/share/keyrings/docker-archive-keyring.gpg

<span class="nb">echo</span> <span class="s2">"deb [arch=</span><span class="si">$(</span>dpkg <span class="nt">--print-architecture</span><span class="si">)</span><span class="s2"> signed-by=/usr/share/keyrings/docker-archive-keyring.gpg] https://download.docker.com/linux/ubuntu </span><span class="si">$(</span>lsb_release <span class="nt">-cs</span><span class="si">)</span><span class="s2"> stable"</span> | <span class="nb">sudo tee</span> /etc/apt/sources.list.d/docker.list <span class="o">&gt;</span> /dev/null

apt update
apt-cache policy docker-ce

apt <span class="nb">install </span>docker-ce
systemctl restart docker
systemctl status docker
</code></pre></div></div>

<p>Skyline install and configure Skyline</p>
<ul>
  <li><strong>NOTE:</strong> If you are not using FQDNs then use the IP address in the keystone URL because it doesn’t like non-FQDNs for some reason??</li>
</ul>

<div class="language-bash highlighter-rouge"><div class="highlight"><pre class="highlight"><code>docker pull 99cloud/skyline:latest

<span class="nb">mkdir</span> <span class="nt">-p</span> /etc/skyline /var/log/skyline /var/lib/skyline /var/log/nginx
</code></pre></div></div>

<p>Edit /etc/skyline/skyline.yaml:</p>

<div class="language-yml highlighter-rouge"><div class="highlight"><pre class="highlight"><code><span class="na">default</span><span class="pi">:</span>
  <span class="na">database_url</span><span class="pi">:</span> <span class="s">mysql://skyline:SKYLINE_DBPASS@localhost:3306/skyline</span>
  <span class="na">debug</span><span class="pi">:</span> <span class="no">true</span>
  <span class="na">log_dir</span><span class="pi">:</span> <span class="s">/var/log</span>
<span class="na">openstack</span><span class="pi">:</span>
  <span class="na">keystone_url</span><span class="pi">:</span> <span class="s">http://osc.i.rhysmg.nz:5000/v3/</span>
  <span class="na">system_user_password</span><span class="pi">:</span> <span class="s">SKYLINE_PASS</span>
  <span class="na">default_region</span><span class="pi">:</span> <span class="s">Auckland</span>
</code></pre></div></div>

<div class="language-bash highlighter-rouge"><div class="highlight"><pre class="highlight"><code><span class="nb">chmod </span>660 /etc/skyline/skyline.yaml
</code></pre></div></div>
<p>Bootstrap Skyline</p>

<div class="language-bash highlighter-rouge"><div class="highlight"><pre class="highlight"><code>docker run <span class="nt">--name</span> skyline_bootstrap <span class="se">\</span>
  <span class="nt">-e</span> <span class="nv">KOLLA_BOOTSTRAP</span><span class="o">=</span><span class="s2">""</span> <span class="se">\</span>
  <span class="nt">-v</span> /etc/skyline/skyline.yaml:/etc/skyline/skyline.yaml <span class="se">\</span>
  <span class="nt">-v</span> /var/log:/var/log <span class="se">\</span>
  <span class="nt">--net</span><span class="o">=</span>host 99cloud/skyline:latest
</code></pre></div></div>

<p>Clean up the bootstrap</p>

<div class="language-bash highlighter-rouge"><div class="highlight"><pre class="highlight"><code>docker <span class="nb">rm</span> <span class="nt">-f</span> skyline_bootstrap
</code></pre></div></div>

<p><strong>NOTE</strong>: If you want to deploy TLS from the get-go skip to the TLS section below to start the skyline server with certificate specified. 
Start Skyline</p>

<div class="language-bash highlighter-rouge"><div class="highlight"><pre class="highlight"><code>docker run <span class="nt">-d</span> <span class="nt">--name</span> skyline <span class="nt">--restart</span><span class="o">=</span>always <span class="se">\</span>
  <span class="nt">-v</span> /etc/skyline/skyline.yaml:/etc/skyline/skyline.yaml <span class="se">\</span>
  <span class="nt">-v</span> /var/log:/var/log <span class="se">\</span>
  <span class="nt">--net</span><span class="o">=</span>host 99cloud/skyline:latest
</code></pre></div></div>
<p>Finally! A UI: http://hcui01.i.rhysmg.nz:9999/</p>

<p>But seriously, get familiar with the OpenStack CLI/API, the UI is just for fun.</p>

<h1 id="quotas">Quotas</h1>
<div class="language-bash highlighter-rouge"><div class="highlight"><pre class="highlight"><code>openstack quota show <span class="nt">--all</span>

</code></pre></div></div>

<h1 id="tlsify">TLSify</h1>
<p>I wasn’t brave enough to do https throughout or certificate-based auth for keystone. I’d like to come back and do this at some point, maybe on the next build. But let’s at least add a let’s encrypt cert for the Ceph dashboard and Skyline. A separate process will need to be developed to update these every time the cert renews.</p>

<h2 id="certbot-for-wildcard-with-cloudflare-dns-do-this-on-the-controller">Certbot for wildcard with Cloudflare DNS (Do this on the controller)</h2>
<p>Here we create a wild card certificate that can be used for web interfaces.</p>

<p>Create API token in cloudflare with DNS:Edit</p>

<div class="language-bash highlighter-rouge"><div class="highlight"><pre class="highlight"><code><span class="nb">mkdir</span> <span class="nt">-p</span> /root/sec/certbot
</code></pre></div></div>
<p>Create /root/sec/certbot/cf with <code class="language-plaintext highlighter-rouge">dns_cloudflare_api_token = my_cloudFlaretoken</code></p>

<div class="language-bash highlighter-rouge"><div class="highlight"><pre class="highlight"><code><span class="nb">chmod </span>660 <span class="nt">-R</span> /root/sec/
</code></pre></div></div>

<div class="language-bash highlighter-rouge"><div class="highlight"><pre class="highlight"><code>snap <span class="nb">install</span> <span class="nt">--classic</span> certbot
<span class="nb">ln</span> <span class="nt">-s</span> /snap/bin/certbot /usr/bin/certbot
snap <span class="nb">set </span>certbot trust-plugin-with-root<span class="o">=</span>ok
snap <span class="nb">install </span>certbot-dns-cloudflare

certbot certonly <span class="nt">--dns-cloudflare</span> <span class="nt">--dns-cloudflare-credentials</span> /root/sec/certbot/cf <span class="nt">-d</span> <span class="k">*</span>.i.rhysmg.nz <span class="nt">--key-type</span> rsa <span class="nt">--rsa-key-size</span> 2048
</code></pre></div></div>

<h2 id="tls-for-ceph-dashboard">TLS for Ceph Dashboard</h2>
<p>Do this on the controller</p>

<p><strong>Note:</strong> Ceph dashboard supports RSA certs not ED25119, which is what we created above</p>

<div class="language-bash highlighter-rouge"><div class="highlight"><pre class="highlight"><code>ceph dashboard set-ssl-certificate <span class="nt">-i</span> /etc/letsencrypt/live/i.rhysmg.nz/cert.pem
ceph dashboard set-ssl-certificate-key <span class="nt">-i</span> /etc/letsencrypt/live/i.rhysmg.nz/privkey.pem
ceph mgr module disable dashboard
ceph mgr module <span class="nb">enable </span>dashboard
ceph health
</code></pre></div></div>
<p>Revert to self-signed if something goes wrong:</p>

<div class="language-bash highlighter-rouge"><div class="highlight"><pre class="highlight"><code>ceph config-key <span class="nb">rm </span>mgr/dashboard/key
ceph config-key <span class="nb">rm </span>mgr/dashboard/crt
ceph mgr module disable dashboard
ceph mgr module <span class="nb">enable </span>dashboard
ceph dashboard create-self-signed-cert
</code></pre></div></div>
<p>Enable redirect_resolve_ip_addr so that if the active manager moves to a different host, the FQDN, rather than the IP address will be used in the redirect. - <strong>Requires reverse DNS zone or host file on each Ceph node</strong></p>

<div class="language-bash highlighter-rouge"><div class="highlight"><pre class="highlight"><code>ceph config <span class="nb">set </span>mgr mgr/dashboard/redirect_resolve_ip_addr True
</code></pre></div></div>

<h3 id="enable-tls-for-grafana-in-ceph-dash">Enable TLS for Grafana in Ceph Dash</h3>
<p>ceph config-key set mgr/cephadm/{hostname}/grafana_key -i $PWD/key.pem
ceph config-key set mgr/cephadm/{hostname}/grafana_crt -i $PWD/certificate.pem
ceph orch reconfig grafana</p>

<h2 id="tls-for-skyline-dashboard">TLS for Skyline Dashboard</h2>
<p>Make a certs directory on huci01: <code class="language-plaintext highlighter-rouge">/etc/skyline/certs/</code>
From the controller copy the let’s encrypt certificates to huci01</p>

<div class="language-bash highlighter-rouge"><div class="highlight"><pre class="highlight"><code>scp <span class="nt">-r</span> /etc/letsencrypt/live/i.rhysmg.nz/ hcui01:/etc/skyline/certs/
</code></pre></div></div>
<p>On hcui01. Stop and remove the skyline docker image and run it again with the certificate specified. We’ll also set it to run of port 443.</p>

<div class="language-bash highlighter-rouge"><div class="highlight"><pre class="highlight"><code>docker ps <span class="nt">--all</span>
docker stop 6f3c7937455d bash
docker <span class="nb">rm </span>6f3c7937455d bash

docker run <span class="nt">-d</span> <span class="nt">--name</span> skyline <span class="nt">--restart</span><span class="o">=</span>always <span class="nt">-e</span> <span class="nv">SSL_CERTFILE</span><span class="o">=</span>/etc/skyline/certs/i.rhysmg.nz/cert.pem <span class="nt">-e</span> <span class="nv">SSL_KEYFILE</span><span class="o">=</span>/etc/skyline/certs/i.rhysmg.nz/privkey.pem <span class="nt">-e</span> <span class="nv">LISTEN_ADDRESS</span><span class="o">=</span>0.0.0.0:443 <span class="nt">-v</span> /etc/skyline/certs/:/etc/skyline/certs/ <span class="nt">-v</span> /etc/skyline/skyline.yaml:/etc/skyline/skyline.yaml <span class="nt">-v</span> /var/log:/var/log <span class="nt">--net</span><span class="o">=</span>host 99cloud/skyline:latest  
</code></pre></div></div>

<p>In theory refreshing the cert should just be a case of copying the cert files back to that same path which we could do with a certbot hook. Later.</p>

<h2 id="simple-self-ca-certificate-authority">Simple Self CA (Certificate Authority)</h2>
<p>Credit: <a href="https://arminreiter.com/2022/01/create-your-own-certificate-authority-ca-using-openssl/">https://arminreiter.com/2022/01/create-your-own-certificate-authority-ca-using-openssl/</a></p>

<div class="language-bash highlighter-rouge"><div class="highlight"><pre class="highlight"><code><span class="nv">CANAME</span><span class="o">=</span>ca.i.rhysmg.nz
<span class="nb">mkdir</span> <span class="nv">$CANAME</span>
<span class="nb">cd</span> <span class="nv">$CANAME</span>
<span class="c"># generate aes encrypted private key</span>
openssl genrsa <span class="nt">-aes256</span> <span class="nt">-out</span> <span class="nv">$CANAME</span>.key 4096

<span class="c"># create certificate, 22 years</span>
openssl req <span class="nt">-x509</span> <span class="nt">-new</span> <span class="nt">-nodes</span> <span class="nt">-key</span> <span class="nv">$CANAME</span>.key <span class="nt">-sha256</span> <span class="nt">-days</span> 8030 <span class="nt">-out</span> <span class="nv">$CANAME</span>.crt <span class="nt">-subj</span> <span class="s1">'/CN=i.rhysmg.nz CA/C=NZ/ST=Auckland/L=Auckland/O=Fairburn'</span>

<span class="c">#Add CA certs to Ubuntu trust store - I haven't done this. </span>
<span class="nb">sudo </span>apt <span class="nb">install</span> <span class="nt">-y</span> ca-certificates
<span class="nb">sudo cp</span> <span class="nv">$CANAME</span>.crt /usr/local/share/ca-certificates
<span class="nb">sudo </span>update-ca-certificates


<span class="c"># Create wildcard cert</span>
<span class="nv">MYCERT</span><span class="o">=</span>wild.i.rhysmg.nz
openssl req <span class="nt">-new</span> <span class="nt">-nodes</span> <span class="nt">-out</span> <span class="nv">$MYCERT</span>.csr <span class="nt">-newkey</span> rsa:4096 <span class="nt">-keyout</span> <span class="nv">$MYCERT</span>.key <span class="nt">-subj</span> <span class="s1">'/CN=wild/C=NZ/ST=Auckland/L=Auckland/O=Fairburn'</span>
<span class="c"># create a v3 ext file for SAN properties</span>
<span class="nb">cat</span> <span class="o">&gt;</span> <span class="nv">$MYCERT</span>.v3.ext <span class="o">&lt;&lt;</span> <span class="no">EOF</span><span class="sh">
authorityKeyIdentifier=keyid,issuer
basicConstraints=CA:FALSE
keyUsage = digitalSignature, nonRepudiation, keyEncipherment, dataEncipherment
subjectAltName = @alt_names
[alt_names]
DNS.1 = *.i.rhysmg.nz
DNS.2 = i.rhysmg.nz
</span><span class="no">EOF

</span><span class="c">#Sign the wildcard cert with the CA cert</span>
openssl x509 <span class="nt">-req</span> <span class="nt">-in</span> <span class="nv">$MYCERT</span>.csr <span class="nt">-CA</span> <span class="nv">$CANAME</span>.crt <span class="nt">-CAkey</span> <span class="nv">$CANAME</span>.key <span class="nt">-CAcreateserial</span> <span class="nt">-out</span> <span class="nv">$MYCERT</span>.crt <span class="nt">-days</span> 4015 <span class="nt">-sha256</span> <span class="nt">-extfile</span> <span class="nv">$MYCERT</span>.v3.ext

</code></pre></div></div>

<h1 id="snippets--leftovers">Snippets &amp; Leftovers</h1>
<p>The remainder of this post is just a scratchpad of snippets, notes and experiments. Much of it is likely incorrect or missing but there might be some gems amongst the trash.</p>

<h1 id="links-to-re-visit">Links to re-visit:</h1>
<p>https://xahteiwi.eu/resources/hints-and-kinks/dos-donts-ceph-openstack/
http://www.yangguanjun.com/2015/11/17/cinder-with-multi-ceph-pools/
https://www.redhat.com/en/blog/9-tips-properly-configure-your-openstack-instance</p>

<h1 id="misc-tidy-up-tasks">Misc Tidy Up Tasks</h1>
<ul>
  <li>Check Perms/ownership of ceph keyrings</li>
  <li>Disable auto updates on all critical hosts (nodes + controller)</li>
</ul>

<p>Edit: /etc/apt/apt.conf.d/20auto-upgrades:</p>

<div class="language-conf highlighter-rouge"><div class="highlight"><pre class="highlight"><code><span class="n">APT</span>::<span class="n">Periodic</span>::<span class="n">Update</span>-<span class="n">Package</span>-<span class="n">Lists</span> <span class="s2">"0"</span>;
<span class="n">APT</span>::<span class="n">Periodic</span>::<span class="n">Unattended</span>-<span class="n">Upgrade</span> <span class="s2">"0"</span>;
</code></pre></div></div>

<h1 id="image-work">Image Work</h1>
<h3 id="properties-for-windows-images">Properties for Windows images</h3>
<p>These the properties which should be applied to a Windows image for secure boot and optimal? performance. 
<strong>NOTE:</strong> The <code class="language-plaintext highlighter-rouge">--property os_type=windows</code> below is very important for Windows performance. As is setting sockets=1 on the flavour (or the image). See: https://www.safespring.com/blogg/2022/2022-02-windows-vm-cpu-perf/</p>

<div class="language-bash highlighter-rouge"><div class="highlight"><pre class="highlight"><code><span class="nt">--property</span> <span class="nv">os_distro</span><span class="o">=</span>windows <span class="nt">--property</span> <span class="nv">os_type</span><span class="o">=</span>windows <span class="nt">--property</span> <span class="nv">os_version</span><span class="o">=</span>10 <span class="nt">--property</span> <span class="nv">hw_scsi_model</span><span class="o">=</span>virtio-scsi <span class="nt">--property</span> <span class="nv">hw_disk_bus</span><span class="o">=</span>scsi <span class="nt">--property</span> <span class="nv">hw_qemu_guest_agent</span><span class="o">=</span><span class="nb">yes</span> <span class="nt">--property</span> <span class="nv">os_require_quiesce</span><span class="o">=</span><span class="nb">yes</span> <span class="nt">--property</span> <span class="nv">hw_machine_type</span><span class="o">=</span>q35 <span class="nt">--property</span> <span class="nv">hw_firmware_type</span><span class="o">=</span>uefi <span class="nt">--property</span> <span class="nv">os_secure_boot</span><span class="o">=</span>required <span class="nt">--property</span> <span class="nv">hw_vif_multiqueue_enabled</span><span class="o">=</span><span class="nb">true</span>
</code></pre></div></div>
<h3 id="interesting-image-properties-for-linux-vms">Interesting Image properties for Linux VMS</h3>
<div class="language-bash highlighter-rouge"><div class="highlight"><pre class="highlight"><code><span class="nt">--property</span> <span class="nv">os_distro</span><span class="o">=</span>ubuntu <span class="nt">--property</span> <span class="nv">os_type</span><span class="o">=</span>linux <span class="nt">--property</span> <span class="nv">hw_vif_model</span><span class="o">=</span>virtio <span class="nt">--property</span> <span class="nv">hw_vif_multiqueue_enabled</span><span class="o">=</span><span class="nb">true</span>
</code></pre></div></div>
<h2 id="migrate-windows-hyper-v-vm-to-openstack">Migrate Windows Hyper-V VM to OpenStack</h2>
<p>There is a bunch of ways that you can approach this. This is the process I landed on after lot of trial and error.</p>

<p>Prepare the source VHDX (Clean up the disk/os as much as possible and shrink the partition) in disk manger. I leave ~2GB of free space so the OS can keep working. You might want to temporarily disable the page file while you do this, to maximize the shrink</p>

<p>Resize the VHDX with PowerShell <code class="language-plaintext highlighter-rouge">resize-vhd</code> or Hyper-V Manager</p>

<p>Copy the VHDX to one of the nodes (I’m using a secondary SSD in one of the nodes which I can thrash)</p>

<p>Convert the VHDX to raw with qemu-img:
<code class="language-plaintext highlighter-rouge">qemu-img convert -f vhdx -O raw exc10.lab.rhysgoodwin.com.vhdx exc10.lab.rhysgoodwin.com.raw</code></p>

<p>Launch a VM with the raw image file using virt-install. Note that we need to boot from a windows ISO and enter repair mode to install the virtio storage driver. Note the VNC display number (97 below), you need to be ready with your VNC client to jump straight into the console and press any key to boot from CDROM. If you miss it, you might need to destroy the VM (<code class="language-plaintext highlighter-rouge">virsh destroy exc10</code>), undefine it (<code class="language-plaintext highlighter-rouge">virsh undefine exc10 --nvram</code>), and start again.</p>

<div class="language-bash highlighter-rouge"><div class="highlight"><pre class="highlight"><code>virt-install <span class="se">\</span>
<span class="nt">--boot</span> <span class="nv">firmware</span><span class="o">=</span>efi,loader_secure<span class="o">=</span><span class="nb">yes</span>,menu<span class="o">=</span>on <span class="se">\</span>
<span class="nt">--cdrom</span> /imagework/win-2019/windows_server_2019_x64_dvd_f9475476.iso <span class="se">\</span>
<span class="nt">--features</span> vmport.state<span class="o">=</span>off,hyperv.vapic.state<span class="o">=</span>on,hyperv.spinlocks.state<span class="o">=</span>on,hyperv.spinlocks.retries<span class="o">=</span>8191,hyperv.relaxed.state<span class="o">=</span>on <span class="se">\</span>
<span class="nt">--clock</span> <span class="nv">offset</span><span class="o">=</span>localtime,hypervclock_present<span class="o">=</span><span class="nb">yes</span>,rtc_tickpolicy<span class="o">=</span>catchup,hpet_present<span class="o">=</span>no,pit_tickpolicy<span class="o">=</span>delay <span class="se">\</span>
<span class="nt">--machine</span> q35 <span class="se">\</span>
<span class="nt">--vcpus</span> <span class="nv">sockets</span><span class="o">=</span>1,cores<span class="o">=</span>2 <span class="nt">--cpu</span> host-passthrough <span class="se">\</span>
<span class="nt">--graphics</span> vnc,port<span class="o">=</span>5997,listen<span class="o">=</span>0.0.0.0 <span class="se">\</span>
<span class="nt">--sound</span> ich9 <span class="se">\</span>
<span class="nt">--video</span> qxl <span class="se">\</span>
<span class="nt">--memballoon</span> virtio <span class="se">\</span>
<span class="nt">--name</span> exc10 <span class="se">\</span>
<span class="nt">--os-variant</span> win2k19 <span class="se">\</span>
<span class="nt">--network</span> <span class="nv">network</span><span class="o">=</span>default,model<span class="o">=</span>virtio <span class="se">\</span>
<span class="nt">--ram</span> 4096 <span class="se">\</span>
<span class="nt">--controller</span><span class="o">=</span>scsi,model<span class="o">=</span>virtio-scsi <span class="se">\</span>
<span class="nt">--disk</span> <span class="nv">path</span><span class="o">=</span>/imagework/exc10/exc10.lab.rhysgoodwin.com.raw,format<span class="o">=</span>raw,device<span class="o">=</span>disk,target.bus<span class="o">=</span>virtio,driver.discard<span class="o">=</span>unmap,cache<span class="o">=</span>writeback,driver.io<span class="o">=</span>threads <span class="se">\</span>
<span class="nt">--disk</span> <span class="nv">path</span><span class="o">=</span>/imagework/virtio/virtio-win-0.1.229.iso,format<span class="o">=</span>raw,device<span class="o">=</span>cdrom,target.bus<span class="o">=</span>sata,readonly<span class="o">=</span>on
</code></pre></div></div>
<p>Once the Windows ISO boots, select language, then ‘repair your computer’, then troubleshoot, then command prompt</p>

<p>You can see the disks which are accessible using:</p>
<div class="language-plaintext highlighter-rouge"><div class="highlight"><pre class="highlight"><code>wmic logicaldisk get caption
</code></pre></div></div>

<p>One of the disks will be the virtio disk. Install the virtio storage drivers from amd64[os.ver]\ as follows:</p>
<div class="language-plaintext highlighter-rouge"><div class="highlight"><pre class="highlight"><code>E:\amd64\2k16\&gt;drvload vioscsi.inf
E:\amd64\2k16\&gt;drvload viostor.inf
</code></pre></div></div>

<p>Run: <code class="language-plaintext highlighter-rouge">wmic logicaldisk get caption</code> again and you should now see another drive letter, in my case C: this is the system disk of the source VM.</p>

<p>Use dism to insert the virtio storage drivers:</p>
<div class="language-plaintext highlighter-rouge"><div class="highlight"><pre class="highlight"><code>E:\amd64\2k16\&gt;dism /image:D:\ /add-driver /driver: vioscsi.inf
E:\amd64\2k16\&gt;dism /image:D:\ /add-driver /driver:\viostor.inf
</code></pre></div></div>

<p>Exit cmd and continue to boot. Windows should now boot and reconfigure itself for the new virtual hardware.</p>

<p>Log on to the VM and install the full virtio package from the attached disk.</p>

<p>Shutdown the VM and create an OpenStack image from the raw file</p>
<div class="language-bash highlighter-rouge"><div class="highlight"><pre class="highlight"><code>openstack image create <span class="nt">--disk-format</span> raw <span class="nt">--container-format</span> bare <span class="nt">--public</span> <span class="nt">--file</span> exc10.lab.rhysgoodwin.com.raw exc10
</code></pre></div></div>

<p>Set the properties of the image to suit Windows</p>
<div class="language-bash highlighter-rouge"><div class="highlight"><pre class="highlight"><code>openstack image <span class="nb">set</span> <span class="se">\</span>
<span class="nt">--property</span> <span class="nv">os_distro</span><span class="o">=</span>windows <span class="se">\</span>
<span class="nt">--property</span> <span class="nv">os_type</span><span class="o">=</span>windows <span class="se">\</span>
<span class="nt">--property</span> <span class="nv">os_version</span><span class="o">=</span>2019 <span class="se">\</span>
<span class="nt">--property</span> <span class="nv">hw_scsi_model</span><span class="o">=</span>virtio-scsi <span class="se">\</span>
<span class="nt">--property</span> <span class="nv">hw_disk_bus</span><span class="o">=</span>scsi <span class="se">\</span>
<span class="nt">--property</span> <span class="nv">hw_qemu_guest_agent</span><span class="o">=</span><span class="nb">yes</span> <span class="se">\</span>
<span class="nt">--property</span> <span class="nv">os_require_quiesce</span><span class="o">=</span><span class="nb">yes</span> <span class="se">\</span>
<span class="nt">--property</span> <span class="nv">hw_machine_type</span><span class="o">=</span>q35 <span class="se">\</span>
<span class="nt">--property</span> <span class="nv">hw_firmware_type</span><span class="o">=</span>uefi <span class="se">\</span>
<span class="nt">--property</span> <span class="nv">os_secure_boot</span><span class="o">=</span>required <span class="se">\</span>
<span class="nt">--property</span> <span class="nv">hw_vif_multiqueue_enabled</span><span class="o">=</span><span class="nb">true </span>exc10
</code></pre></div></div>

<p>Create the final VM from the image:
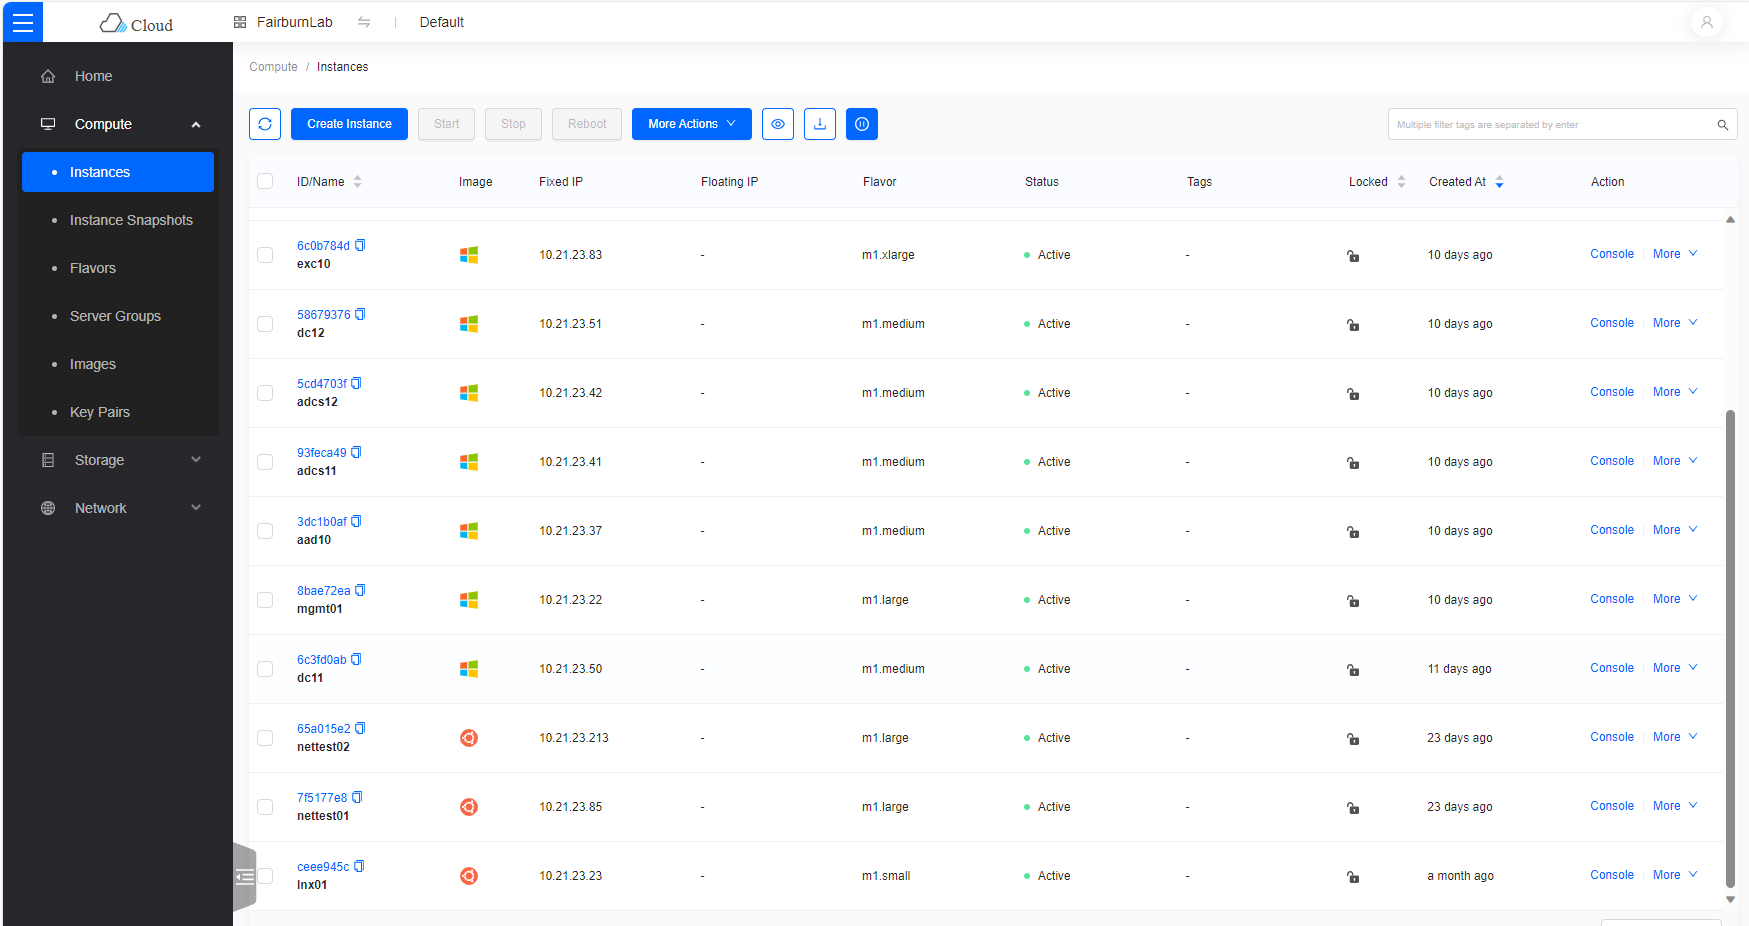
</p>
<div class="language-bash highlighter-rouge"><div class="highlight"><pre class="highlight"><code>openstack server create <span class="nt">--flavor</span> m1.xlarge <span class="nt">--image</span> exc10 <span class="nt">--nic</span> net-id<span class="o">=</span>fairburnlab,v4-fixed-ip<span class="o">=</span>10.21.23.83 <span class="nt">--security-group</span> fairburn_lab exc10
</code></pre></div></div>
<p>Log onto the server and expand the disk.</p>

<p>To migrate secondary data disks, I used the following, it seems a bit hacky, is there a better way?:</p>

<p>As above, shrink the partition, shrink the VHDX, and convert to raw.</p>

<p>Create a new OpenStack volume the same size as the raw image:</p>
<div class="language-plaintext highlighter-rouge"><div class="highlight"><pre class="highlight"><code>openstack volume create --size 468 fs10-data01
</code></pre></div></div>

<p>Copy the Ceph image from the Ceph dashboard e.g. volume-e59f564b-abaf-4b8f-95ae-851233ffcf2d then delete the Ceph image from the Ceph dashboard. Note, OpenStack still thinks the volume exists.</p>

<p>Import the raw image into Ceph with the same name using rbd:</p>
<div class="language-plaintext highlighter-rouge"><div class="highlight"><pre class="highlight"><code>rbd import data01.raw volumes/volume-e59f564b-abaf-4b8f-95ae-851233ffcf2d
</code></pre></div></div>

<p>Expand the volume as needed:</p>
<div class="language-plaintext highlighter-rouge"><div class="highlight"><pre class="highlight"><code>openstack volume set --size 600 e59f564b-abaf-4b8f-95ae-851233ffcf2d
</code></pre></div></div>

<p>Now attach the volume to the server:</p>
<div class="language-plaintext highlighter-rouge"><div class="highlight"><pre class="highlight"><code>openstack server add volume fs10 e59f564b-abaf-4b8f-95ae-851233ffcf2d
</code></pre></div></div>

<h2 id="new-windows-image-build">New Windows Image Build</h2>
<p>For Windows 10. Server 2016, 2019 etc.</p>
<ul>
  <li>On one of the hosts create a VM on a local disk using virt-install.
    <div class="language-bash highlighter-rouge"><div class="highlight"><pre class="highlight"><code>virt-install <span class="se">\</span>
<span class="nt">--boot</span> <span class="nv">firmware</span><span class="o">=</span>efi,loader_secure<span class="o">=</span><span class="nb">yes</span> <span class="se">\</span>
<span class="nt">--cdrom</span> /imagework/win-2022/windows_server_2022_x64_dvd_63dab61a.iso <span class="se">\</span>
<span class="nt">--features</span> vmport.state<span class="o">=</span>off,hyperv.vapic.state<span class="o">=</span>on,hyperv.spinlocks.state<span class="o">=</span>on,hyperv.spinlocks.retries<span class="o">=</span>8191,hyperv.relaxed.state<span class="o">=</span>on <span class="se">\</span>
<span class="nt">--clock</span> <span class="nv">offset</span><span class="o">=</span>localtime,hypervclock_present<span class="o">=</span><span class="nb">yes</span>,rtc_tickpolicy<span class="o">=</span>catchup,hpet_present<span class="o">=</span>no,pit_tickpolicy<span class="o">=</span>delay <span class="se">\</span>
<span class="nt">--machine</span> q35 <span class="se">\</span>
<span class="nt">--vcpus</span> <span class="nv">sockets</span><span class="o">=</span>1,cores<span class="o">=</span>2 <span class="nt">--cpu</span> host-model <span class="se">\</span>
<span class="nt">--graphics</span> vnc,port<span class="o">=</span>5999,listen<span class="o">=</span>0.0.0.0 <span class="se">\</span>
<span class="nt">--sound</span> ich9 <span class="se">\</span>
<span class="nt">--video</span> qxl <span class="se">\</span>
<span class="nt">--memballoon</span> virtio <span class="se">\</span>
<span class="nt">--name</span> win22-img <span class="se">\</span>
<span class="nt">--os-variant</span> win10 <span class="se">\</span>
<span class="nt">--network</span> <span class="nv">network</span><span class="o">=</span>default,model<span class="o">=</span>virtio <span class="se">\</span>
<span class="nt">--ram</span> 4096 <span class="se">\</span>
<span class="nt">--controller</span><span class="o">=</span>scsi,model<span class="o">=</span>virtio-scsi <span class="se">\</span>
<span class="nt">--disk</span> <span class="nv">path</span><span class="o">=</span>/imagework/win-2022/windows-server-2022-2023-11-14.qcow2,size<span class="o">=</span>35,device<span class="o">=</span>disk,target.bus<span class="o">=</span>virtio,driver.discard<span class="o">=</span>unmap,cache<span class="o">=</span>writeback,driver.io<span class="o">=</span>threads <span class="se">\</span>
<span class="nt">--disk</span> <span class="nv">path</span><span class="o">=</span>/imagework/virtio/virtio-win-0.1.229.iso,format<span class="o">=</span>raw,device<span class="o">=</span>cdrom,target.bus<span class="o">=</span>sata,readonly<span class="o">=</span>on
</code></pre></div>    </div>
  </li>
  <li>Connect to the VNC console (above I’m using display number 98) ‘exit’ the UEFI menu and select the DVD from the boot manger and start the Windows install.</li>
  <li>You will need to load the virtio SCSI driver from the attached virtio ISO.</li>
  <li>Complete the Windows install. For Windows 10 create the first user as ‘Admin’.
The VM might stop when it goes for it’s first reboot, restart it with <code class="language-plaintext highlighter-rouge">virsh start win10-img</code></li>
  <li>Install the full virtio package</li>
  <li>Set time zone</li>
  <li>Update Windows</li>
  <li>Set PowerShell policy to unrestricted</li>
  <li>Disable Sleep (makes the VM die, haven’t looked too far into it yet)</li>
  <li>Configure Windows firewall</li>
  <li>Enable remote desktop</li>
  <li>Install cloudbase-init:
    <ul>
      <li>Untick metadata password</li>
      <li>Username: Admin (win10) or Administrator (Win Server)</li>
      <li>run as local system</li>
      <li>no sysprep</li>
    </ul>
  </li>
  <li>Configure cloud-init (cloudbase-init-unattend.conf)
    <ul>
      <li>inject_user_password=false (Never take a clear text password from metadata, instead set a random password, encrypt with ssh pub key and post back to metadata service)</li>
      <li>allow_reboot=true (Allows cloudbase-init to reboot the system as required to complete the install)</li>
      <li>first_logon_behaviour=no (Never promt to set password at first login)</li>
    </ul>
  </li>
</ul>

<p>Setting the hostname on Windows 10/11 machines. A known issue of Windows 10/11, which causes a SetComputerName function to run during the OOBE step, that changes the computer name to DESKTOP-randomstring. As we run our cloudbase-init-unattend during specialize(which is before oobe), the hostname plugin execution becomes irrelevant. <a href="https://ask.cloudbase.it/question/1036/windows-10-hostname-not-being-set">Credit</a></p>

<p>To remedy this we will add a post-cloudbase-init script to the oobeSystem pass.</p>

<p>Edit Unattend.xml and insert the  <FirstLogonCommands> section, or the   <SynchronousCommand wcm:action="add" wcm:keyValue="1"> section if <FirstLogonCommands> already exists</FirstLogonCommands></SynchronousCommand></FirstLogonCommands></p>

<div class="language-xml highlighter-rouge"><div class="highlight"><pre class="highlight"><code>  <span class="nt">&lt;settings</span> <span class="na">pass=</span><span class="s">"oobeSystem"</span><span class="nt">&gt;</span>
    <span class="nt">&lt;component</span> <span class="na">name=</span><span class="s">"Microsoft-Windows-Shell-Setup"</span> <span class="na">processorArchitecture=</span><span class="s">"amd64"</span> <span class="na">publicKeyToken=</span><span class="s">"31bf3856ad364e35"</span> <span class="na">language=</span><span class="s">"neutral"</span> <span class="na">versionScope=</span><span class="s">"nonSxS"</span> <span class="na">xmlns:wcm=</span><span class="s">"http://schemas.microsoft.com/WMIConfig/2002/State"</span><span class="nt">&gt;</span>
      <span class="c">&lt;!-- Other settings (OOBE, etc.) can go here --&gt;</span>
 
      <span class="nt">&lt;FirstLogonCommands&gt;</span>
        <span class="nt">&lt;SynchronousCommand</span> <span class="na">wcm:action=</span><span class="s">"add"</span> <span class="na">wcm:keyValue=</span><span class="s">"1"</span><span class="nt">&gt;</span>
          <span class="c">&lt;!-- Make sure PowerShell is called with ExecutionPolicy Bypass
               so scripts can run without being blocked --&gt;</span>
          <span class="nt">&lt;CommandLine&gt;</span>powershell.exe -ExecutionPolicy Bypass -File "c:\oshci\post-cloudbase-init\post-cloudbase-init.ps1"<span class="nt">&lt;/CommandLine&gt;</span>
          <span class="nt">&lt;Description&gt;</span>Set Hostname from Metadata<span class="nt">&lt;/Description&gt;</span>
          <span class="nt">&lt;Order&gt;</span>1<span class="nt">&lt;/Order&gt;</span>
        <span class="nt">&lt;/SynchronousCommand&gt;</span>
      <span class="nt">&lt;/FirstLogonCommands&gt;</span>
 
    <span class="nt">&lt;/component&gt;</span>
  <span class="nt">&lt;/settings&gt;</span>
</code></pre></div></div>

<p>Create the post cloudbase-init powershell script c:\oshci\post-cloudbase-init\post-cloudbase-init.ps1</p>
<div class="language-powershell highlighter-rouge"><div class="highlight"><pre class="highlight"><code><span class="c"># Event source name</span><span class="w">
</span><span class="nv">$source</span><span class="w"> </span><span class="o">=</span><span class="w"> </span><span class="s2">"oshci Post-cloudbase-init"</span><span class="w">
</span><span class="c">#Create event source</span><span class="w">
</span><span class="kr">if</span><span class="p">(</span><span class="o">-not</span><span class="w"> </span><span class="p">[</span><span class="n">System.Diagnostics.EventLog</span><span class="p">]::</span><span class="n">SourceExists</span><span class="p">(</span><span class="nv">$source</span><span class="p">))</span><span class="w"> </span><span class="p">{</span><span class="w">
    </span><span class="n">New-EventLog</span><span class="w"> </span><span class="nt">-LogName</span><span class="w"> </span><span class="nx">System</span><span class="w"> </span><span class="nt">-Source</span><span class="w"> </span><span class="nv">$source</span><span class="w">
</span><span class="p">}</span><span class="w">

</span><span class="c"># Get the current Win32_ComputerSystem object</span><span class="w">
</span><span class="nv">$computer</span><span class="w"> </span><span class="o">=</span><span class="w"> </span><span class="n">Get-WmiObject</span><span class="w"> </span><span class="nx">Win32_ComputerSystem</span><span class="w">
 
</span><span class="c"># Get the hostname from metadata</span><span class="w">
</span><span class="nv">$metaHostname</span><span class="w"> </span><span class="o">=</span><span class="w"> </span><span class="p">(</span><span class="n">New-Object</span><span class="w"> </span><span class="nx">System.Net.WebClient</span><span class="p">)</span><span class="o">.</span><span class="nf">DownloadString</span><span class="p">(</span><span class="s2">"http://169.254.169.254/latest/meta-data/hostname"</span><span class="p">)</span><span class="w">
 
</span><span class="c"># Extract the short name (before the dot)</span><span class="w">
</span><span class="nv">$desiredHostName</span><span class="w"> </span><span class="o">=</span><span class="w"> </span><span class="nv">$metaHostname</span><span class="o">.</span><span class="nf">Split</span><span class="p">(</span><span class="s1">'.'</span><span class="p">)[</span><span class="mi">0</span><span class="p">]</span><span class="w">

</span><span class="c"># Check if a rename is required</span><span class="w">
</span><span class="kr">if</span><span class="p">(</span><span class="nv">$computer</span><span class="o">.</span><span class="nf">Name</span><span class="w"> </span><span class="o">-notlike</span><span class="w"> </span><span class="nv">$desiredHostName</span><span class="p">)</span><span class="w">
</span><span class="p">{</span><span class="w">

    </span><span class="n">Write-EventLog</span><span class="w"> </span><span class="nt">-LogName</span><span class="w"> </span><span class="nx">System</span><span class="w"> </span><span class="nt">-Source</span><span class="w"> </span><span class="nv">$source</span><span class="w"> </span><span class="nt">-EventId</span><span class="w"> </span><span class="nx">1122</span><span class="w"> </span><span class="nt">-EntryType</span><span class="w"> </span><span class="nx">Information</span><span class="w"> </span><span class="nt">-Message</span><span class="w"> </span><span class="s2">"Current hostname does not match metadata. System will be renamed from </span><span class="si">$(</span><span class="nv">$computer</span><span class="o">.</span><span class="nf">Name</span><span class="si">)</span><span class="s2"> to </span><span class="nv">$desiredHostName</span><span class="s2"> and rebooted."</span><span class="w">
    </span><span class="c"># Rename the computer and restart</span><span class="w">
    </span><span class="nv">$computer</span><span class="o">.</span><span class="nf">Rename</span><span class="p">(</span><span class="nv">$desiredHostName</span><span class="p">)</span><span class="w">
    </span><span class="n">Restart-Computer</span><span class="w">
</span><span class="p">}</span><span class="w">
</span><span class="kr">else</span><span class="w">
</span><span class="p">{</span><span class="w">
    </span><span class="n">Write-EventLog</span><span class="w"> </span><span class="nt">-LogName</span><span class="w"> </span><span class="nx">System</span><span class="w"> </span><span class="nt">-Source</span><span class="w"> </span><span class="nv">$source</span><span class="w"> </span><span class="nt">-EventId</span><span class="w"> </span><span class="nx">1123</span><span class="w"> </span><span class="nt">-EntryType</span><span class="w"> </span><span class="nx">Information</span><span class="w"> </span><span class="nt">-Message</span><span class="w"> </span><span class="s2">"Current hostname matches metadata. System will not be renamed."</span><span class="w">
</span><span class="p">}</span><span class="w">
</span></code></pre></div></div>

<ul>
  <li>Bitlocker
On win 11 disable before sysprep:
    <div class="language-plaintext highlighter-rouge"><div class="highlight"><pre class="highlight"><code>manage-bde -off C:
</code></pre></div>    </div>
    <p>It may take a few minutes to decrypt. You can view the status by running</p>
    <div class="language-plaintext highlighter-rouge"><div class="highlight"><pre class="highlight"><code>manage-bde -status
</code></pre></div>    </div>
    <p><a href="https://www.dell.com/community/en/conversations/image-assist/workaround-bitlocker-prevents-sysprep-on-vm-in-24h2/671aa8c40acd30163138f18b">Credit</a></p>
  </li>
  <li>Use disk part to delete the recovery part (win10/11, Server 2022, Server 2025).</li>
  <li>powercfg.exe /hibernate off</li>
  <li>defrag C: /U /V</li>
  <li>sdelete -z C:</li>
  <li>Shutdown the VM and make a pre-sysprep copy of the qcow image file in case you want to make more changes, then start the VM again with</li>
  <li>Shrink the system partition using diskmanager, leave ~2GB. If it just won’t shrink, boot from a live gparted ISO and shrink it that way.</li>
  <li>Take note of the final size of the OS partition e.g. 18GB</li>
</ul>

<div class="language-plaintext highlighter-rouge"><div class="highlight"><pre class="highlight"><code>virsh start win10-img
</code></pre></div></div>
<p>Run cmd as admin:</p>
<div class="language-plaintext highlighter-rouge"><div class="highlight"><pre class="highlight"><code>cd c:\Windows\System32\Sysprep
sysprep.exe /generalize /oobe /shutdown /unattend:C:\progra~1\cloudb~1\cloudb~1\conf\Unattend.xml
</code></pre></div></div>

<p>Once the VM shuts down after sysprep:</p>
<ul>
  <li>Convert the image to raw</li>
  <li>Shrink the raw image to the size noted above plus a bit more to be safe.</li>
  <li>Create an OpenStack image</li>
  <li>Set the image properties</li>
</ul>

<div class="language-bash highlighter-rouge"><div class="highlight"><pre class="highlight"><code>qemu-img resize <span class="nt">--shrink</span> <span class="nt">-f</span> qcow2 win10-img.qcow2 19G

qemu-img convert <span class="nt">-f</span> qcow2 <span class="nt">-O</span> raw win10-img.qcow2 win10-img.raw

openstack image create <span class="nt">--disk-format</span> raw <span class="nt">--container-format</span> bare <span class="nt">--public</span> <span class="nt">--file</span> win10-img.raw win10-2023-08-21
openstack image <span class="nb">set</span> <span class="nt">--property</span> <span class="nv">os_distro</span><span class="o">=</span>windows <span class="nt">--property</span> <span class="nv">os_type</span><span class="o">=</span>windows <span class="nt">--property</span> <span class="nv">os_version</span><span class="o">=</span>10 <span class="nt">--property</span> <span class="nv">hw_scsi_model</span><span class="o">=</span>virtio-scsi <span class="nt">--property</span> <span class="nv">hw_disk_bus</span><span class="o">=</span>scsi <span class="nt">--property</span> <span class="nv">hw_qemu_guest_agent</span><span class="o">=</span><span class="nb">yes</span> <span class="nt">--property</span> <span class="nv">os_require_quiesce</span><span class="o">=</span><span class="nb">yes</span> <span class="nt">--property</span> <span class="nv">hw_machine_type</span><span class="o">=</span>q35 <span class="nt">--property</span> <span class="nv">hw_firmware_type</span><span class="o">=</span>uefi <span class="nt">--property</span> <span class="nv">os_secure_boot</span><span class="o">=</span>required <span class="nt">--property</span> <span class="nv">hw_vif_multiqueue_enabled</span><span class="o">=</span><span class="nb">true
</span>win10-2023-08-21 
</code></pre></div></div>

<h2 id="temp-attach-an-iso-to-an-existing-vm-for-troubleshooting">Temp attach an ISO to an existing VM for troubleshooting</h2>
<ul>
  <li>Migrate the VM to the host where the iso is</li>
  <li>Get the KVM instance name with <code class="language-plaintext highlighter-rouge">openstack server show</code></li>
  <li>Attache the ISO <code class="language-plaintext highlighter-rouge">virsh attach-disk instance-0000008f /imagework/ubuntu-22.04.3-live-server-amd64.iso hdc --type cdrom --config</code></li>
  <li>Edit the instnace and set boot to cdrom: <code class="language-plaintext highlighter-rouge">virsh edit instance-0000008f</code>
    <os>
  <type arch="x86_64" machine="pc-i440fx-6.2">hvm</type>
  <boot dev="cdrom" />
  <boot dev="hd" />
  <smbios mode="sysinfo" />
</os>
  </li>
  <li>Shutdown the instance <code class="language-plaintext highlighter-rouge">virsh shutdown instance-0000008f</code></li>
  <li>Start the instnace <code class="language-plaintext highlighter-rouge">virsh start instance-0000008f</code></li>
  <li>Get the the VNC display and connect <code class="language-plaintext highlighter-rouge">virsh vncdisplay instance-0000008f</code></li>
</ul>

<h2 id="sophos-xg-firewall-build">Sophos XG Firewall Build</h2>
<p>I use a Sophos XG VM as my main firewall and I run it outside of OpenStack.</p>
<div class="language-bash highlighter-rouge"><div class="highlight"><pre class="highlight"><code>virsh vol-create-as <span class="s2">"infra-pool"</span> <span class="s2">"fwxg01"</span> <span class="nt">--capacity</span> <span class="s2">"250G"</span> <span class="nt">--format</span> raw
virt-install <span class="se">\</span>
  <span class="nt">--connect</span> qemu:///system <span class="se">\</span>
  <span class="nt">--virt-type</span> kvm <span class="se">\</span>
  <span class="nt">--machine</span> q35 <span class="se">\</span>
  <span class="nt">--name</span> <span class="s2">"fwxg01"</span> <span class="se">\</span>
  <span class="nt">--vcpus</span> <span class="nv">sockets</span><span class="o">=</span>1,cores<span class="o">=</span>4 <span class="nt">--cpu</span> host-model <span class="nt">--memory</span> <span class="s2">"6114"</span> <span class="se">\</span>
  <span class="nt">--disk</span> <span class="s2">"vol=infra-pool/fwxg01,device=disk,target.bus=virtio,driver.discard=unmap,cache=writeback"</span> <span class="se">\</span>
  <span class="nt">--noautoconsole</span> <span class="se">\</span>
  <span class="nt">--cdrom</span> <span class="s2">"/tmp/SW-19.5.1_MR-1-278.iso"</span> <span class="se">\</span>
  <span class="nt">--os-variant</span> <span class="s2">"linux2020"</span> <span class="se">\</span>
  <span class="nt">--graphics</span> vnc,listen<span class="o">=</span>0.0.0.0 <span class="se">\</span>
  <span class="nt">--network</span><span class="o">=</span>bridge:br-infra,model<span class="o">=</span>virtio,virtualport_type<span class="o">=</span>openvswitch,target.dev<span class="o">=</span>fw-infra-mgmt <span class="se">\</span>
  <span class="nt">--network</span><span class="o">=</span>bridge:br-infra,model<span class="o">=</span>virtio,virtualport_type<span class="o">=</span>openvswitch,target.dev<span class="o">=</span>fwxg01-wan,driver.name<span class="o">=</span>vhost,driver.queues<span class="o">=</span>4 <span class="se">\</span>
  <span class="nt">--network</span><span class="o">=</span>bridge:br-infra,model<span class="o">=</span>virtio,virtualport_type<span class="o">=</span>openvswitch,target.dev<span class="o">=</span>fwxg01-trunk,driver.name<span class="o">=</span>vhost,driver.queues<span class="o">=</span>4 <span class="se">\</span>
  <span class="nt">--xml</span> <span class="s1">'./devices/interface[1]/vlan/tag/@id=2040'</span> <span class="se">\</span>
  <span class="nt">--xml</span> <span class="s1">'./devices/interface[2]/vlan/tag/@id=10'</span> <span class="se">\</span>
  <span class="nt">--autostart</span>
</code></pre></div></div>

<h2 id="customize-a-cloud-image">Customize a cloud image</h2>

<p>Install the libguestfs-tools on the server whre you do your image work.</p>

<p>Mainly from: More detail here: <a href="https://gist.github.com/si458/98aa940837784e9ef9bff9e24a7a8bfd#file-virt-customize-ubuntu22">https://gist.github.com/si458/98aa940837784e9ef9bff9e24a7a8bfd#file-virt-customize-ubuntu22</a></p>

<div class="language-bash highlighter-rouge"><div class="highlight"><pre class="highlight"><code>apt <span class="nt">-y</span> <span class="nb">install </span>libguestfs-tools
virt-customize <span class="nt">-a</span> jammy-server-cloudimg-amd64.img <span class="nt">--install</span> qemu-guest-agent
virt-customize <span class="nt">-a</span> jammy-server-cloudimg-amd64.img <span class="nt">--timezone</span> Pacific/Auckland
virt-customize <span class="nt">-a</span> jammy-server-cloudimg-amd64.img <span class="nt">--run-command</span> <span class="s1">'sed -i s/^PasswordAuthentication.*/PasswordAuthentication\ yes/ /etc/ssh/sshd_config'</span>
virt-customize <span class="nt">-a</span> jammy-server-cloudimg-amd64.img <span class="nt">--root-password</span> password:MePasword


</code></pre></div></div>
<h2 id="disk-work">Disk Work</h2>
<h4 id="expand-disk-for-libvirt-infra-vms">Expand disk (For libvirt infra VMs)</h4>
<div class="language-bash highlighter-rouge"><div class="highlight"><pre class="highlight"><code>qemu-img info <span class="nt">-f</span> rbd 
qemu-img resize <span class="s2">"rbd:infra-pool/hcc01"</span> +60G

Get the name of the disk
virsh domblklist hcc01

virsh blockresize <span class="nt">--domain</span> hcc01 <span class="nt">--path</span> vda <span class="nt">--size</span> 120G
</code></pre></div></div>

<h4 id="extend-ubuntu-lvm-after-resizing-disk">Extend ubuntu lvm after resizing disk</h4>
<div class="language-bash highlighter-rouge"><div class="highlight"><pre class="highlight"><code>fdisk <span class="nt">-l</span>
growpart /dev/vda 3
pvresize /dev/vda3
lvextend <span class="nt">-l</span> +100%FREE /dev/ubuntu-vg/ubuntu-lv
resize2fs /dev/mapper/ubuntu--vg-ubuntu--lv
</code></pre></div></div>

<h4 id="extend-ubuntu-encrypted-lvm-after-resizing-disk">Extend ubuntu encrypted lvm after resizing disk</h4>
<p>Credit: <a href="https://semanticlab.net/sysadmin/encryption/How-to-resize-a-LUKS-encrypted-root-partition/">How to resize a LUKS encrypted root partion</a></p>

<div class="language-bash highlighter-rouge"><div class="highlight"><pre class="highlight"><code><span class="c">#Grow the part</span>
growpart /dev/vda 3

<span class="c"># resize the LUKS parititon (dm_crypt-0)</span>
cryptsetup resize dm_crypt-0

<span class="c"># resize the physical device on top of it</span>
pvresize /dev/mapper/dm_crypt-0

<span class="c"># resize the logical device (ubuntu--vg-ubuntu--lv)</span>
lvextend <span class="nt">-l</span> +100%FREE /dev/mapper/ubuntu--vg-ubuntu--lv

<span class="c"># grow the file system accordingly</span>
resize2fs /dev/mapper/ubuntu--vg-ubuntu--lv
</code></pre></div></div>
<p>Remember to reset the LUKS password from the default image</p>

<div class="language-bash highlighter-rouge"><div class="highlight"><pre class="highlight"><code>cryptsetup luksAddKey /dev/vda3
<span class="c"># Reboot and test new key, then remove the old key</span>
cryptsetup luksRemoveKey /dev/vda3
</code></pre></div></div>

<h1 id="useful-ceph-commands">Useful Ceph Commands</h1>

<h2 id="prep-cluster-for-shutdown-of-one-or-all-hosts">Prep cluster for shutdown of one or all hosts</h2>
<p>If shutting down all hosts obviously stop all work loads running on Ceph. In my case I’d connect directly to the infra-mgmt VLAN to do this because access to the cl-mgmt interfaces is via the firewall which is stored on the cluster. If shutting down one host then the cluster will stay up.</p>

<p>Check Health:</p>

<div class="language-bash highlighter-rouge"><div class="highlight"><pre class="highlight"><code>ceph status
ceph health
</code></pre></div></div>
<p>Disable recovery</p>

<div class="language-bash highlighter-rouge"><div class="highlight"><pre class="highlight"><code>ceph osd <span class="nb">set </span>noout
ceph osd <span class="nb">set </span>nobackfill
ceph osd <span class="nb">set </span>norecover
</code></pre></div></div>
<p>Resume normal operation</p>

<div class="language-bash highlighter-rouge"><div class="highlight"><pre class="highlight"><code>ceph osd <span class="nb">unset </span>norecover
ceph osd <span class="nb">unset </span>nobackfill
ceph osd <span class="nb">unset </span>noout
</code></pre></div></div>

<h3 id="crashes--health">Crashes &amp; Health</h3>

<div class="language-bash highlighter-rouge"><div class="highlight"><pre class="highlight"><code>ceph health detail 

ceph crash <span class="nb">ls
</span>ceph crash info 2023-08-15T08:50:29.609422Z_bbdd35e2-4567-47be-bc19-8a0686a1b886
ceph crash archive-all
</code></pre></div></div>

<p>If a host is marked as offline when really it isn’t:</p>

<div class="language-bash highlighter-rouge"><div class="highlight"><pre class="highlight"><code>ceph cephadm check-host hcn03
</code></pre></div></div>

<h3 id="adding-a-new-set-of-disks">Adding a new set of disks</h3>
<p>Here are steps I took to add a new 2TB sata disk to each host</p>
<ul>
  <li>Create new sata0</li>
  <li>Create a new crush rule class and crush rule</li>
  <li>Create a new pools ‘volumes2’</li>
  <li>Assign the new crush rule to the new pool</li>
  <li>Update the capabilites for the client.cinder user</li>
</ul>

<div class="language-bash highlighter-rouge"><div class="highlight"><pre class="highlight"><code>ceph osd crush rm-device-class osd.3
ceph osd crush rm-device-class osd.4
ceph osd crush rm-device-class osd.5

ceph osd crush set-device-class sata0 osd.3
ceph osd crush set-device-class sata0 osd.4
ceph osd crush set-device-class sata0 osd.5

ceph osd crush rule create-replicated replicated_rule_sata0 default host sata0

ceph osd pool create volumes2
rbd pool init volumes2
ceph osd pool <span class="nb">set </span>volumes2 crush_rule replicated_rule_sata0

ceph auth get client.cinder

ceph auth caps client.cinder mon <span class="s1">'profile rbd'</span> osd <span class="s1">'profile rbd pool=volumes, profile rbd pool=volumes2, profile rbd pool=vms, profile rbd-read-only pool=images'</span> mgr <span class="s1">'profile rbd pool=volumes, profile rbd pool=volumes2, profile rbd pool=vms'</span>

ceph auth get client.cinder
</code></pre></div></div>

<p>Next add a new backend to Cinder
Thanks to <a href="https://www.sebastien-han.fr/blog/2013/04/25/ceph-and-cinder-multi-backend/">https://www.sebastien-han.fr/blog/2013/04/25/ceph-and-cinder-multi-backend/</a></p>

<p>Edit /etc/cinder/cinder.conf:</p>

<div class="language-ini highlighter-rouge"><div class="highlight"><pre class="highlight"><code><span class="py">enabled_backends</span> <span class="p">=</span> <span class="s">ceph-nvme0,ceph-sata0</span>
<span class="c">#....
</span>
<span class="nn">[ceph-sata0]</span>
<span class="py">volume_driver</span> <span class="p">=</span> <span class="s">cinder.volume.drivers.rbd.RBDDriver</span>
<span class="py">volume_backend_name</span> <span class="p">=</span> <span class="s">ceph-sata0</span>
<span class="py">rbd_pool</span> <span class="p">=</span> <span class="s">volumes2</span>
<span class="py">rbd_ceph_conf</span> <span class="p">=</span> <span class="s">/etc/ceph/ceph.conf</span>
<span class="py">rbd_flatten_volume_from_snapshot</span> <span class="p">=</span> <span class="s">false</span>
<span class="py">rbd_max_clone_depth</span> <span class="p">=</span> <span class="s">5</span>
<span class="py">rbd_store_chunk_size</span> <span class="p">=</span> <span class="s">4</span>
<span class="py">rados_connect_timeout</span> <span class="p">=</span> <span class="s">-1</span>
<span class="py">rbd_user</span> <span class="p">=</span> <span class="s">cinder</span>
<span class="py">rbd_secret_uuid</span> <span class="p">=</span> <span class="s">327a788a-3daa-11ee-9092-0d04acbcec26</span>

</code></pre></div></div>

<div class="language-bash highlighter-rouge"><div class="highlight"><pre class="highlight"><code>cinder type-create nvme0
cinder type-key nvme0 <span class="nb">set </span><span class="nv">volume_backend_name</span><span class="o">=</span>ceph-nvme0

cinder type-create sata0
cinder type-key sata0 <span class="nb">set </span><span class="nv">volume_backend_name</span><span class="o">=</span>ceph-sata0

cinder extra-specs-list

systemctl restart cinder-scheduler.service
systemctl restart cinder-volume.service

</code></pre></div></div>
<p>Now you should be able to create volumes with the two types instead of the default type</p>

<h2 id="windows-vm-crash-issue">Windows VM Crash issue</h2>
<p>I’ve had a couple of Windows VMs crash. Testing this solution. 
<a href="https://bugs.launchpad.net/ubuntu/+source/linux/+bug/2015455">https://bugs.launchpad.net/ubuntu/+source/linux/+bug/2015455</a></p>

<div class="language-bash highlighter-rouge"><div class="highlight"><pre class="highlight"><code><span class="nb">cat</span> /sys/module/kvm/parameters/tdp_mmu
<span class="nb">echo</span> <span class="s2">"options kvm tdp_mmu=N"</span> <span class="o">&gt;</span>/etc/modprobe.d/kvm-disable-tdp-mmu.conf
<span class="nb">cat</span> /sys/module/kvm/parameters/tdp_mmu
</code></pre></div></div>

<p>Then reboot.</p>

<h1 id="monitoring-server-build">Monitoring server build</h1>
<ul>
  <li>Create server mon01 in home servers project, ssh and set passwd for user ubuntu</li>
  <li>Add cl-mgm interface, remove home-servers interface</li>
  <li>Console to server and disable cloud init
    <div class="language-plaintext highlighter-rouge"><div class="highlight"><pre class="highlight"><code>touch /etc/cloud/cloud-init.disabled
</code></pre></div>    </div>
  </li>
  <li>Configure netplan</li>
  <li>Install chrony and point hcn01</li>
  <li>update</li>
</ul>

<div class="language-bash highlighter-rouge"><div class="highlight"><pre class="highlight"><code>apt update
apt upgrade
</code></pre></div></div>

<h3 id="install-grafana">Install grafana</h3>
<p>Credit: <a href="https://www.digitalocean.com/community/tutorials/how-to-install-and-secure-grafana-on-ubuntu-22-04">https://www.digitalocean.com/community/tutorials/how-to-install-and-secure-grafana-on-ubuntu-22-04</a></p>

<div class="language-bash highlighter-rouge"><div class="highlight"><pre class="highlight"><code>wget <span class="nt">-q</span> <span class="nt">-O</span> - https://packages.grafana.com/gpg.key | gpg <span class="nt">--dearmor</span> | <span class="nb">sudo tee</span> /usr/share/keyrings/grafana.gpg <span class="o">&gt;</span> /dev/null
<span class="nb">echo</span> <span class="s2">"deb [signed-by=/usr/share/keyrings/grafana.gpg] https://packages.grafana.com/oss/deb stable main"</span> | <span class="nb">sudo tee</span> <span class="nt">-a</span> /etc/apt/sources.list.d/grafana.list
apt update
apt <span class="nb">install </span>grafana
</code></pre></div></div>

<p>Configure Grafana</p>
<div class="language-ini highlighter-rouge"><div class="highlight"><pre class="highlight"><code><span class="nn">[server]</span>
<span class="py">protocol</span> <span class="p">=</span> <span class="s">https</span>
<span class="py">http_port</span> <span class="p">=</span> <span class="s">3000</span>
<span class="py">domain</span> <span class="p">=</span> <span class="s">mon.i.rhysmg.nz</span>
<span class="py">cert_file</span> <span class="p">=</span> <span class="s">/etc/grafana/certs/wild.i.rhysmg.nz.crt</span>
<span class="py">cert_key</span> <span class="p">=</span> <span class="s">/etc/grafana/certs/wild.i.rhysmg.nz.key</span>
</code></pre></div></div>

<p>Start and enable Grafana service</p>
<div class="language-bash highlighter-rouge"><div class="highlight"><pre class="highlight"><code>systemctl start grafana-server
systemctl status grafana-server
systemctl <span class="nb">enable </span>grafana-server
</code></pre></div></div>

<h3 id="install-prometheus-server">Install Prometheus Server</h3>

<div class="language-bash highlighter-rouge"><div class="highlight"><pre class="highlight"><code>wget https://github.com/prometheus/prometheus/releases/download/v2.47.2/prometheus-2.47.2.linux-amd64.tar.gz
groupadd <span class="nt">--system</span> prometheus
useradd <span class="nt">-s</span> /sbin/nologin <span class="nt">--system</span> <span class="nt">-g</span> prometheus prometheus
<span class="nb">mkdir</span> /etc/prometheus
<span class="nb">mkdir</span> /var/lib/prometheus
<span class="nb">tar </span>vxf prometheus<span class="k">*</span>.tar.gz
<span class="nb">cd </span>prometheus<span class="k">*</span>/
<span class="nb">mv </span>prometheus /usr/local/bin
<span class="nb">mv </span>promtool /usr/local/bin
<span class="nb">chown </span>prometheus:prometheus /usr/local/bin/prometheus
<span class="nb">chown </span>prometheus:prometheus /usr/local/bin/promtool
<span class="nb">mv </span>consoles /etc/prometheus
<span class="nb">mv </span>console_libraries /etc/prometheus
<span class="nb">mv </span>prometheus.yml /etc/prometheus
<span class="nb">chown </span>prometheus:prometheus /etc/prometheus
<span class="nb">chown</span> <span class="nt">-R</span> prometheus:prometheus /etc/prometheus/consoles
<span class="nb">chown</span> <span class="nt">-R</span> prometheus:prometheus /etc/prometheus/console_libraries
<span class="nb">chown</span> <span class="nt">-R</span> prometheus:prometheus /var/lib/prometheus
</code></pre></div></div>

<p>Create service unit at /etc/systemd/system/prometheus.service</p>
<div class="language-ini highlighter-rouge"><div class="highlight"><pre class="highlight"><code><span class="nn">[Unit]</span>
<span class="py">Description</span><span class="p">=</span><span class="s">Prometheus</span>
<span class="py">Wants</span><span class="p">=</span><span class="s">network-online.target</span>
<span class="py">After</span><span class="p">=</span><span class="s">network-online.target</span>

<span class="nn">[Service]</span>
<span class="py">User</span><span class="p">=</span><span class="s">prometheus</span>
<span class="py">Group</span><span class="p">=</span><span class="s">prometheus</span>
<span class="py">Type</span><span class="p">=</span><span class="s">simple</span>
<span class="py">ExecStart</span><span class="p">=</span><span class="s">/usr/local/bin/prometheus </span><span class="se">\
</span>    <span class="s">--config.file /etc/prometheus/prometheus.yml </span><span class="se">\
</span>    <span class="s">--storage.tsdb.path /var/lib/prometheus/ </span><span class="se">\
</span>    <span class="s">--web.console.templates=/etc/prometheus/consoles </span><span class="se">\
</span>    <span class="s">--web.console.libraries=/etc/prometheus/console_libraries</span>

<span class="nn">[Install]</span>
<span class="py">WantedBy</span><span class="p">=</span><span class="s">multi-user.target</span>
</code></pre></div></div>

<p>Enable and start service</p>

<div class="language-bash highlighter-rouge"><div class="highlight"><pre class="highlight"><code>systemctl daemon-reload
systemctl <span class="nb">enable </span>prometheus
systemctl start prometheus
</code></pre></div></div>

<h3 id="install-prometheus-node-exporter-on-other-hosts-to-be-monitored">Install Prometheus Node Exporter (On other hosts to be monitored)</h3>
<div class="language-bash highlighter-rouge"><div class="highlight"><pre class="highlight"><code>wget https://github.com/prometheus/node_exporter/releases/download/v1.6.1/node_exporter-1.6.1.linux-amd64.tar.gz
<span class="nb">tar </span>vxf node_exporter<span class="k">*</span>.tar.gz
<span class="nb">cd </span>node_exporter<span class="k">*</span>/
<span class="nb">mv </span>node_exporter /usr/local/bin
groupadd <span class="nt">--system</span> node_exporter
useradd <span class="nt">-s</span> /sbin/nologin <span class="nt">--system</span> <span class="nt">-g</span> node_exporter node_exporter
</code></pre></div></div>

<p>Create service unit at /etc/systemd/system/node_exporter.service</p>
<div class="language-ini highlighter-rouge"><div class="highlight"><pre class="highlight"><code><span class="nn">[Unit]</span>
<span class="py">Description</span><span class="p">=</span><span class="s">Node Exporter</span>
<span class="py">After</span><span class="p">=</span><span class="s">network.target</span>

<span class="nn">[Service]</span>
<span class="py">User</span><span class="p">=</span><span class="s">node_exporter</span>
<span class="py">Group</span><span class="p">=</span><span class="s">node_exporter</span>
<span class="py">Type</span><span class="p">=</span><span class="s">simple</span>
<span class="py">ExecStart</span><span class="p">=</span><span class="s">/usr/local/bin/node_exporter</span>

<span class="nn">[Install]</span>
<span class="py">WantedBy</span><span class="p">=</span><span class="s">multi-user.target</span>
</code></pre></div></div>

<p>Enable and start service</p>
<div class="language-bash highlighter-rouge"><div class="highlight"><pre class="highlight"><code>systemctl daemon-reload
systemctl <span class="nb">enable </span>node_exporter
systemctl start node_exporter
systemctl status node_exporter
</code></pre></div></div>

<h4 id="blackbox-exporter">Blackbox exporter</h4>
<p>TBC</p>
<h4 id="install-node-exporter-on-mon01">Install node exporter on mon01</h4>
<div class="language-bash highlighter-rouge"><div class="highlight"><pre class="highlight"><code>wget https://github.com/prometheus/blackbox_exporter/releases/download/v0.25.0/blackbox_exporter-0.25.0.linux-amd64.tar.gz
<span class="nb">tar</span> <span class="nt">-xzf</span> blackbox_exporter-0.25.0.linux-amd64.tar.gz
<span class="nb">mv </span>blackbox_exporter-0.25.0.linux-amd64/blackbox_exporter /usr/local/bin

<span class="nb">mkdir</span> /etc/blackbox_exporter
wget https://raw.githubusercontent.com/prometheus/blackbox_exporter/master/example.yml
<span class="nb">mv </span>blackbox_exporter-0.25.0.linux-amd64/blackbox.yml /etc/blackbox_exporter/

vi /etc/systemd/system/blackbox_exporter.service
</code></pre></div></div>
<div class="language-ini highlighter-rouge"><div class="highlight"><pre class="highlight"><code><span class="nn">[Unit]</span>
<span class="py">Description</span><span class="p">=</span><span class="s">Prometheus Blackbox Exporter</span>
<span class="py">Wants</span><span class="p">=</span><span class="s">network-online.target</span>
<span class="py">After</span><span class="p">=</span><span class="s">network-online.target</span>

<span class="nn">[Service]</span>
<span class="py">Type</span><span class="p">=</span><span class="s">simple</span>
<span class="py">ExecStart</span><span class="p">=</span><span class="s">/usr/local/bin/blackbox_exporter --config.file=/etc/blackbox_exporter/blackbox.yml</span>

<span class="nn">[Install]</span>
<span class="py">WantedBy</span><span class="p">=</span><span class="s">multi-user.target</span>

</code></pre></div></div>

<div class="language-bash highlighter-rouge"><div class="highlight"><pre class="highlight"><code>systemctl daemon-reload
systemctl <span class="nb">enable </span>blackbox_exporter
systemctl start blackbox_exporter
</code></pre></div></div>

<h4 id="configure-prometheus-to-scrape-data">Configure Prometheus to scrape data</h4>
<p><code class="language-plaintext highlighter-rouge">vi /etc/prometheus/prometheus.yml</code></p>

<div class="language-yaml highlighter-rouge"><div class="highlight"><pre class="highlight"><code><span class="na">scrape_configs</span><span class="pi">:</span>
  <span class="pi">-</span> <span class="na">job_name</span><span class="pi">:</span> <span class="s1">'</span><span class="s">blackbox'</span>
    <span class="na">metrics_path</span><span class="pi">:</span> <span class="s">/probe</span>
    <span class="na">params</span><span class="pi">:</span>
      <span class="na">module</span><span class="pi">:</span> <span class="pi">[</span><span class="nv">http_2xx</span><span class="pi">]</span>  <span class="c1"># Look for a HTTP 200 response.</span>
    <span class="na">static_configs</span><span class="pi">:</span>
      <span class="pi">-</span> <span class="na">targets</span><span class="pi">:</span>
        <span class="pi">-</span> <span class="s">http://prometheus.io</span>    <span class="c1"># Target to probe with http.</span>
        <span class="pi">-</span> <span class="s">https://prometheus.io</span>   <span class="c1"># Target to probe with https.</span>
        <span class="pi">-</span> <span class="s">http://example.com:8080</span> <span class="c1"># Target to probe with http on port 8080.</span>
    <span class="na">relabel_configs</span><span class="pi">:</span>
      <span class="pi">-</span> <span class="na">source_labels</span><span class="pi">:</span> <span class="pi">[</span><span class="nv">__address__</span><span class="pi">]</span>
        <span class="na">target_label</span><span class="pi">:</span> <span class="s">__param_target</span>
      <span class="pi">-</span> <span class="na">source_labels</span><span class="pi">:</span> <span class="pi">[</span><span class="nv">__param_target</span><span class="pi">]</span>
        <span class="na">target_label</span><span class="pi">:</span> <span class="s">instance</span>
      <span class="pi">-</span> <span class="na">target_label</span><span class="pi">:</span> <span class="s">__address__</span>
        <span class="na">replacement</span><span class="pi">:</span> <span class="s">mon01.i.rhysmg.nz:9115</span>  <span class="c1"># The blackbox exporter's real hostname:port.</span>
  <span class="pi">-</span> <span class="na">job_name</span><span class="pi">:</span> <span class="s1">'</span><span class="s">blackbox_exporter'</span>  <span class="c1"># collect blackbox exporter's operational metrics.</span>
    <span class="na">static_configs</span><span class="pi">:</span>
      <span class="pi">-</span> <span class="na">targets</span><span class="pi">:</span> <span class="pi">[</span><span class="s1">'</span><span class="s">127.0.0.1:9115'</span><span class="pi">]</span>

</code></pre></div></div>

<h4 id="install-alertmanager">Install alertmanager</h4>
<div class="language-bash highlighter-rouge"><div class="highlight"><pre class="highlight"><code>wget https://github.com/prometheus/alertmanager/releases/download/v0.27.0/alertmanager-0.27.0.linux-amd64.tar.gz
<span class="nb">tar</span> <span class="nt">-zxf</span> alertmanager-0.27.0.linux-amd64.tar.gz
<span class="nb">cd </span>alertmanager-0.27.0.linux-amd64
<span class="nb">sudo mv </span>alertmanager /usr/local/bin/
<span class="nb">sudo mv </span>amtool /usr/local/bin/
<span class="nb">mkdir</span> /etc/alertmanager/
vi 
vi /etc/alertmanager/alertmanager.yml
</code></pre></div></div>

<div class="language-yaml highlighter-rouge"><div class="highlight"><pre class="highlight"><code><span class="na">global</span><span class="pi">:</span>
  <span class="na">resolve_timeout</span><span class="pi">:</span> <span class="s">5m</span>
<span class="na">route</span><span class="pi">:</span>
  <span class="na">receiver</span><span class="pi">:</span> <span class="s1">'</span><span class="s">web.hook'</span>
<span class="na">receivers</span><span class="pi">:</span>
<span class="pi">-</span> <span class="na">name</span><span class="pi">:</span> <span class="s1">'</span><span class="s">web.hook'</span>
  <span class="na">webhook_configs</span><span class="pi">:</span>
  <span class="pi">-</span> <span class="na">url</span><span class="pi">:</span> <span class="s1">'</span><span class="s">http://localhost:5001/'</span>

</code></pre></div></div>

<div class="language-bash highlighter-rouge"><div class="highlight"><pre class="highlight"><code>vi /etc/systemd/system/alertmanager.service

</code></pre></div></div>

<div class="language-ini highlighter-rouge"><div class="highlight"><pre class="highlight"><code><span class="nn">[Unit]</span>
<span class="py">Description</span><span class="p">=</span><span class="s">Prometheus Alertmanager</span>
<span class="py">Wants</span><span class="p">=</span><span class="s">network-online.target</span>
<span class="py">After</span><span class="p">=</span><span class="s">network-online.target</span>

<span class="nn">[Service]</span>
<span class="py">Type</span><span class="p">=</span><span class="s">simple</span>
<span class="py">User</span><span class="p">=</span><span class="s">alertmanager</span>
<span class="py">Group</span><span class="p">=</span><span class="s">alertmanager</span>
<span class="py">ExecStart</span><span class="p">=</span><span class="s">/usr/local/bin/alertmanager </span><span class="se">\
</span>  <span class="s">--config.file=/etc/alertmanager/alertmanager.yml </span><span class="se">\
</span>  <span class="s">--storage.path=/var/lib/alertmanager/</span>

<span class="py">Restart</span><span class="p">=</span><span class="s">always</span>

<span class="nn">[Install]</span>
<span class="py">WantedBy</span><span class="p">=</span><span class="s">multi-user.target</span>


</code></pre></div></div>
<div class="language-bash highlighter-rouge"><div class="highlight"><pre class="highlight"><code>
useradd <span class="nt">-rs</span> /bin/false alertmanager
<span class="nb">mkdir</span> /var/lib/alertmanager
<span class="nb">chown </span>alertmanager:alertmanager /etc/alertmanager /var/lib/alertmanager

systemctl daemon-reload
systemctl <span class="nb">enable </span>alertmanager
systemctl start alertmanager

</code></pre></div></div>
<p>Revist these, they look useful:
https://samber.github.io/awesome-prometheus-alerts/rules#rule-host-and-hardware-1-13</p>

<h4 id="libvirt-exporter-on-all-hci-nodes">Libvirt Exporter (On all HCI nodes)</h4>
<p>There are vairous libvirt exports out there. The Ubuntu snap (<code class="language-plaintext highlighter-rouge">snap install prometheus-libvirt-exporter</code>) and the Ubuntu package (<code class="language-plaintext highlighter-rouge">apt install prometheus-libvirt-exporter</code>) were not so good for me. In the end I found this one to be most complete and useful:</p>

<p>https://github.com/Tinkoff/libvirt-exporter</p>

<p>And this is simply installed with docker:
https://hub.docker.com/r/alekseizakharov/libvirt-exporter</p>

<div class="language-bash highlighter-rouge"><div class="highlight"><pre class="highlight"><code>docker run <span class="nt">-p9177</span>:9177 <span class="nt">-d</span> <span class="nt">-v</span> /var/run/libvirt:/var/run/libvirt alekseizakharov/libvirt-exporter:lates
curl localhost:9177
</code></pre></div></div>
<p>Also configure the scaper job in <code class="language-plaintext highlighter-rouge">/etc/prometheus/prometheus.yml</code></p>

<h4 id="snmp-exporter">SNMP exporter</h4>
<p><strong>On mon01</strong></p>
<div class="language-bash highlighter-rouge"><div class="highlight"><pre class="highlight"><code>wget https://github.com/prometheus/snmp_exporter/releases/download/v0.25.0/snmp_exporter-0.25.0.linux-amd64.tar.gz
<span class="nb">tar</span> <span class="nt">-xzf</span> snmp_exporter-0.25.0.linux-amd64.tar.gz
<span class="nb">cd </span>snmp_exporter-0.25.0.linux-amd64
<span class="nb">cp </span>snmp_exporter /usr/local/bin/
<span class="nb">mkdir</span> /etc/snmp_exporter
<span class="nb">cp </span>snmp.yml /etc/snmp_exporter/
vi /etc/systemd/system/snmp_exporter.service
</code></pre></div></div>

<div class="language-ini highlighter-rouge"><div class="highlight"><pre class="highlight"><code><span class="nn">[Unit]</span>
<span class="py">Description</span><span class="p">=</span><span class="s">SNMP Exporter</span>
<span class="py">After</span><span class="p">=</span><span class="s">network-online.target</span>

<span class="c"># This assumes you are running snmp_exporter under the user "prometheus"
</span>
<span class="nn">[Service]</span>
<span class="py">User</span><span class="p">=</span><span class="s">prometheus</span>
<span class="py">Restart</span><span class="p">=</span><span class="s">on-failure</span>
<span class="py">ExecStart</span><span class="p">=</span><span class="s">/usr/local/bin/snmp_exporter --config.file=/etc/snmp_exporter/snmp.yml</span>

<span class="nn">[Install]</span>
<span class="py">WantedBy</span><span class="p">=</span><span class="s">multi-user.target</span>

</code></pre></div></div>

<div class="language-bash highlighter-rouge"><div class="highlight"><pre class="highlight"><code>systemctl daemon-reload
systemctl <span class="nb">enable </span>snmp_exporter
systemctl start snmp_exporter
systemctl status snmp_exporter
</code></pre></div></div>

<h1 id="resource-allocation-issue">Resource Allocation Issue</h1>
<p>I was having issues with migrating VMs and was getting this notice in /var/log/nova/nova-scheduler.log
<code class="language-plaintext highlighter-rouge">Got no allocation candidates from the Placement API. This could be due to insufficient resources or a temporary occurrence as compute nodes start up.</code></p>

<p>I found the VCPU ratio was set to 4. I have 8 cores so that only allowed up to 32 vCPUs to be allocated. This applies even if not all the VMs are powerd on. So I increased the ration to 16.</p>

<div class="language-bash highlighter-rouge"><div class="highlight"><pre class="highlight"><code>openstack resource provider list
openstack resource provider inventory list 27202a9f-e2ca-42d7-b147-f6cbb4397198
openstack resource provider inventory class <span class="nb">set </span>27202a9f-e2ca-42d7-b147-f6cbb4397198  VCPU <span class="nt">--total</span> 8 <span class="nt">--max_unit</span> 8 <span class="nt">--allocation_ratio</span> 16
openstack resource provider inventory list 27202a9f-e2ca-42d7-b147-f6cbb4397198
</code></pre></div></div>

<h1 id="duplicate-port-binding">Duplicate Port Binding</h1>
<p>Credit: <a href="https://bugs.launchpad.net/neutron/+bug/1849802/comments/7">https://bugs.launchpad.net/neutron/+bug/1849802/comments/7</a>
Live migration was failing. <code class="language-plaintext highlighter-rouge">/var/log/neutron/neutron-server.log</code> said the port already existed at the target host.</p>

<div class="language-bash highlighter-rouge"><div class="highlight"><pre class="highlight"><code>ERROR neutron.pecan_wsgi.hooks.translation oslo_db.exception.DBDuplicateEntry
default default] create failed <span class="o">(</span>client error<span class="o">)</span>: There was a conflict when trying to <span class="nb">complete </span>your request.
</code></pre></div></div>

<p><code class="language-plaintext highlighter-rouge">/var/log/nova/nova-conductor.log</code> Contains:</p>
<div class="language-bash highlighter-rouge"><div class="highlight"><pre class="highlight"><code>2024-01-05 04:12:46.063 1787 ERROR nova.network.neutron <span class="o">[</span>instance: 344f91d5-ae4d-4982-80ae-533968eaefec] neutronclient.common.exceptions.Conflict: Binding <span class="k">for </span>port 53f9aa72-ba76-44d0-aa55-a1afe4d20c66 on host hcn03 already exists.
2024-01-05 04:16:14.188 1786 ERROR nova.network.neutron <span class="o">[</span>None req-fce0a500-6cb6-4a27-bc34-aeedfaeed4da 373bfb0a19fe475c8ceffa3768b5af2a f3191ccb29cf4df7b0d2caea424cb6f1 - - default default] <span class="o">[</span>instance: 344f91d5-ae4d-4982-80ae-533968eaefec] Binding failed <span class="k">for </span>port 53f9aa72-ba76-44d0-aa55-a1afe4d20c66 and host hcn03.: neutronclient.common.exceptions.Conflict: Binding <span class="k">for </span>port 53f9aa72-ba76-44d0-aa55-a1afe4d20c66 on host hcn03 already exists.

</code></pre></div></div>
<p>And sure enough:</p>

<p><code class="language-plaintext highlighter-rouge">openstack port list --host hcn02 |grep "53f9aa72-ba76-44d0-aa55-a1afe4d20c66"</code>
and
<code class="language-plaintext highlighter-rouge">openstack port list --host hcn03 |grep "53f9aa72-ba76-44d0-aa55-a1afe4d20c66"</code>
Both show an active port. The following will remove the port binding on the target host after which migration should be possible.</p>

<div class="language-plaintext highlighter-rouge"><div class="highlight"><pre class="highlight"><code>NEUTRON_API_URL=$(openstack endpoint list --service neutron --interface public -c URL -f value)
TOKEN=$(openstack token issue -c id -f value)
curl -X DELETE -H "X-Auth-Token: $TOKEN" ${NEUTRON_API_URL}/v2.0/ports/53f9aa72-ba76-44d0-aa55-a1afe4d20c66/bindings/hcn03
</code></pre></div></div>

<h1 id="dynamic-routing">Dynamic Routing</h1>
<h2 id="on-hcc01">On HCC01</h2>
<p>apt install neutron-dynamic-routing-common neutron-bgp-dragent
Edit neutron.conf add <code class="language-plaintext highlighter-rouge">neutron_dynamic_routing.services.bgp.bgp_plugin.BgpPlugin</code>
service_plugins = router,neutron_dynamic_routing.services.bgp.bgp_plugin.BgpPlugin</p>

<p>edit bgp_dragent.ini:
[bpg]
bgp_speaker_driver = neutron_dynamic_routing.services.bgp.agent.driver.os_ken.driver.OsKenBgpDriver
bgp_router_id = 10.20.10.10</p>

<h2 id="run-the-database-upgrade">Run the database upgrade:</h2>
<div class="language-bash highlighter-rouge"><div class="highlight"><pre class="highlight"><code>su <span class="nt">-s</span> /bin/sh <span class="nt">-c</span> <span class="s2">"neutron-db-manage --config-file /etc/neutron/neutron.conf --config-file /etc/neutron/plugins/ml2/ml2_conf.ini upgrade head"</span> neutron
</code></pre></div></div>

<p>This should produce an output like this:</p>

<div class="language-bash highlighter-rouge"><div class="highlight"><pre class="highlight"><code>INFO  <span class="o">[</span>alembic.runtime.migration] Context impl MySQLImpl.
INFO  <span class="o">[</span>alembic.runtime.migration] Will assume non-transactional DDL.
  Running upgrade <span class="k">for </span>neutron ...
INFO  <span class="o">[</span>alembic.runtime.migration] Context impl MySQLImpl.
INFO  <span class="o">[</span>alembic.runtime.migration] Will assume non-transactional DDL.
  OK
INFO  <span class="o">[</span>alembic.runtime.migration] Context impl MySQLImpl.
INFO  <span class="o">[</span>alembic.runtime.migration] Will assume non-transactional DDL.
  Running upgrade <span class="k">for </span>neutron-dynamic-routing ...
INFO  <span class="o">[</span>alembic.runtime.migration] Context impl MySQLImpl.
INFO  <span class="o">[</span>alembic.runtime.migration] Will assume non-transactional DDL.
INFO  <span class="o">[</span>alembic.runtime.migration] Running upgrade  -&gt; start_neutron_dynamic_routing, start neutron-dynamic-routing chain
INFO  <span class="o">[</span>alembic.runtime.migration] Running upgrade start_neutron_dynamic_routing -&gt; 61cc795e43e8, initial
INFO  <span class="o">[</span>alembic.runtime.migration] Running upgrade 61cc795e43e8 -&gt; 4cf8bc3edb66, rename tenant to project
INFO  <span class="o">[</span>alembic.runtime.migration] Running upgrade 4cf8bc3edb66 -&gt; a589fdb5724c, change size of as number
INFO  <span class="o">[</span>alembic.runtime.migration] Running upgrade start_neutron_dynamic_routing -&gt; f399fa0f5f25, initial
  OK

</code></pre></div></div>

<div class="language-bash highlighter-rouge"><div class="highlight"><pre class="highlight"><code>openstack bgp speaker create <span class="nt">--ip-version</span> 4 <span class="nt">--local-as</span> 65511 bgpspeaker
openstack bgp speaker add network bgpspeaker lab-transit
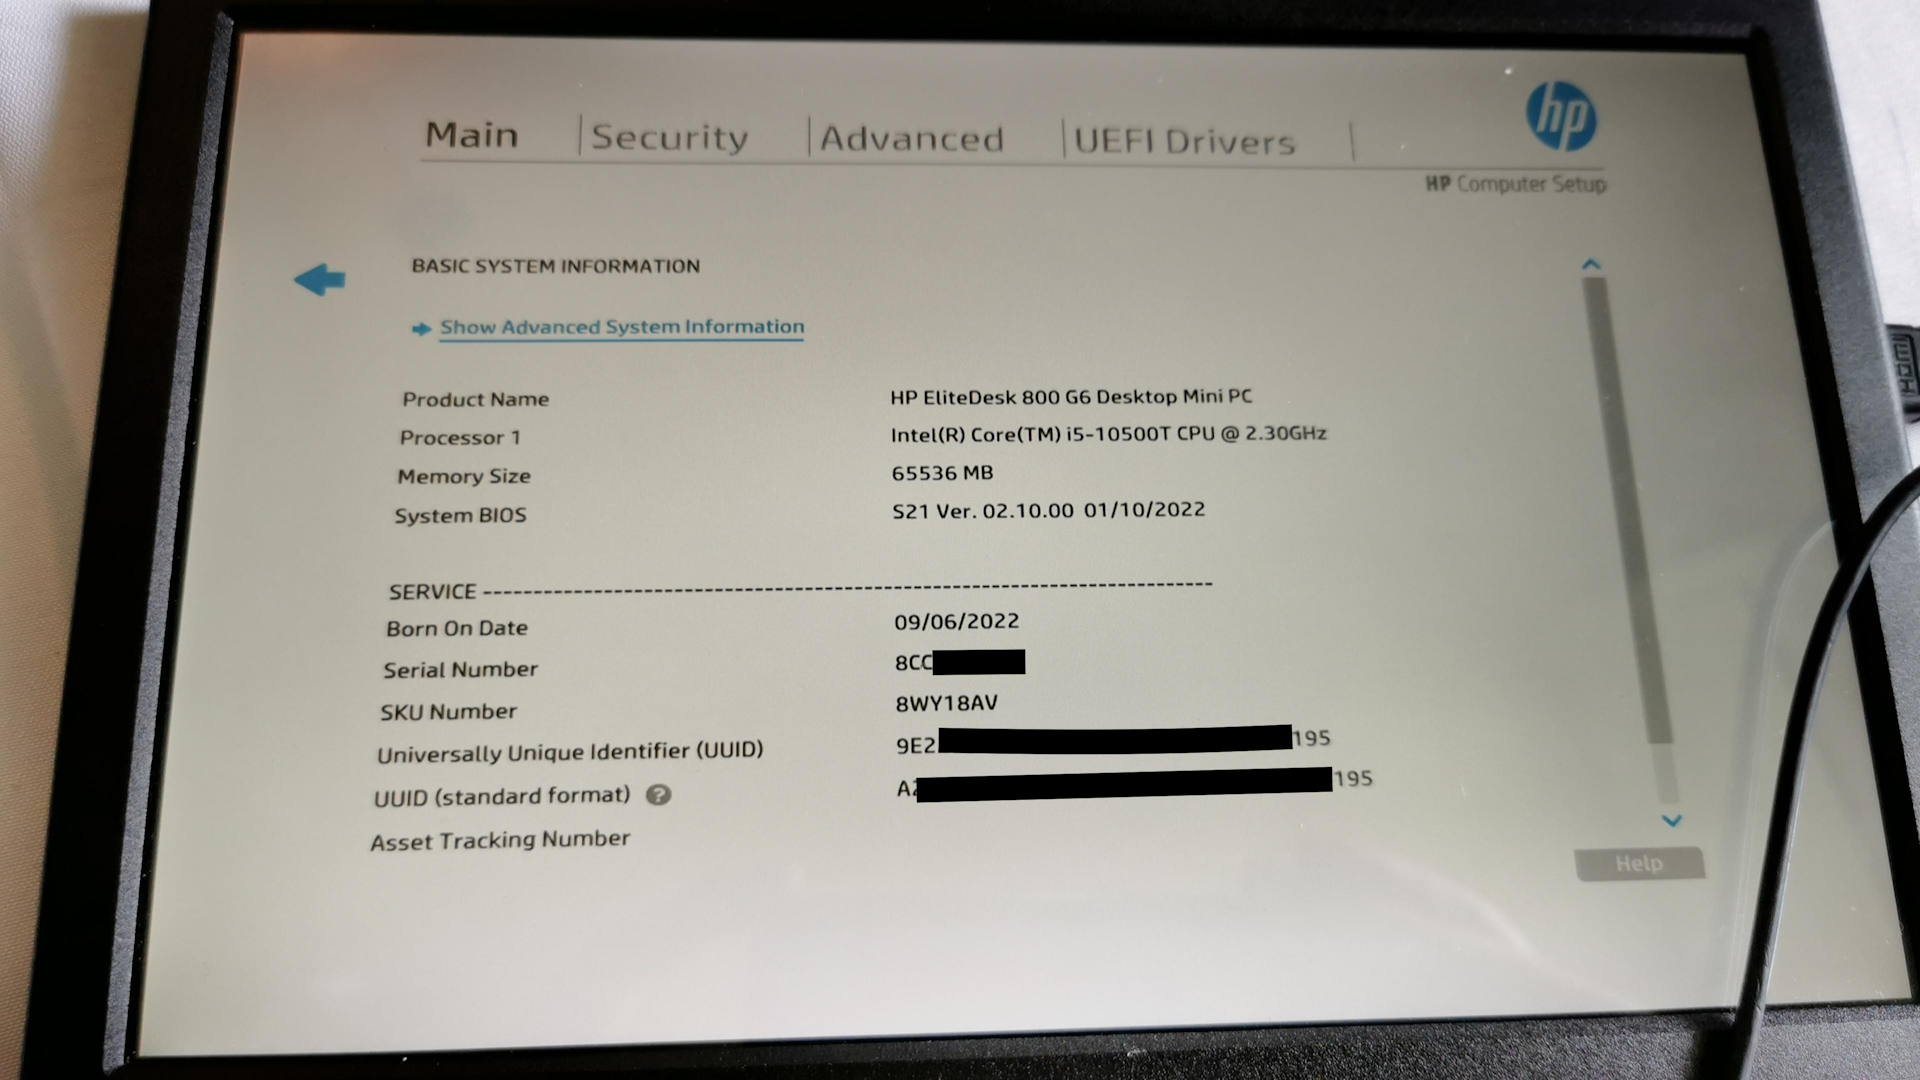
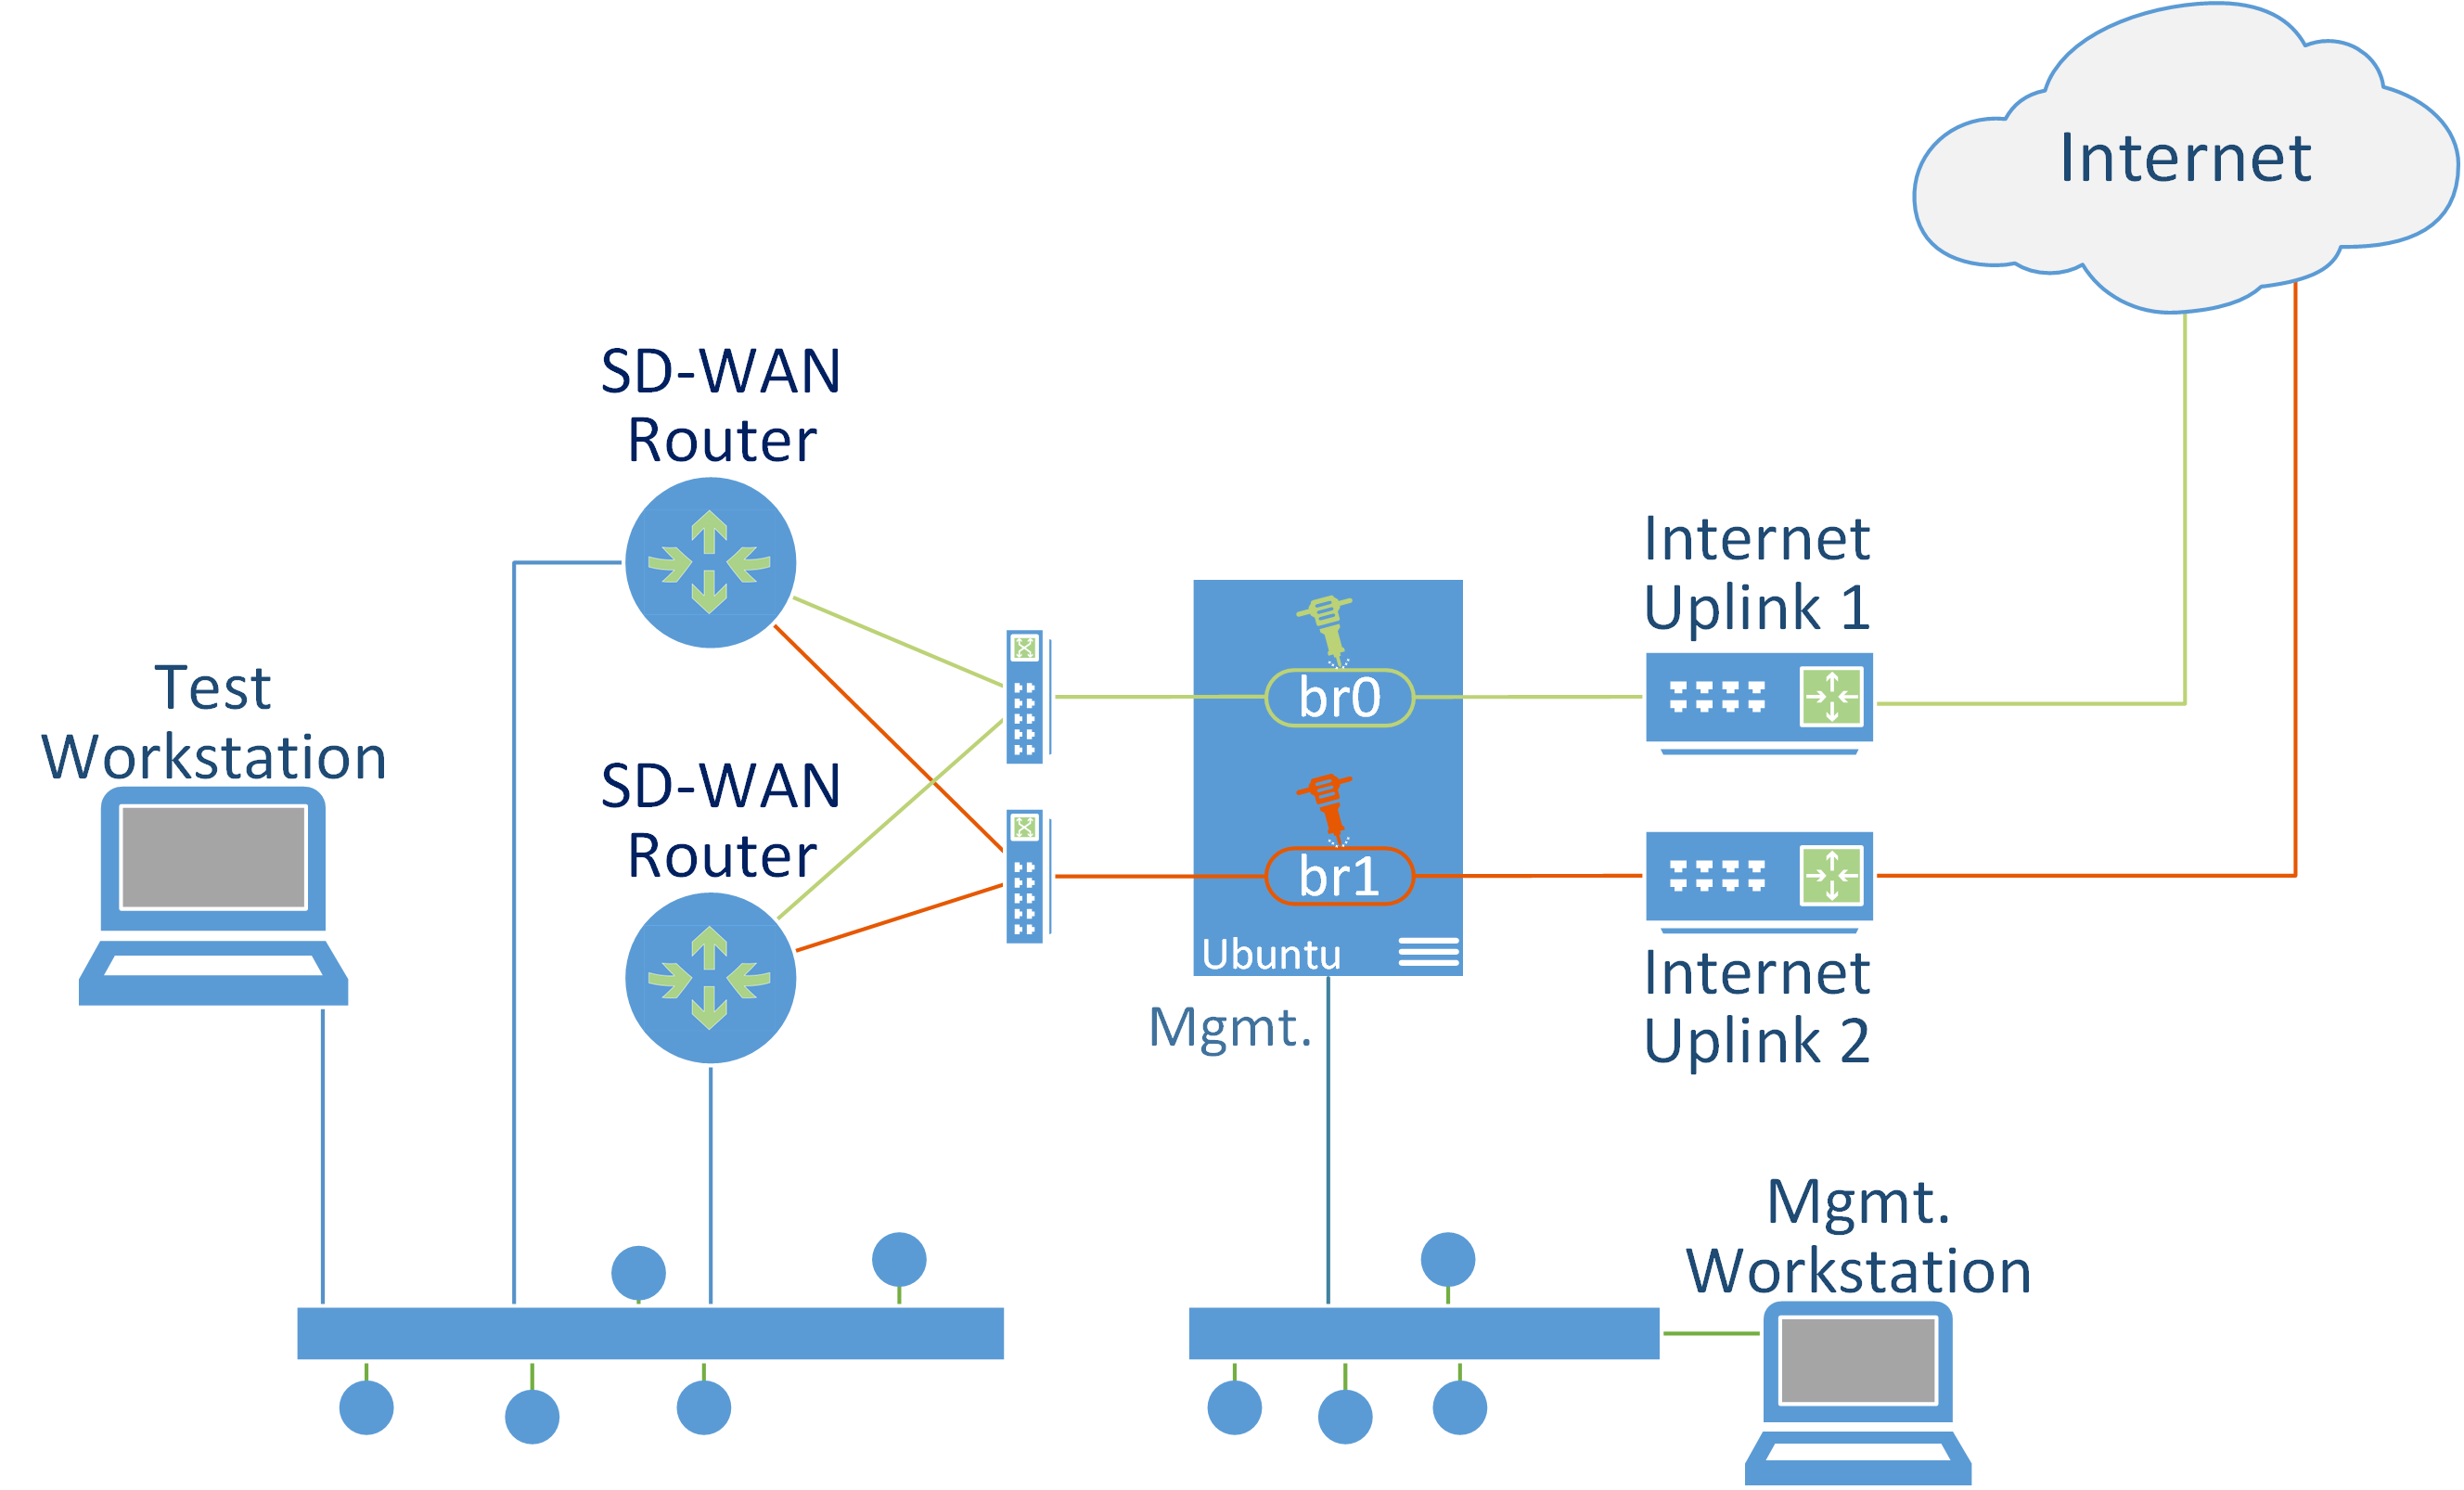
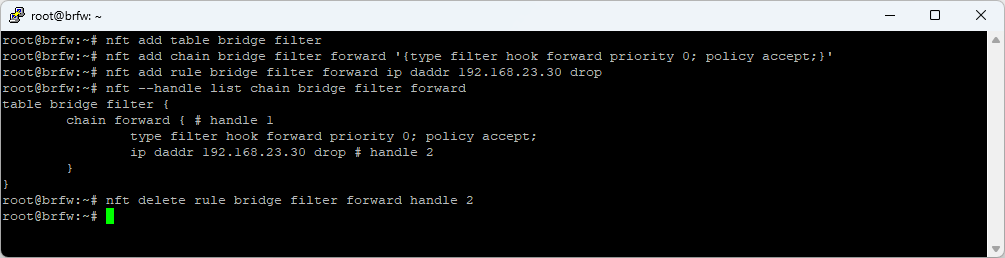
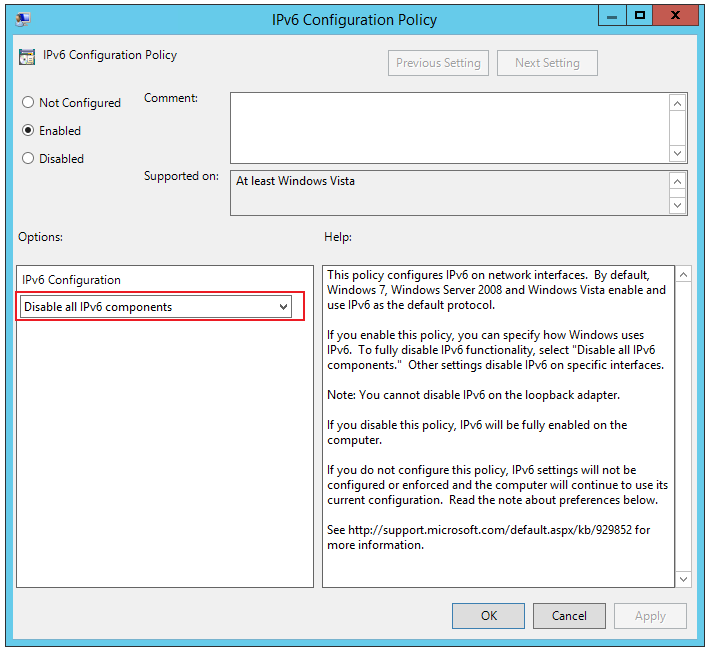
</code></pre></div></div>]]></content><author><name>Rhys Goodwin</name></author><category term="it" /><category term="openstack" /><category term="ceph" /><category term="open vswitch" /><category term="ring topology" /><category term="10G" /><summary type="html"><![CDATA[Notes from my 3-node OpenStack/Ceph cluster build for home/lab infrastructure.]]></summary></entry><entry><title type="html">Transparent Firewall and Packet Mangler for SD-WAN Testing</title><link href="https://blog.rhysgoodwin.com/it/Transparent-Firewall-and-Packet-Mangler/" rel="alternate" type="text/html" title="Transparent Firewall and Packet Mangler for SD-WAN Testing" /><published>2022-11-15T00:00:00+00:00</published><updated>2022-11-15T00:00:00+00:00</updated><id>https://blog.rhysgoodwin.com/it/Transparent-Firewall-and-Packet-Mangler-for-SD-WAN-Testing</id><content type="html" xml:base="https://blog.rhysgoodwin.com/it/Transparent-Firewall-and-Packet-Mangler/"><![CDATA[<p>Kia ora folks,</p>

<p>This is a quick recipe to build a transparent firewall and packet mangler. This can be used for things like SD-WAN testing where you place it transparently in-line between the WAN port and the uplink and use it to limit bandwidth, add latency, introduce packet loss/corruption, and block destinations.
You can also use this arrangement for packet capture.</p>

<p>You can use a server, desktop, or VM with three network interfaces running Ubuntu Server 22.04. One NIC is for management and has an IP address so I can SSH to it. The other two NICs are configured in a bridge. Or 4 NICs for two bridges. I did my testing with a Hyper-V VM. For a VM make sure MAC spoofing is allowed for the two bridge NICs.</p>

<p><a href="/content/uploads/2022/11/15/brfw-w.png"><img src="/content/uploads/2022/11/15/brfw-t.png" alt="" /></a></p>

<p>You can think of the two NICS in a bridge as an ethernet cable which connects the SD-WAN router to the internet uplink – an ethernet cable which can transparently manipulate the packets flowing through it.</p>

<p>I’m not going to go in to too much detail, just the main steps to get you going. Let me know if you have any questions and I’ll update the post as needed. The main tools we’re using are:</p>
<ul>
  <li><strong>tc</strong>: the Linux kernel traffic control utility. This is used for rate limiting and introducing packet loss etc.</li>
  <li><strong>nft</strong>: the tool for managing nftables, the modern Linux kernel packet classification framework which replaces iptables. 
Both tools are vast so I’ll just provide some basic examples which will give you a starting point, after which you should be able to implement your own requirements using the reference documentation for these tools.</li>
</ul>

<h1 id="steps">Steps</h1>
<ol>
  <li>Do a vanilla install of Ubuntu 22.04 server. The only extra component I enabled during the install is OpenSSH Server. The first network interface is given an IP address. The other two interfaces are left as DHCP for now.</li>
  <li>After the install, SSH to the box and configure the interfaces and the bridge using netplan by editing /etc/netplan/00-installer-config.yaml. You might have a static IP for your management interface. I’m using DHCP. The main point is that we’ve got two NICs with no IP configured in a bridge. Mine netplan looks like this:</li>
</ol>

<div class="language-yaml highlighter-rouge"><div class="highlight"><pre class="highlight"><code><span class="na">network</span><span class="pi">:</span>
  <span class="na">version</span><span class="pi">:</span> <span class="m">2</span>
  <span class="na">ethernets</span><span class="pi">:</span>
    <span class="na">eth0</span><span class="pi">:</span>
      <span class="na">dhcp4</span><span class="pi">:</span> <span class="no">true</span>
    <span class="na">eth1</span><span class="pi">:</span>
      <span class="na">dhcp4</span><span class="pi">:</span> <span class="no">false</span>
      <span class="na">link-local</span><span class="pi">:</span> <span class="pi">[</span> <span class="pi">]</span>
    <span class="na">eth2</span><span class="pi">:</span>
      <span class="na">dhcp4</span><span class="pi">:</span> <span class="no">false</span>
      <span class="na">link-local</span><span class="pi">:</span> <span class="pi">[</span> <span class="pi">]</span>
    <span class="na">eth3</span><span class="pi">:</span>
      <span class="na">dhcp4</span><span class="pi">:</span> <span class="no">false</span>
      <span class="na">link-local</span><span class="pi">:</span> <span class="pi">[</span> <span class="pi">]</span>
    <span class="na">eth4</span><span class="pi">:</span>
      <span class="na">dhcp4</span><span class="pi">:</span> <span class="no">false</span>
      <span class="na">link-local</span><span class="pi">:</span> <span class="pi">[</span> <span class="pi">]</span>      
  <span class="na">bridges</span><span class="pi">:</span>
    <span class="na">br0</span><span class="pi">:</span>
      <span class="na">dhcp4</span><span class="pi">:</span> <span class="no">false</span>
      <span class="na">link-local</span><span class="pi">:</span> <span class="pi">[</span> <span class="pi">]</span>
      <span class="na">interfaces</span><span class="pi">:</span>
        <span class="pi">-</span> <span class="s">eth1</span>
        <span class="pi">-</span> <span class="s">eth2</span>
    <span class="na">br1</span><span class="pi">:</span>
      <span class="na">dhcp4</span><span class="pi">:</span> <span class="no">false</span>
      <span class="na">link-local</span><span class="pi">:</span> <span class="pi">[</span> <span class="pi">]</span>
      <span class="na">interfaces</span><span class="pi">:</span>
        <span class="pi">-</span> <span class="s">eth3</span>
        <span class="pi">-</span> <span class="s">eth4</span>        
</code></pre></div></div>

<ol start="3">
  <li>Apply the config<br />
 <code class="language-plaintext highlighter-rouge">netplan apply</code></li>
</ol>

<p>Now that the basic networking is in place, confirm that things are working just as if you had a cable between the router and the uplink, then we can start messing with some packets.</p>

<h1 id="tc">tc</h1>
<p>The first thing to consider is that these <strong>tc</strong> commands only apply to egress (outgoing) packets so if you want to manipulate both directions you need to apply your configuration to both interfaces. Just remember that for round trip latency it will be double. I.e. 30ms will be 60, likewise 10% packet loss on both interfaces will be 20%.  I wrote some very basic shell scripts for different scenarios. In these examples I’m just working with br0 (eth1, eth2).</p>

<h4 id="scenario-1---rate-limit-and-latency">Scenario 1 - Rate limit and latency</h4>
<div class="language-bash highlighter-rouge"><div class="highlight"><pre class="highlight"><code><span class="c">#!/bin/bash</span>
<span class="nv">LATENCY</span><span class="o">=</span><span class="s2">"30ms"</span>
<span class="nv">RATE</span><span class="o">=</span><span class="s2">"50mbit"</span>
tc qdisc del dev eth1 root
tc qdisc del dev eth2 root
tc qdisc add dev eth1 root netem delay <span class="nv">$LATENCY</span> rate <span class="nv">$RATE</span>
tc qdisc add dev eth2 root netem delay <span class="nv">$LATENCY</span> rate <span class="nv">$RATE</span>
</code></pre></div></div>
<p>The first two lines remove any existing qdisc config then we apply latency and a rate limit.</p>

<h4 id="scenario-2---packet-loss">Scenario 2 - Packet Loss</h4>
<div class="language-bash highlighter-rouge"><div class="highlight"><pre class="highlight"><code><span class="c">#!/bin/bash</span>
<span class="nv">PACKETLOSS</span><span class="o">=</span><span class="s2">"10%"</span>
tc qdisc del dev eth1 root
tc qdisc del dev eth2 root
tc qdisc add dev eth1 root netem loss <span class="nv">$PACKETLOSS</span>
tc qdisc add dev eth2 root netem loss <span class="nv">$PACKETLOSS</span>
</code></pre></div></div>

<p>There’s a lot you can do with tc and plenty doco and articles out there. <br />
Here’s some links for tc:</p>
<ul>
  <li><a href="https://wiki.archlinux.org/title/advanced_traffic_control">https://wiki.archlinux.org/title/advanced_traffic_control</a></li>
  <li><a href="https://netbeez.net/blog/how-to-use-the-linux-traffic-control/">https://netbeez.net/blog/how-to-use-the-linux-traffic-control/</a></li>
</ul>

<h1 id="nft">nft</h1>
<p>Here we’ll implement a basic firewall with an accept policy, that is, everything will be allowed unless we block it. This is a bit different to the typical firewall which is normally also a router and controls traffic between two segments. With this config we’re firewalling traffic within the same LAN segment across the bridge.
Here are some commands to get you started:</p>
<ul>
  <li>
    <p>Add a table called ‘filter’ of family ‘bridge’<br />
<code class="language-plaintext highlighter-rouge">nft add table bridge filter</code></p>
  </li>
  <li>
    <p>Add a chain called ‘forward’ to the table which has a chain type of ‘filter’ and receives packets from the forward hook with a policy of accept. Accept is actually the default so this can be left off, but if you want to set the policy to drop and then add allow rules, this is where you would do it.<br />
<code class="language-plaintext highlighter-rouge">nft add chain bridge filter forward '{type filter hook forward priority 0; policy accept;}'</code></p>
  </li>
  <li>
    <p>Add a rule to the chain to match packets for destination 192.168.23.30 and drop them. There’s a LOT of flexibility in how you can match packets<br />
<code class="language-plaintext highlighter-rouge">nft add rule bridge filter forward ip daddr 192.168.23.30 drop</code></p>
  </li>
  <li>
    <p>List rules in the table / chain and display the handle<br />
<code class="language-plaintext highlighter-rouge">nft --handle list chain bridge filter forward</code></p>
  </li>
  <li>
    <p>Delete a rule from the chain using its handle<br />
<code class="language-plaintext highlighter-rouge">nft delete rule bridge filter forward handle 2</code></p>
  </li>
  <li>
    <p>Clear all tables, chains and rules<br />
<code class="language-plaintext highlighter-rouge">nft flush ruleset</code></p>
  </li>
  <li>
    <p>List the full rule set<br />
<code class="language-plaintext highlighter-rouge">nft list ruleset</code></p>
  </li>
</ul>

<p><a href="/content/uploads/2022/11/15/nft.png"><img src="/content/uploads/2022/11/15/nft.png" alt="" /></a></p>

<p>Here’s some links for nft:</p>
<ul>
  <li><a href="https://wiki.nftables.org/wiki-nftables/index.php/Quick_reference-nftables_in_10_minutes">https://wiki.nftables.org/wiki-nftables/index.php/Quick_reference-nftables_in_10_minutes</a></li>
  <li><a href="https://wiki.nftables.org/wiki-nftables/index.php/Bridge_filtering">https://wiki.nftables.org/wiki-nftables/index.php/Bridge_filtering</a></li>
  <li><a href="https://wiki.archlinux.org/title/nftables">https://wiki.archlinux.org/title/nftables</a></li>
</ul>

<h4 id="update">Update</h4>
<p>Here’s a great series of posts I found some time after writing this article:</p>
<ul>
  <li><a href="https://www.excentis.com/blog/use-linux-traffic-control-as-impairment-node-in-a-test-environment-part-1/">https://www.excentis.com/blog/use-linux-traffic-control-as-impairment-node-in-a-test-environment-part-1/</a></li>
  <li><a href="https://www.excentis.com/blog/use-linux-traffic-control-as-impairment-node-in-a-test-environment-part-2/">https://www.excentis.com/blog/use-linux-traffic-control-as-impairment-node-in-a-test-environment-part-2/</a></li>
  <li><a href="* https://www.excentis.com/blog/use-linux-traffic-control-as-impairment-node-in-a-test-environment-part-3/">https://www.excentis.com/blog/use-linux-traffic-control-as-impairment-node-in-a-test-environment-part-3/</a></li>
</ul>

<p>That’s it! Happy packet mangling!</p>

<p>Ngā mihi nui <br />
Rhys</p>]]></content><author><name>Rhys Goodwin</name></author><category term="it" /><category term="nftables" /><category term="linux bridge" /><category term="firewall" /><category term="traffic control" /><summary type="html"><![CDATA[A quick recipe to build a transparent firewall and packet mangler for SD-WAN testing which you can place in-line between the WAN port and the uplink. Use it to limit bandwidth, add latency, introduce packet loss/corruption, and block destinations.]]></summary></entry><entry><title type="html">Kopia Ransom Protection with AWS S3 Object Lock</title><link href="https://blog.rhysgoodwin.com/it/kopia-ransom-protection/" rel="alternate" type="text/html" title="Kopia Ransom Protection with AWS S3 Object Lock" /><published>2022-09-13T00:00:00+00:00</published><updated>2022-09-13T00:00:00+00:00</updated><id>https://blog.rhysgoodwin.com/it/kopia-with-s3-objectlock%20copy</id><content type="html" xml:base="https://blog.rhysgoodwin.com/it/kopia-ransom-protection/"><![CDATA[<p class="notice--danger">Warning: This article is a work in progress, take it with a grain of salt.</p>

<p>Kia ora folks,</p>

<p><a href="https://kopia.io//" target="_blank">Kopia</a> is an excellet open-source backup tool. It’s seldom you come across such a well architected and robust piece of software. The point of this post is to describe using Kopia in conjunction with Amazon S3 with Object Lock to protect against a ransom attack.</p>

<p>The concern is that if an attacker compromises your host, they not only encrypt your data and demand a ransom, but they also trash your backups. Where tapes can provide an air gap to protect backups, when using AWS S3 storage as a backup target it’s possible to apply a retention lock on objects (object lock) which prevents and object from being deleted or altered for a set period.</p>

<p>I’m new to Kopia, and backup is not a strong point for me so I’m hoping others in the community can provide feedback to enhance this article and approach.</p>

<p>First, we’ll see AWS S3 versioning and S3 Object Lock in action, then we’ll look at the Kopia setup and simulate an attack and recovery.</p>

<h1 id="s3-bucket-setup">S3 Bucket Setup</h1>

<p>I create my buckets and associated objects (IAM accounts etc.) using Terraform. I don’t know all the GUI steps, but basically you need:</p>
<ul>
  <li>An S3 bucket:
    <ul>
      <li>Versioning and object lock enabled these settings can only be set at bucket creation
        <ul>
          <li>Note, we are not setting a default retention rule, instead we’ll allow Kopia to set the retention period (more on that later)</li>
        </ul>
      </li>
      <li>All public access is disabled</li>
      <li>(optional) server side encryption enabled (with bucket key). Maybe overkill since Kopia encrypts the data</li>
      <li>A lifecycle rule which expires (deletes) non-current data after 30 days</li>
    </ul>
  </li>
  <li>An IAM account/key with a policy attached with limited permission just to this bucket. Permissions:
    <ul>
      <li>s3:GetObjectRetention</li>
      <li>s3:DeleteObjectVersion</li>
      <li>s3:ListBucketVersions</li>
      <li>s3:GetObjectAttributes</li>
      <li>s3:ListBucket</li>
      <li>s3:PutObjectLegalHold</li>
      <li>s3:GetObjectLegalHold</li>
      <li>s3:GetObjectVersionAttributes</li>
      <li>s3:PutObject</li>
      <li>s3:GetObject</li>
      <li>s3:PutObjectRetention</li>
      <li>s3:DeleteObject</li>
      <li>s3:GetObjectVersion</li>
    </ul>
  </li>
</ul>

<p class="notice--danger">Todo: are these permissions^ correct? Where did I get this list from?</p>

<p>You should be able to tell the settings you need from this TF file:</p>

<details>  <summary>bkp_s3.tf</summary>

<figure class="highlight"><pre><code class="language-terraform" data-lang="terraform"><span class="k">resource</span> <span class="s2">"aws_s3_bucket"</span> <span class="s2">"bkp_s3"</span> <span class="p">{</span>
  <span class="nx">bucket</span> <span class="p">=</span> <span class="s2">"my-awesome-bucket-name"</span>
  <span class="nx">object_lock_enabled</span> <span class="p">=</span> <span class="kc">true</span>
  <span class="nx">lifecycle</span> <span class="p">{</span>
   <span class="nx">prevent_destroy</span> <span class="p">=</span> <span class="kc">true</span> <span class="c1">#comment this to be able to delete the bucket if you ware really sure. </span>
   <span class="c1">#Ingoring changes here because lifecycle and encryption can be configured on the resource (old way) or with a sub-resource (the new way, which is used here). </span>
   <span class="c1">#Without this ignore things change with every apply this will probably be fixed in a future version. </span>
   <span class="nx">ignore_changes</span> <span class="p">=</span> <span class="p">[</span>
    <span class="nx">lifecycle_rule</span><span class="p">,</span>
    <span class="nx">server_side_encryption_configuration</span>
    <span class="p">]</span>
  <span class="p">}</span>
<span class="p">}</span>

<span class="k">resource</span> <span class="s2">"aws_s3_bucket_acl"</span> <span class="s2">"bkp_s3"</span>  <span class="p">{</span>
  <span class="nx">bucket</span> <span class="p">=</span> <span class="nx">aws_s3_bucket</span><span class="p">.</span><span class="nx">bkp_s3</span><span class="p">.</span><span class="nx">id</span>
  <span class="nx">acl</span>    <span class="p">=</span> <span class="s2">"private"</span>
<span class="p">}</span>

<span class="k">resource</span> <span class="s2">"aws_s3_bucket_public_access_block"</span> <span class="s2">"bkp_s3"</span> <span class="p">{</span>
  <span class="nx">bucket</span>                  <span class="p">=</span> <span class="nx">aws_s3_bucket</span><span class="p">.</span><span class="nx">bkp_s3</span><span class="p">.</span><span class="nx">id</span>
  <span class="nx">block_public_acls</span>       <span class="p">=</span> <span class="kc">true</span>
  <span class="nx">block_public_policy</span>     <span class="p">=</span> <span class="kc">true</span>
  <span class="nx">ignore_public_acls</span>      <span class="p">=</span> <span class="kc">true</span>
  <span class="nx">restrict_public_buckets</span> <span class="p">=</span> <span class="kc">true</span>
<span class="p">}</span>

<span class="k">resource</span> <span class="s2">"aws_s3_bucket_server_side_encryption_configuration"</span> <span class="s2">"bkp_s3"</span> <span class="p">{</span>
  <span class="nx">bucket</span> <span class="p">=</span> <span class="nx">aws_s3_bucket</span><span class="p">.</span><span class="nx">bkp_s3</span><span class="p">.</span><span class="nx">bucket</span>
  <span class="nx">rule</span> <span class="p">{</span>
    <span class="nx">bucket_key_enabled</span> <span class="p">=</span> <span class="kc">true</span>
    <span class="nx">apply_server_side_encryption_by_default</span> <span class="p">{</span>
      <span class="nx">sse_algorithm</span>     <span class="p">=</span> <span class="s2">"aws:kms"</span>
    <span class="p">}</span>
  <span class="p">}</span>
<span class="p">}</span>

<span class="k">resource</span> <span class="s2">"aws_s3_bucket_versioning"</span> <span class="s2">"bkp_s3"</span> <span class="p">{</span>
  <span class="nx">bucket</span> <span class="p">=</span> <span class="nx">aws_s3_bucket</span><span class="p">.</span><span class="nx">bkp_s3</span><span class="p">.</span><span class="nx">id</span>
  <span class="nx">versioning_configuration</span> <span class="p">{</span>
    <span class="nx">status</span> <span class="p">=</span> <span class="s2">"Enabled"</span>
  <span class="p">}</span>
<span class="p">}</span>

<span class="k">resource</span> <span class="s2">"aws_s3_bucket_lifecycle_configuration"</span> <span class="s2">"bkp_s3"</span> <span class="p">{</span>
  <span class="nx">depends_on</span> <span class="p">=</span> <span class="p">[</span><span class="nx">aws_s3_bucket_versioning</span><span class="p">.</span><span class="nx">bkp_s3</span><span class="p">]</span>
  <span class="nx">bucket</span> <span class="p">=</span> <span class="nx">aws_s3_bucket</span><span class="p">.</span><span class="nx">bkp_s3</span><span class="p">.</span><span class="nx">id</span>
  <span class="nx">rule</span> <span class="p">{</span>
    <span class="nx">id</span>      <span class="p">=</span> <span class="s2">"Expire Data"</span>
    <span class="nx">noncurrent_version_expiration</span> <span class="p">{</span>
      <span class="nx">noncurrent_days</span> <span class="p">=</span> <span class="mi">30</span>
    <span class="p">}</span>
    <span class="nx">status</span> <span class="p">=</span> <span class="s2">"Enabled"</span>
  <span class="p">}</span>
<span class="p">}</span>

<span class="k">resource</span> <span class="s2">"aws_iam_user"</span> <span class="s2">"bkp_s3"</span> <span class="p">{</span>
  <span class="nx">name</span> <span class="p">=</span> <span class="s2">"</span><span class="k">${</span><span class="nx">aws_s3_bucket</span><span class="p">.</span><span class="nx">bkp_s3</span><span class="p">.</span><span class="nx">bucket</span><span class="k">}</span><span class="s2">"</span>
  <span class="nx">tags</span> <span class="p">=</span> <span class="p">{</span>
    <span class="nx">tag</span><span class="err">-</span><span class="nx">key</span> <span class="p">=</span> <span class="s2">"tag-value"</span>
  <span class="p">}</span>
<span class="p">}</span>

<span class="k">resource</span> <span class="s2">"aws_iam_access_key"</span> <span class="s2">"bkp_s3"</span> <span class="p">{</span>
  <span class="nx">user</span> <span class="p">=</span> <span class="nx">aws_iam_user</span><span class="p">.</span><span class="nx">bkp_s3</span><span class="p">.</span><span class="nx">name</span>
<span class="p">}</span>

<span class="k">resource</span> <span class="s2">"aws_iam_user_policy"</span> <span class="s2">"bkp_s3"</span> <span class="p">{</span>
  <span class="nx">name</span> <span class="p">=</span> <span class="s2">"</span><span class="k">${</span><span class="nx">aws_s3_bucket</span><span class="p">.</span><span class="nx">bkp_s3</span><span class="p">.</span><span class="nx">bucket</span><span class="k">}</span><span class="s2">"</span>
  <span class="nx">user</span> <span class="p">=</span> <span class="nx">aws_iam_user</span><span class="p">.</span><span class="nx">bkp_s3</span><span class="p">.</span><span class="nx">name</span>
  <span class="nx">policy</span> <span class="p">=</span> <span class="nx">jsonencode</span><span class="p">({</span>
    <span class="s2">"Version"</span><span class="err">:</span> <span class="s2">"2012-10-17"</span><span class="p">,</span>
    <span class="s2">"Statement"</span><span class="err">:</span> <span class="p">[</span>
        <span class="p">{</span>
            <span class="s2">"Sid"</span><span class="err">:</span> <span class="s2">"VisualEditor0"</span><span class="p">,</span>
            <span class="s2">"Effect"</span><span class="err">:</span> <span class="s2">"Allow"</span><span class="p">,</span>
            <span class="s2">"Action"</span><span class="err">:</span> <span class="p">[</span>
                <span class="s2">"s3:GetObjectRetention"</span><span class="p">,</span>
                <span class="s2">"s3:DeleteObjectVersion"</span><span class="p">,</span>
                <span class="s2">"s3:ListBucketVersions"</span><span class="p">,</span>
                <span class="s2">"s3:GetObjectAttributes"</span><span class="p">,</span>
                <span class="s2">"s3:ListBucket"</span><span class="p">,</span>
                <span class="s2">"s3:PutObjectLegalHold"</span><span class="p">,</span>
                <span class="s2">"s3:GetObjectLegalHold"</span><span class="p">,</span>
                <span class="s2">"s3:GetObjectVersionAttributes"</span><span class="p">,</span>
                <span class="s2">"s3:PutObject"</span><span class="p">,</span>
                <span class="s2">"s3:GetObject"</span><span class="p">,</span>
                <span class="s2">"s3:PutObjectRetention"</span><span class="p">,</span>
                <span class="s2">"s3:DeleteObject"</span><span class="p">,</span>
                <span class="s2">"s3:GetObjectVersion"</span>
            <span class="p">],</span>
            <span class="s2">"Resource"</span><span class="err">:</span> <span class="p">[</span>
                <span class="s2">"arn:aws:s3:::</span><span class="k">${</span><span class="nx">aws_s3_bucket</span><span class="p">.</span><span class="nx">bkp_s3</span><span class="p">.</span><span class="nx">bucket</span><span class="k">}</span><span class="s2">"</span><span class="p">,</span>
                <span class="s2">"arn:aws:s3:::</span><span class="k">${</span><span class="nx">aws_s3_bucket</span><span class="p">.</span><span class="nx">bkp_s3</span><span class="p">.</span><span class="nx">bucket</span><span class="k">}</span><span class="s2">/*"</span>
            <span class="p">]</span>
        <span class="p">}</span>
    <span class="p">]</span>
 <span class="p">})</span>
<span class="p">}</span></code></pre></figure>

</details>

<p> </p>

<h1 id="aws-s3-versioning-and-deletemarkers">AWS S3 Versioning and DeleteMarkers</h1>
<p>There’s plenty of official doco about S3 versioning. Here I’ll step through it in practice. Basically, a documentation of my own experiments.</p>

<p>All of this is done with an AWS IAM credential which has limited access to the S3 bucket (as described above) and is the same credential used to run Kopia backups. Such a credential is most likely to be stolen from a compromised server where backups are configured.</p>

<p>First, I write a file and put it in the bucket:</p>
<div class="language-bash highlighter-rouge"><div class="highlight"><pre class="highlight"><code>rhys@mgmt:~<span class="nv">$ </span><span class="nb">echo</span> <span class="s1">'Rerenga tuatahi (first version)'</span> <span class="o">&gt;</span>mytestfile.fun

rhys@mgmt:~<span class="nv">$ </span>aws s3 <span class="nb">cp</span> ./mytestfile.fun s3://my-awesome-bucket-name/
upload: ./mytestfile.fun to s3://my-awesome-bucket-name/mytestfile.fun
</code></pre></div></div>

<p>I list the file and yes, it’s there:</p>
<div class="language-bash highlighter-rouge"><div class="highlight"><pre class="highlight"><code>rhys@mgmt:~<span class="nv">$ </span>aws s3 <span class="nb">ls </span>s3://my-awesome-bucket-name/mytestfile.fun
2022-09-12 23:58:43         32 mytestfile.fun
</code></pre></div></div>

<p>Now I list the object versions for that. Note, there’s just 1 version that <strong>IsLatest</strong>:</p>
<div class="language-bash highlighter-rouge"><div class="highlight"><pre class="highlight"><code>rhys@mgmt:~<span class="nv">$ </span> aws s3api list-object-versions <span class="nt">--bucket</span> my-awesome-bucket-name <span class="nt">--prefix</span> mytestfile.fun
<span class="o">{</span>
    <span class="s2">"Versions"</span>: <span class="o">[</span>
        <span class="o">{</span>
            <span class="s2">"ETag"</span>: <span class="s2">"</span><span class="se">\"</span><span class="s2">105dd7c965480c0853995fce961f0e73</span><span class="se">\"</span><span class="s2">"</span>,
            <span class="s2">"Size"</span>: 32,
            <span class="s2">"StorageClass"</span>: <span class="s2">"STANDARD"</span>,
            <span class="s2">"Key"</span>: <span class="s2">"mytestfile.fun"</span>,
            <span class="s2">"VersionId"</span>: <span class="s2">"54keir1ROKFGXwT6LWvMM0wAEwcbdyb_"</span>,
            <span class="s2">"IsLatest"</span>: <span class="nb">true</span>,
            <span class="s2">"LastModified"</span>: <span class="s2">"2022-09-12T23:58:43+00:00"</span>
        <span class="o">}</span>
    <span class="o">]</span>
<span class="o">}</span>
</code></pre></div></div>
<p>Now I edit the file and put it in the bucket again (second version). This doesn’t overwrite the original file, it stacks on top of it as the latest version. The first version is now non-current:</p>
<div class="language-bash highlighter-rouge"><div class="highlight"><pre class="highlight"><code>rhys@mgmt:~<span class="nv">$ </span><span class="nb">echo</span> <span class="s1">'Rerenga tuarua (second version)'</span> <span class="o">&gt;</span>mytestfile.fun
rhys@mgmt:~<span class="nv">$ </span>aws s3 <span class="nb">cp</span> ./mytestfile.fun s3://my-awesome-bucket-name/
upload: ./mytestfile.fun to s3://my-awesome-bucket-name/mytestfile.fun
</code></pre></div></div>

<p>Now the third version:</p>
<div class="language-bash highlighter-rouge"><div class="highlight"><pre class="highlight"><code>rhys@mgmt:~<span class="nv">$ </span><span class="nb">echo</span> <span class="s1">'Rerenga tuatoru (third version)'</span> <span class="o">&gt;</span>mytestfile.fun
rhys@mgmt:~<span class="nv">$ </span>aws s3 <span class="nb">cp</span> ./mytestfile.fun s3://my-awesome-bucket-name/
upload: ./mytestfile.fun to s3://my-awesome-bucket-name/mytestfile.fun
</code></pre></div></div>

<p>Now we’ve got three versions - two which are non-current:</p>
<div class="language-bash highlighter-rouge"><div class="highlight"><pre class="highlight"><code>rhys@mgmt:~<span class="nv">$ </span>aws s3api list-object-versions <span class="nt">--bucket</span> my-awesome-bucket-name <span class="nt">--prefix</span> mytestfile.fun
<span class="o">{</span>
    <span class="s2">"Versions"</span>: <span class="o">[</span>
        <span class="o">{</span>
            <span class="s2">"ETag"</span>: <span class="s2">"</span><span class="se">\"</span><span class="s2">188da8a565815139b005b8c331fbaf80</span><span class="se">\"</span><span class="s2">"</span>,
            <span class="s2">"Size"</span>: 32,
            <span class="s2">"StorageClass"</span>: <span class="s2">"STANDARD"</span>,
            <span class="s2">"Key"</span>: <span class="s2">"mytestfile.fun"</span>,
            <span class="s2">"VersionId"</span>: <span class="s2">"YHsF2jhmad6S0tl1azd64241nWdTBv.e"</span>,
            <span class="s2">"IsLatest"</span>: <span class="nb">true</span>,
            <span class="s2">"LastModified"</span>: <span class="s2">"2022-09-13T00:34:39+00:00"</span>
        <span class="o">}</span>,
        <span class="o">{</span>
            <span class="s2">"ETag"</span>: <span class="s2">"</span><span class="se">\"</span><span class="s2">0c4ba5107663526195fde438738b437f</span><span class="se">\"</span><span class="s2">"</span>,
            <span class="s2">"Size"</span>: 32,
            <span class="s2">"StorageClass"</span>: <span class="s2">"STANDARD"</span>,
            <span class="s2">"Key"</span>: <span class="s2">"mytestfile.fun"</span>,
            <span class="s2">"VersionId"</span>: <span class="s2">"XurzKINJNUmbgSgr2wKBuYM9yKmHJA5H"</span>,
            <span class="s2">"IsLatest"</span>: <span class="nb">false</span>,
            <span class="s2">"LastModified"</span>: <span class="s2">"2022-09-13T00:33:59+00:00"</span>
        <span class="o">}</span>,
        <span class="o">{</span>
            <span class="s2">"ETag"</span>: <span class="s2">"</span><span class="se">\"</span><span class="s2">105dd7c965480c0853995fce961f0e73</span><span class="se">\"</span><span class="s2">"</span>,
            <span class="s2">"Size"</span>: 32,
            <span class="s2">"StorageClass"</span>: <span class="s2">"STANDARD"</span>,
            <span class="s2">"Key"</span>: <span class="s2">"mytestfile.fun"</span>,
            <span class="s2">"VersionId"</span>: <span class="s2">"54keir1ROKFGXwT6LWvMM0wAEwcbdyb_"</span>,
            <span class="s2">"IsLatest"</span>: <span class="nb">false</span>,
            <span class="s2">"LastModified"</span>: <span class="s2">"2022-09-12T23:58:43+00:00"</span>
        <span class="o">}</span>
    <span class="o">]</span>
<span class="o">}</span>
</code></pre></div></div>

<p>Now I “delete” the file with a simple delete:</p>
<div class="language-bash highlighter-rouge"><div class="highlight"><pre class="highlight"><code>rhys@mgmt:~<span class="nv">$ </span>aws s3 <span class="nb">rm </span>s3://my-awesome-bucket-name/mytestfile.fun
delete: s3://my-awesome-bucket-name/mytestfile.fun
</code></pre></div></div>

<p>Now look at the versions of this object - we have three non-current versions and a DeleteMarker which is the current version (<strong>“IsLatest”: true</strong>):</p>
<div class="language-bash highlighter-rouge"><div class="highlight"><pre class="highlight"><code>rhys@mgmt:~<span class="nv">$ </span>aws s3api list-object-versions <span class="nt">--bucket</span> my-awesome-bucket-name <span class="nt">--prefix</span> mytestfile.fun
<span class="o">{</span>
    <span class="s2">"Versions"</span>: <span class="o">[</span>
        <span class="o">{</span>
            <span class="s2">"ETag"</span>: <span class="s2">"</span><span class="se">\"</span><span class="s2">188da8a565815139b005b8c331fbaf80</span><span class="se">\"</span><span class="s2">"</span>,
            <span class="s2">"Size"</span>: 32,
            <span class="s2">"StorageClass"</span>: <span class="s2">"STANDARD"</span>,
            <span class="s2">"Key"</span>: <span class="s2">"mytestfile.fun"</span>,
            <span class="s2">"VersionId"</span>: <span class="s2">"YHsF2jhmad6S0tl1azd64241nWdTBv.e"</span>,
            <span class="s2">"IsLatest"</span>: <span class="nb">false</span>,
            <span class="s2">"LastModified"</span>: <span class="s2">"2022-09-13T00:34:39+00:00"</span>
        <span class="o">}</span>,
        <span class="o">{</span>
            <span class="s2">"ETag"</span>: <span class="s2">"</span><span class="se">\"</span><span class="s2">0c4ba5107663526195fde438738b437f</span><span class="se">\"</span><span class="s2">"</span>,
            <span class="s2">"Size"</span>: 32,
            <span class="s2">"StorageClass"</span>: <span class="s2">"STANDARD"</span>,
            <span class="s2">"Key"</span>: <span class="s2">"mytestfile.fun"</span>,
            <span class="s2">"VersionId"</span>: <span class="s2">"XurzKINJNUmbgSgr2wKBuYM9yKmHJA5H"</span>,
            <span class="s2">"IsLatest"</span>: <span class="nb">false</span>,
            <span class="s2">"LastModified"</span>: <span class="s2">"2022-09-13T00:33:59+00:00"</span>
        <span class="o">}</span>,
        <span class="o">{</span>
            <span class="s2">"ETag"</span>: <span class="s2">"</span><span class="se">\"</span><span class="s2">105dd7c965480c0853995fce961f0e73</span><span class="se">\"</span><span class="s2">"</span>,
            <span class="s2">"Size"</span>: 32,
            <span class="s2">"StorageClass"</span>: <span class="s2">"STANDARD"</span>,
            <span class="s2">"Key"</span>: <span class="s2">"mytestfile.fun"</span>,
            <span class="s2">"VersionId"</span>: <span class="s2">"54keir1ROKFGXwT6LWvMM0wAEwcbdyb_"</span>,
            <span class="s2">"IsLatest"</span>: <span class="nb">false</span>,
            <span class="s2">"LastModified"</span>: <span class="s2">"2022-09-12T23:58:43+00:00"</span>
        <span class="o">}</span>
    <span class="o">]</span>,
    <span class="s2">"DeleteMarkers"</span>: <span class="o">[</span>
        <span class="o">{</span>
            <span class="s2">"Key"</span>: <span class="s2">"mytestfile.fun"</span>,
            <span class="s2">"VersionId"</span>: <span class="s2">"ESI2jjpPyXev4Cblf2jxMu0G5no33qEv"</span>,
            <span class="s2">"IsLatest"</span>: <span class="nb">true</span>,
            <span class="s2">"LastModified"</span>: <span class="s2">"2022-09-13T00:37:13+00:00"</span>
        <span class="o">}</span>
    <span class="o">]</span>
<span class="o">}</span>
</code></pre></div></div>

<p>I list the file and sure enough, it’s gone. At least it looks like it’s gone:</p>
<div class="language-bash highlighter-rouge"><div class="highlight"><pre class="highlight"><code>rhys@mgmt:~<span class="nv">$ </span>aws s3 <span class="nb">ls </span>s3://my-awesome-bucket-name/mytestfile.fun
<span class="o">[</span>nothing returned]
</code></pre></div></div>

<p>Now I “undelete” the file by deleting the DeleteMarker. Notice I specify the version-id of the DeleteMarker:</p>
<div class="language-bash highlighter-rouge"><div class="highlight"><pre class="highlight"><code>rhys@mgmt:~<span class="nv">$ </span>aws s3api delete-object <span class="nt">--bucket</span> my-awesome-bucket-name <span class="nt">--key</span> mytestfile.fun <span class="nt">--version-id</span> <span class="s2">"ESI2jjpPyXev4Cblf2jxMu0G5no33qEv"</span>
<span class="o">{</span>
    <span class="s2">"DeleteMarker"</span>: <span class="nb">true</span>,
    <span class="s2">"VersionId"</span>: <span class="s2">"ESI2jjpPyXev4Cblf2jxMu0G5no33qEv"</span>
<span class="o">}</span>
</code></pre></div></div>

<p>See, the DeleteMarker is now gone:</p>
<div class="language-bash highlighter-rouge"><div class="highlight"><pre class="highlight"><code>rhys@mgmt:~<span class="nv">$ </span>aws s3api list-object-versions <span class="nt">--bucket</span> my-awesome-bucket-name <span class="nt">--prefix</span> mytestfile.fun
<span class="o">{</span>
    <span class="s2">"Versions"</span>: <span class="o">[</span>
        <span class="o">{</span>
            <span class="s2">"ETag"</span>: <span class="s2">"</span><span class="se">\"</span><span class="s2">188da8a565815139b005b8c331fbaf80</span><span class="se">\"</span><span class="s2">"</span>,
            <span class="s2">"Size"</span>: 32,
            <span class="s2">"StorageClass"</span>: <span class="s2">"STANDARD"</span>,
            <span class="s2">"Key"</span>: <span class="s2">"mytestfile.fun"</span>,
            <span class="s2">"VersionId"</span>: <span class="s2">"YHsF2jhmad6S0tl1azd64241nWdTBv.e"</span>,
            <span class="s2">"IsLatest"</span>: <span class="nb">true</span>,
            <span class="s2">"LastModified"</span>: <span class="s2">"2022-09-13T00:34:39+00:00"</span>
        <span class="o">}</span>,
        <span class="o">{</span>
            <span class="s2">"ETag"</span>: <span class="s2">"</span><span class="se">\"</span><span class="s2">0c4ba5107663526195fde438738b437f</span><span class="se">\"</span><span class="s2">"</span>,
            <span class="s2">"Size"</span>: 32,
            <span class="s2">"StorageClass"</span>: <span class="s2">"STANDARD"</span>,
            <span class="s2">"Key"</span>: <span class="s2">"mytestfile.fun"</span>,
            <span class="s2">"VersionId"</span>: <span class="s2">"XurzKINJNUmbgSgr2wKBuYM9yKmHJA5H"</span>,
            <span class="s2">"IsLatest"</span>: <span class="nb">false</span>,
            <span class="s2">"LastModified"</span>: <span class="s2">"2022-09-13T00:33:59+00:00"</span>
        <span class="o">}</span>,
        <span class="o">{</span>
            <span class="s2">"ETag"</span>: <span class="s2">"</span><span class="se">\"</span><span class="s2">105dd7c965480c0853995fce961f0e73</span><span class="se">\"</span><span class="s2">"</span>,
            <span class="s2">"Size"</span>: 32,
            <span class="s2">"StorageClass"</span>: <span class="s2">"STANDARD"</span>,
            <span class="s2">"Key"</span>: <span class="s2">"mytestfile.fun"</span>,
            <span class="s2">"VersionId"</span>: <span class="s2">"54keir1ROKFGXwT6LWvMM0wAEwcbdyb_"</span>,
            <span class="s2">"IsLatest"</span>: <span class="nb">false</span>,
            <span class="s2">"LastModified"</span>: <span class="s2">"2022-09-12T23:58:43+00:00"</span>
        <span class="o">}</span>
    <span class="o">]</span>
<span class="o">}</span>
</code></pre></div></div>

<p>And when I list the file it’s there again:</p>
<div class="language-bash highlighter-rouge"><div class="highlight"><pre class="highlight"><code>rhys@mgmt:~<span class="nv">$ </span>aws s3 <span class="nb">ls </span>s3://my-awesome-bucket-name/mytestfile.fun
2022-09-13 00:34:39         32 mytestfile.fun
</code></pre></div></div>

<p>What about really deleting a file? Let’s try to remove an object for real, rather than just pretending it’s gone with a DeleteMarker. This time I use the <strong>aws s3api delete-object</strong> method and specify the version-id of current version:</p>
<div class="language-bash highlighter-rouge"><div class="highlight"><pre class="highlight"><code>rhys@mgmt:~<span class="nv">$ </span>aws s3api delete-object <span class="nt">--bucket</span> my-awesome-bucket-name <span class="nt">--key</span> mytestfile.fun <span class="nt">--version-id</span> YHsF2jhmad6S0tl1azd64241nWdTBv.e
<span class="o">{</span>
    <span class="s2">"VersionId"</span>: <span class="s2">"YHsF2jhmad6S0tl1azd64241nWdTBv.e"</span>
<span class="o">}</span>
</code></pre></div></div>

<p>Now the latest version is gone, and the previous version becomes current:</p>
<div class="language-bash highlighter-rouge"><div class="highlight"><pre class="highlight"><code>rhys@mgmt:~<span class="nv">$ </span>aws s3api list-object-versions <span class="nt">--bucket</span> my-awesome-bucket-name <span class="nt">--prefix</span> mytestfile.fun
<span class="o">{</span>
    <span class="s2">"Versions"</span>: <span class="o">[</span>
        <span class="o">{</span>
            <span class="s2">"ETag"</span>: <span class="s2">"</span><span class="se">\"</span><span class="s2">0c4ba5107663526195fde438738b437f</span><span class="se">\"</span><span class="s2">"</span>,
            <span class="s2">"Size"</span>: 32,
            <span class="s2">"StorageClass"</span>: <span class="s2">"STANDARD"</span>,
            <span class="s2">"Key"</span>: <span class="s2">"mytestfile.fun"</span>,
            <span class="s2">"VersionId"</span>: <span class="s2">"XurzKINJNUmbgSgr2wKBuYM9yKmHJA5H"</span>,
            <span class="s2">"IsLatest"</span>: <span class="nb">true</span>,
            <span class="s2">"LastModified"</span>: <span class="s2">"2022-09-13T00:33:59+00:00"</span>
        <span class="o">}</span>,
        <span class="o">{</span>
            <span class="s2">"ETag"</span>: <span class="s2">"</span><span class="se">\"</span><span class="s2">105dd7c965480c0853995fce961f0e73</span><span class="se">\"</span><span class="s2">"</span>,
            <span class="s2">"Size"</span>: 32,
            <span class="s2">"StorageClass"</span>: <span class="s2">"STANDARD"</span>,
            <span class="s2">"Key"</span>: <span class="s2">"mytestfile.fun"</span>,
            <span class="s2">"VersionId"</span>: <span class="s2">"54keir1ROKFGXwT6LWvMM0wAEwcbdyb_"</span>,
            <span class="s2">"IsLatest"</span>: <span class="nb">false</span>,
            <span class="s2">"LastModified"</span>: <span class="s2">"2022-09-12T23:58:43+00:00"</span>
        <span class="o">}</span>
    <span class="o">]</span>
<span class="o">}</span>
</code></pre></div></div>

<p>Now I delete the remaining two versions:</p>
<div class="language-bash highlighter-rouge"><div class="highlight"><pre class="highlight"><code>rhys@mgmt:~<span class="nv">$ </span>aws s3api delete-object <span class="nt">--bucket</span> my-awesome-bucket-name <span class="nt">--key</span> mytestfile.fun <span class="nt">--version-id</span> <span class="s2">"XurzKINJNUmbgSgr2wKBuYM9yKmHJA5H"</span>
<span class="o">{</span>
    <span class="s2">"VersionId"</span>: <span class="s2">"XurzKINJNUmbgSgr2wKBuYM9yKmHJA5H"</span>
<span class="o">}</span>

rhys@mgmt:~<span class="nv">$ </span>aws s3api delete-object <span class="nt">--bucket</span> my-awesome-bucket-name <span class="nt">--key</span> mytestfile.fun <span class="nt">--version-id</span> <span class="s2">"54keir1ROKFGXwT6LWvMM0wAEwcbdyb_"</span>
<span class="o">{</span>
    <span class="s2">"VersionId"</span>: <span class="s2">"54keir1ROKFGXwT6LWvMM0wAEwcbdyb_"</span>
<span class="o">}</span>
</code></pre></div></div>

<p>Now the object is 100% gone:</p>
<div class="language-bash highlighter-rouge"><div class="highlight"><pre class="highlight"><code>rhys@mgmt:~<span class="nv">$ </span>aws s3api list-object-versions <span class="nt">--bucket</span> my-awesome-bucket-name <span class="nt">--prefix</span> mytestfile.fun
rhys@mgmt:~<span class="nv">$ </span>aws s3 <span class="nb">ls </span>s3://my-awesome-bucket-name/mytestfile.fun
rhys@mgmt:~<span class="nv">$ </span><span class="o">[</span>nothing returned]
</code></pre></div></div>

<p>Before we move on to looking at Object Lock it’s worth mentioning that <em>by default</em> deleted files in an S3 bucket with versioning enabled, that is files which are hidden with a DeleteMarker, are never permanently deleted. This is where our <strong>Lifecycle rule</strong> comes in. It will permanently delete non-current versions <em>x</em> days after they become non-current.</p>

<h1 id="aws-s3-object-lock">AWS S3 Object Lock</h1>

<p>Let’s start again. I create a new file and put it in the bucket:</p>
<div class="language-bash highlighter-rouge"><div class="highlight"><pre class="highlight"><code>rhys@mgmt:~<span class="nv">$ </span><span class="nb">echo</span> <span class="s1">'Rerenga tuatahi (first version)'</span> <span class="o">&gt;</span>mysafetestfile.fun
rhys@mgmt:~<span class="nv">$ </span>aws s3 <span class="nb">cp</span> ./mysafetestfile.fun s3://my-awesome-bucket-name/
upload: ./mysafetestfile.fun to s3://my-awesome-bucket-name/mysafetestfile.fun
</code></pre></div></div>

<p>Now I set an Object Lock retention period:</p>
<div class="language-bash highlighter-rouge"><div class="highlight"><pre class="highlight"><code>rhys@mgmt:~<span class="nv">$ </span>aws s3api put-object-retention <span class="nt">--bucket</span> my-awesome-bucket-name <span class="nt">--key</span> mysafetestfile.fun <span class="nt">--retention</span> <span class="s1">'{ "Mode": "GOVERNANCE", "RetainUntilDate": "2022-09-16T00:00:00" }'</span>
<span class="o">[</span>nothing returned, success]
</code></pre></div></div>

<p>Using <strong>head-object</strong> we can see the file now has a <strong>RetainUntilDate</strong>:</p>
<div class="language-bash highlighter-rouge"><div class="highlight"><pre class="highlight"><code>rhys@mgmt:~<span class="nv">$ </span>aws s3api head-object <span class="nt">--bucket</span> my-awesome-bucket-name <span class="nt">--key</span> mysafetestfile.fun
<span class="o">{</span>
    <span class="s2">"AcceptRanges"</span>: <span class="s2">"bytes"</span>,
    <span class="s2">"LastModified"</span>: <span class="s2">"2022-09-13T00:51:00+00:00"</span>,
    <span class="s2">"ContentLength"</span>: 32,
    <span class="s2">"ETag"</span>: <span class="s2">"</span><span class="se">\"</span><span class="s2">e2ca77dbc72f1f605256cf9b64910603</span><span class="se">\"</span><span class="s2">"</span>,
    <span class="s2">"VersionId"</span>: <span class="s2">"4KIp9ih15unnz7g3.6v0Wb1F304jCik."</span>,
    <span class="s2">"ContentType"</span>: <span class="s2">"binary/octet-stream"</span>,
    <span class="s2">"ServerSideEncryption"</span>: <span class="s2">"aws:kms"</span>,
    <span class="s2">"Metadata"</span>: <span class="o">{}</span>,
    <span class="s2">"SSEKMSKeyId"</span>: <span class="s2">"arn:aws:kms:ap-southeast-2:912773030942:key/65945124-c013-451e-a5da-a31d3ce45fb1"</span>,
    <span class="s2">"BucketKeyEnabled"</span>: <span class="nb">true</span>,
    <span class="s2">"ObjectLockMode"</span>: <span class="s2">"GOVERNANCE"</span>,
    <span class="s2">"ObjectLockRetainUntilDate"</span>: <span class="s2">"2022-09-16T00:00:00+00:00"</span>
<span class="o">}</span>
</code></pre></div></div>

<p>Now let’s try a simple delete. Yes it works:</p>
<div class="language-bash highlighter-rouge"><div class="highlight"><pre class="highlight"><code>rhys@mgmt:~<span class="nv">$ </span>aws s3 <span class="nb">rm </span>s3://my-awesome-bucket-name/mysafetestfile.fun
delete: s3://my-awesome-bucket-name/mysafetestfile.fun
</code></pre></div></div>

<p>Just as before a delete marker is placed:</p>
<div class="language-bash highlighter-rouge"><div class="highlight"><pre class="highlight"><code>rhys@mgmt:~<span class="nv">$ </span>aws s3api list-object-versions <span class="nt">--bucket</span> my-awesome-bucket-name <span class="nt">--prefix</span> mysafetestfile.fun
<span class="o">{</span>
    <span class="s2">"Versions"</span>: <span class="o">[</span>
        <span class="o">{</span>
            <span class="s2">"ETag"</span>: <span class="s2">"</span><span class="se">\"</span><span class="s2">e2ca77dbc72f1f605256cf9b64910603</span><span class="se">\"</span><span class="s2">"</span>,
            <span class="s2">"Size"</span>: 32,
            <span class="s2">"StorageClass"</span>: <span class="s2">"STANDARD"</span>,
            <span class="s2">"Key"</span>: <span class="s2">"mysafetestfile.fun"</span>,
            <span class="s2">"VersionId"</span>: <span class="s2">"4KIp9ih15unnz7g3.6v0Wb1F304jCik."</span>,
            <span class="s2">"IsLatest"</span>: <span class="nb">false</span>,
            <span class="s2">"LastModified"</span>: <span class="s2">"2022-09-13T00:51:00+00:00"</span>
        <span class="o">}</span>
    <span class="o">]</span>,
    <span class="s2">"DeleteMarkers"</span>: <span class="o">[</span>
        <span class="o">{</span>
            <span class="s2">"Key"</span>: <span class="s2">"mysafetestfile.fun"</span>,
            <span class="s2">"VersionId"</span>: <span class="s2">"tW1o6sPOMoNvu68_lgTnIi8xo6NksxXl"</span>,
            <span class="s2">"IsLatest"</span>: <span class="nb">true</span>,
            <span class="s2">"LastModified"</span>: <span class="s2">"2022-09-13T00:57:49+00:00"</span>
        <span class="o">}</span>
    <span class="o">]</span>
<span class="o">}</span>
</code></pre></div></div>

<p>And AWS acts as if the file is gone:</p>
<div class="language-bash highlighter-rouge"><div class="highlight"><pre class="highlight"><code>rhys@mgmt:~<span class="nv">$ </span>aws s3 <span class="nb">ls </span>s3://my-awesome-bucket-name/mysafetestfile.fun
<span class="o">[</span>nothing returned]
</code></pre></div></div>

<p>Ok so let’s delete the DeleteMarker to restore the file:</p>
<div class="language-bash highlighter-rouge"><div class="highlight"><pre class="highlight"><code>rhys@mgmt:~<span class="nv">$ </span>aws s3api delete-object <span class="nt">--bucket</span> my-awesome-bucket-name <span class="nt">--key</span> mysafetestfile.fun <span class="nt">--version-id</span> <span class="s2">"tW1o6sPOMoNvu68_lgTnIi8xo6NksxXl"</span>
<span class="o">{</span>
    <span class="s2">"DeleteMarker"</span>: <span class="nb">true</span>,
    <span class="s2">"VersionId"</span>: <span class="s2">"tW1o6sPOMoNvu68_lgTnIi8xo6NksxXl"</span>
<span class="o">}</span>
</code></pre></div></div>

<p>And the file is back:</p>
<div class="language-bash highlighter-rouge"><div class="highlight"><pre class="highlight"><code>rhys@mgmt:~<span class="nv">$ </span>aws s3 <span class="nb">ls </span>s3://my-awesome-bucket-name/mysafetestfile.fun
2022-09-13 00:51:00         32 mysafetestfile.fun
</code></pre></div></div>

<p>Now let’s try to delete it for real. No go. The Object Lock won’t allow it. Good:</p>
<div class="language-bash highlighter-rouge"><div class="highlight"><pre class="highlight"><code>rhys@mgmt:~<span class="nv">$ </span>aws s3api delete-object <span class="nt">--bucket</span> my-awesome-bucket-name <span class="nt">--key</span> mysafetestfile.fun <span class="nt">--version-id</span> <span class="s2">"4KIp9ih15unnz7g3.6v0Wb1F304jCik."</span>
An error occurred <span class="o">(</span>AccessDenied<span class="o">)</span> when calling the DeleteObject operation: Access Denied
</code></pre></div></div>

<p>Now let’s set the retention to a date in the past so we can delete it. Doesn’t work. Good:</p>
<div class="language-bash highlighter-rouge"><div class="highlight"><pre class="highlight"><code>rhys@mgmt:~<span class="nv">$ </span>aws s3api put-object-retention <span class="nt">--bucket</span> my-awesome-bucket-name <span class="nt">--key</span> mysafetestfile.fun <span class="nt">--retention</span> <span class="s1">'{ "Mode": "GOVERNANCE", "RetainUntilDate": "2022-08-16T00:00:00" }'</span>
An error occurred <span class="o">(</span>InvalidArgument<span class="o">)</span> when calling the PutObjectRetention operation: The retain <span class="k">until </span><span class="nb">date </span>must be <span class="k">in </span>the future!
</code></pre></div></div>

<p>What about a retention date that is in the future but only by 1 minute and therefore much earlier than the original retention date? Doesn’t work, not allowed. Good:</p>
<div class="language-bash highlighter-rouge"><div class="highlight"><pre class="highlight"><code>rhys@mgmt:~<span class="nv">$ </span><span class="nb">date
</span>Tue 13 Sep 2022 01:06:58 AM UTC

rhys@mgmt:~<span class="nv">$ </span>aws s3api put-object-retention <span class="nt">--bucket</span> my-awesome-bucket-name <span class="nt">--key</span> mysafetestfile.fun <span class="nt">--retention</span> <span class="s1">'{ "Mode": "GOVERNANCE", "RetainUntilDate": "2022-09-13T01:08:00" }'</span>
An error occurred <span class="o">(</span>AccessDenied<span class="o">)</span> when calling the PutObjectRetention operation: Access Denied
</code></pre></div></div>

<p>What about a date further into the future than the original retention date (by 1 second). That works. So, we can extend the retention date but not reduce it. Good:</p>
<div class="language-bash highlighter-rouge"><div class="highlight"><pre class="highlight"><code>rhys@mgmt:~<span class="nv">$ </span>aws s3api put-object-retention <span class="nt">--bucket</span> my-awesome-bucket-name <span class="nt">--key</span> mysafetestfile.fun <span class="nt">--retention</span> <span class="s1">'{ "Mode": "GOVERNANCE", "RetainUntilDate": "2022-09-16T00:00:01+00:00" }'</span>
</code></pre></div></div>

<p>Here’s the retention date extended by 1 second.</p>
<div class="language-bash highlighter-rouge"><div class="highlight"><pre class="highlight"><code>rhys@mgmt:~<span class="nv">$ </span>aws s3api head-object <span class="nt">--bucket</span> my-awesome-bucket-name <span class="nt">--key</span> mysafetestfile.fun
<span class="o">{</span>
    <span class="s2">"AcceptRanges"</span>: <span class="s2">"bytes"</span>,
    <span class="s2">"LastModified"</span>: <span class="s2">"2022-09-13T00:51:00+00:00"</span>,
    <span class="s2">"ContentLength"</span>: 32,
    <span class="s2">"ETag"</span>: <span class="s2">"</span><span class="se">\"</span><span class="s2">e2ca77dbc72f1f605256cf9b64910603</span><span class="se">\"</span><span class="s2">"</span>,
    <span class="s2">"VersionId"</span>: <span class="s2">"4KIp9ih15unnz7g3.6v0Wb1F304jCik."</span>,
    <span class="s2">"ContentType"</span>: <span class="s2">"binary/octet-stream"</span>,
    <span class="s2">"ServerSideEncryption"</span>: <span class="s2">"aws:kms"</span>,
    <span class="s2">"Metadata"</span>: <span class="o">{}</span>,
    <span class="s2">"SSEKMSKeyId"</span>: <span class="s2">"arn:aws:kms:ap-southeast-2:912773030942:key/65945124-c013-451e-a5da-a31d3ce45fb1"</span>,
    <span class="s2">"BucketKeyEnabled"</span>: <span class="nb">true</span>,
    <span class="s2">"ObjectLockMode"</span>: <span class="s2">"GOVERNANCE"</span>,
    <span class="s2">"ObjectLockRetainUntilDate"</span>: <span class="s2">"2022-09-16T00:00:01+00:00"</span>
<span class="o">}</span>
</code></pre></div></div>

<p>From all this we can see how AWS S3 versioning works and how object lock works. 
The retention date for an object can either be specified by the client or it can be set by a default rule for on the bucket with for a specific number of days. Regardless of how retention is set, it is per object.  There are two retention modes available compliance and governance. More info <a href="https://docs.aws.amazon.com/AmazonS3/latest/userguide/object-lock-overview.html#object-lock-retention-modes">here</a>. I’d recommend using governance during testing then move to compliance later if needed.</p>

<h1 id="kopia-and-s3-object-lock">Kopia and S3 Object Lock</h1>

<p>Next up, let’s look at this in the context of Kopia and ransom attack protection.</p>

<p><em>Most</em> of these steps can be done in the Kopia’s delightful wee UI.</p>

<p>First, I create and connect to the repo:</p>
<div class="language-bash highlighter-rouge"><div class="highlight"><pre class="highlight"><code>kopia repository create s3 <span class="nt">--bucket</span><span class="o">=</span>my-awesome-bucket-name <span class="nt">--access-key</span><span class="o">=</span><span class="s1">'MeKey'</span> <span class="nt">--secret-access-key</span><span class="o">=</span><span class="s1">'MeSecret'</span> <span class="nt">--region</span><span class="o">=</span>ap-southeast-2 <span class="nt">--password</span><span class="o">=</span><span class="s1">'mePassword'</span> 
Initializing repository with:
  block <span class="nb">hash</span>:          BLAKE2B-256-128
  encryption:          AES256-GCM-HMAC-SHA256
  splitter:            DYNAMIC-4M-BUZHASH
Connected to repository.

NOTICE: Kopia will check <span class="k">for </span>updates on GitHub every 7 days, starting 24 hours after first use.
To disable this behavior, <span class="nb">set </span>environment variable <span class="nv">KOPIA_CHECK_FOR_UPDATES</span><span class="o">=</span><span class="nb">false
</span>Alternatively you can remove the file <span class="s2">"/home/rhys/.config/kopia/repository.config.update-info.json"</span><span class="nb">.</span>

Retention:
  Annual snapshots:                 3   <span class="o">(</span>defined <span class="k">for </span>this target<span class="o">)</span>
  Monthly snapshots:               24   <span class="o">(</span>defined <span class="k">for </span>this target<span class="o">)</span>
  Weekly snapshots:                 4   <span class="o">(</span>defined <span class="k">for </span>this target<span class="o">)</span>
  Daily snapshots:                  7   <span class="o">(</span>defined <span class="k">for </span>this target<span class="o">)</span>
  Hourly snapshots:                48   <span class="o">(</span>defined <span class="k">for </span>this target<span class="o">)</span>
  Latest snapshots:                10   <span class="o">(</span>defined <span class="k">for </span>this target<span class="o">)</span>
  Ignore identical snapshots:   <span class="nb">false</span>   <span class="o">(</span>defined <span class="k">for </span>this target<span class="o">)</span>
Compression disabled.

To find more information about default policy run <span class="s1">'kopia policy get'</span><span class="nb">.</span>
To change the policy use <span class="s1">'kopia policy set'</span> command.

NOTE: Kopia will perform quick maintenance of the repository automatically every 1h0m0s
and full maintenance every 24h0m0s when running as rhys@mgmt.

See https://kopia.io/docs/advanced/maintenance/ <span class="k">for </span>more information.

NOTE: To validate that your provider is compatible with Kopia, please run:

<span class="nv">$ </span>kopia repository validate-provider
</code></pre></div></div>

<p>Now set the retention on the repo. <em>(This step can’t be done in the UI)</em>
Note I’m using GOVERNANCE mode during testing because it’s more flexible. It still allows admins to delete files, compliance mode locks things up proper</p>
<div class="language-bash highlighter-rouge"><div class="highlight"><pre class="highlight"><code>rhys@mgmt:~<span class="nv">$ </span>kopia repo set-parameters <span class="nt">--retention-mode</span><span class="o">=</span>GOVERNANCE <span class="nt">--retention-period</span><span class="o">=</span>90d
 - setting storage backend blob retention mode to GOVERNANCE.

 - setting storage backend blob retention period to 2160h0m0s.

NOTE: Repository parameters updated, you must disconnect and re-connect all other Kopia clients.
</code></pre></div></div>

<p>Now let’s take a snapshot</p>
<div class="language-bash highlighter-rouge"><div class="highlight"><pre class="highlight"><code>rhys@mgmt:~<span class="nv">$ </span>kopia snapshot create /home/rhys/
Snapshotting rhys@mgmt:/home/rhys ...
 <span class="k">*</span> 0 hashing, 37356 hashed <span class="o">(</span>2 GB<span class="o">)</span>, 0 cached <span class="o">(</span>0 B<span class="o">)</span>, uploaded 1.3 GB, estimated 2 GB <span class="o">(</span>100.4%<span class="o">)</span> 0s left
Created snapshot with root k1ec1fe89bba7206a48c6f3a5d7adf2ce and ID 787184263559f186d6c0c68a94ca9a71 <span class="k">in </span>2m35s
Running full maintenance...
Looking <span class="k">for </span>active contents...
Looking <span class="k">for </span>unreferenced contents...
GC found 0 unused contents <span class="o">(</span>0 B bytes<span class="o">)</span>
GC found 0 unused contents that are too recent to delete <span class="o">(</span>0 B bytes<span class="o">)</span>
GC found 31933 <span class="k">in</span><span class="nt">-use</span> contents <span class="o">(</span>1.3 GiB bytes<span class="o">)</span>
GC found 2 <span class="k">in</span><span class="nt">-use</span> system-contents <span class="o">(</span>1.1 KiB bytes<span class="o">)</span>
Rewriting contents from short packs...
Not enough <span class="nb">time </span>has passed since previous successful Snapshot GC. Will try again next time.
Skipping blob deletion because not enough <span class="nb">time </span>has passed yet <span class="o">(</span>59m59s left<span class="o">)</span><span class="nb">.</span>
Cleaned up 0 logs.
Cleaning up old index blobs which have already been compacted...
Finished full maintenance.
</code></pre></div></div>

<p>Now let’s list the files Kopia put in the bucket and examine one of the blobs. You’ll notice that Kopia has placed a Object Lock on this object:</p>
<div class="language-bash highlighter-rouge"><div class="highlight"><pre class="highlight"><code>rhys@mgmt:~<span class="nv">$ </span>aws s3 <span class="nb">ls </span>s3://my-awesome-bucket-name
rhys@mgmt:~<span class="nv">$ </span>aws s3api head-object <span class="nt">--bucket</span> my-awesome-bucket-name <span class="nt">--key</span> pfac824779ef631ac2453bab065c36a16-s1d843f2e82e65f72114
<span class="o">{</span>
    <span class="s2">"AcceptRanges"</span>: <span class="s2">"bytes"</span>,
    <span class="s2">"LastModified"</span>: <span class="s2">"2022-09-13T02:30:15+00:00"</span>,
    <span class="s2">"ContentLength"</span>: 22839698,
    <span class="s2">"ETag"</span>: <span class="s2">"</span><span class="se">\"</span><span class="s2">70219fe8ffe10cb89a05b7555ed99909</span><span class="se">\"</span><span class="s2">"</span>,
    <span class="s2">"VersionId"</span>: <span class="s2">"tzcMT4bAF.xumvHIR3DlQztlat0yqPve"</span>,
    <span class="s2">"ContentType"</span>: <span class="s2">"application/x-kopia"</span>,
    <span class="s2">"ServerSideEncryption"</span>: <span class="s2">"aws:kms"</span>,
    <span class="s2">"Metadata"</span>: <span class="o">{}</span>,
    <span class="s2">"SSEKMSKeyId"</span>: <span class="s2">"arn:aws:kms:ap-southeast-2:912773030942:key/65945124-c013-451e-a5da-a31d3ce45fb1"</span>,
    <span class="s2">"BucketKeyEnabled"</span>: <span class="nb">true</span>,
    <span class="s2">"ObjectLockMode"</span>: <span class="s2">"GOVERNANCE"</span>,
    <span class="s2">"ObjectLockRetainUntilDate"</span>: <span class="s2">"2022-12-12T02:30:13+00:00"</span>
<span class="o">}</span>
</code></pre></div></div>

<p>As things stand when Kopia cleans up data it no longer needs, it does a normal delete which places a DeleteMaker on the object and the data becomes a non-current version, as we saw above. From Kopia’s perspective the file is now gone. But the file won’t actually be deleted until the lifecycle rule runs.
Our lifecycle rule expires (permanently deletes) the data 30 days after it becomes non-current, <strong>but</strong> this can only happen after the retention period ends. Consider this sequence:</p>
<ol>
  <li>Kopia rights a blob with a 90 day retention period</li>
  <li>10 days later Kopia deletes the blob, making it a non-current</li>
  <li>30 days later the lifecycle rule would expire the data however it still has 50 days of retention to run.</li>
  <li>50 days later the retention on the non-current version expires and the lifecycle rule permanently deletes it</li>
</ol>

<p>Now lets’ simulate a ransom attack. Let’s presume the server where Kopia is running is compromised and the credential which Kopia uses to write to the bucket is stolen. The attackers encrypt the local server then delete all the objects in the bucket:</p>
<div class="language-bash highlighter-rouge"><div class="highlight"><pre class="highlight"><code>rhys@mgmt:~<span class="nv">$ </span>aws s3 <span class="nb">rm </span>s3://my-awesome-bucket-name <span class="nt">--recursive</span>
delete: s3://my-awesome-bucket-name/kopia.maintenance
delete: s3://my-awesome-bucket-name/_log_20220913015708_bdb8_1663034228_1663034229_1_a67b860863f71d336b05968801324920
delete: s3://my-awesome-bucket-name/_log_20220913022931_471e_1663036171_1663036333_1_982f3c98cdb064bc4b6b255fb0be5c7d
delete: s3://my-awesome-bucket-name/p0b2cbfd1cda6bebc15bdeffa89b8a96e-s1d843f2e82e65f72114
delete: s3://my-awesome-bucket-name/p124bdb974cb7fa91aa99275585329c41-s1d843f2e82e65f72114
delete: s3://my-awesome-bucket-name/p15598f9c78e76b8ec91d1d1d6d35d408-s1d843f2e82e65f72114
delete: s3://my-awesome-bucket-name/p024cc73dc5d7462363743bd7aac20f79-s1d843f2e82e65f72114
delete: s3://my-awesome-bucket-name/p1f3cd580487973337860306225dccb36-s1d843f2e82e65f72114
delete: s3://my-awesome-bucket-name/kopia.blobcfg
delete: s3://my-awesome-bucket-name/kopia.repository
delete: s3://my-awesome-bucket-name/p290fdfc4d8bbe6c50b289c813f43f6fe-s1d843f2e82e65f72114
delete: s3://my-awesome-bucket-name/p25bc556a938b7f76be5170de35521d14-s1d843f2e82e65f72114
delete: s3://my-awesome-bucket-name/p2a1ea3e01a46ddb80bccda64c3424bac-s1d843f2e82e65f72114
delete: s3://my-awesome-bucket-name/p173fdbd7ca15e82bcd125a4f333a263e-s1d843f2e82e65f72114
…
</code></pre></div></div>

<p>At first glance the files are gone:</p>
<div class="language-bash highlighter-rouge"><div class="highlight"><pre class="highlight"><code>rhys@mgmt:~<span class="nv">$ </span>aws s3 <span class="nb">ls </span>s3://my-awesome-bucket-name
<span class="o">[</span>nothing returned]
</code></pre></div></div>

<p>But on closer inspection we can see they are all still there and we know from our testing above that no snashots created in the last 90 days can not be deleted because of the Object Lock.</p>

<p class="notice--danger">^^This bit I’m not sure about, don’t the snapshots created in the last 90 days depend on all the snapshots piror to that? I.e. wouldn’t we need an indefinite retention date?</p>

<div class="language-bash highlighter-rouge"><div class="highlight"><pre class="highlight"><code>rhys@mgmt:~<span class="nv">$ </span>aws s3api list-object-versions <span class="nt">--bucket</span> my-awesome-bucket-name <span class="nt">--query</span> <span class="s1">'DeleteMarkers[?IsLatest==`true`]'</span>
<span class="o">[</span>
    <span class="o">{</span>
        <span class="s2">"Key"</span>: <span class="s2">"_log_20220913015708_bdb8_1663034228_1663034229_1_a67b860863f71d336b05968801324920"</span>,
        <span class="s2">"VersionId"</span>: <span class="s2">"Bn2yLzlo0o0xUbyEUijajWbLCR.E7ICj"</span>,
        <span class="s2">"IsLatest"</span>: <span class="nb">true</span>,
        <span class="s2">"LastModified"</span>: <span class="s2">"2022-09-13T03:02:21+00:00"</span>
    <span class="o">}</span>,
    <span class="o">{</span>
        <span class="s2">"Key"</span>: <span class="s2">"_log_20220913022931_471e_1663036171_1663036333_1_982f3c98cdb064bc4b6b255fb0be5c7d"</span>,
        <span class="s2">"VersionId"</span>: <span class="s2">"BVQEbQSKqy.go8ZGG.ciQ9DeAsGiHrO6"</span>,
        <span class="s2">"IsLatest"</span>: <span class="nb">true</span>,
        <span class="s2">"LastModified"</span>: <span class="s2">"2022-09-13T03:02:21+00:00"</span>
    <span class="o">}</span>,
    <span class="o">{</span>
        <span class="s2">"Key"</span>: <span class="s2">"kopia.blobcfg"</span>,
        <span class="s2">"VersionId"</span>: <span class="s2">"NhMwPNYw85C8aN4tnfuX1L4E9PmpPbxw"</span>,
        <span class="s2">"IsLatest"</span>: <span class="nb">true</span>,
        <span class="s2">"LastModified"</span>: <span class="s2">"2022-09-13T03:02:21+00:00"</span>
    <span class="o">}</span>,
</code></pre></div></div>

<p>Now we have a bucket where every file is marked with a DeleteMarker (non-current) some of that will be legitimate clean-ups by Kopia but most of it is due to ransom attack so ideally we need to undelete (delete the DeleteMarkers) all files deleted after a certain date.</p>

<p>I found <a href="https://stackoverflow.com/a/52891667">this excellent snippet</a> on StackOverflow which does what we need. This lists DeleteMarkers which were created after a certain date then deletes them.</p>
<div class="language-bash highlighter-rouge"><div class="highlight"><pre class="highlight"><code>rhys@mgmt:~<span class="nv">$ </span>aws s3api delete-objects <span class="nt">--bucket</span> my-awesome-bucket-name <span class="nt">--no-cli-pager</span> <span class="nt">--delete</span> <span class="s2">"</span><span class="si">$(</span>aws s3api list-object-versions <span class="nt">--bucket</span> my-awesome-bucket-name <span class="nt">--output</span><span class="o">=</span>json <span class="nt">--query</span><span class="o">=</span><span class="s1">'{Objects: DeleteMarkers[?IsLatest==`true` &amp;&amp; LastModified&gt;=`2022-09-13T01:00:00+00:00`].{Key:Key,VersionId:VersionId}}'</span><span class="si">)</span><span class="s2">"</span>
</code></pre></div></div>

<p>Now we can see all our objects are visible again:</p>
<div class="language-bash highlighter-rouge"><div class="highlight"><pre class="highlight"><code>rhys@mgmt:~<span class="nv">$ </span>aws s3 <span class="nb">ls </span>s3:// my-awesome-bucket-name /
2022-09-13 01:57:10        774 _log_20220913015708_bdb8_1663034228_1663034229_1_a67b860863f71d336b05968801324920
2022-09-13 02:32:14    1753420 _log_20220913022931_471e_1663036171_1663036333_1_982f3c98cdb064bc4b6b255fb0be5c7d
2022-09-13 02:26:46         93 kopia.blobcfg
2022-09-13 02:32:14        621 kopia.maintenance
2022-09-13 02:26:46       1101 kopia.repository
2022-09-13 02:31:58   26005840 p024cc73dc5d7462363743bd7aac20f79-s1d843f2e82e65f72114
2022-09-13 02:29:42   21054102 p0b2cbfd1cda6bebc15bdeffa89b8a96e-s1d843f2e82e65f72114
2022-09-13 02:29:55   26767729 p124bdb974cb7fa91aa99275585329c41-s1d843f2e82e65f72114
2022-09-13 02:29:34   22964690 p15598f9c78e76b8ec91d1d1d6d35d408-s1d843f2e82e65f72114
2022-09-13 02:30:15   24047886 p173fdbd7ca15e82bcd125a4f333a263e-s1d843f2e82e65f72114
2022-09-13 02:30:20   23589167 p1f3cd580487973337860306225dccb36-s1d843f2e82e65f72114
...
</code></pre></div></div>

<p>And we can list our snapshots:</p>
<div class="language-bash highlighter-rouge"><div class="highlight"><pre class="highlight"><code>rhys@mgmt:~<span class="nv">$ </span>kopia snapshot list
rhys@mgmt:/home/rhys
  2022-09-13 02:29:31 UTC k1ec1fe89bba7206a48c6f3a5d7adf2ce 2 GB drwxr-xr-x files:37349 <span class="nb">dirs</span>:6911 <span class="o">(</span>latest-1,hourly-1,daily-1,weekly-1,monthly-1,annual-1<span class="o">)</span>
</code></pre></div></div>

<p>So there you have it - Kopia with ransom attack protection. Have I missed anything?</p>

<p>I’ve only worked with AWS but no doubt this applies to other compatible providers. Likewise, much of what’s discussed here would apply to other backup tools.</p>

<p>Huge thanks to the Kopia team for such an awesome tool.</p>

<p>I don’t have comments set up on this blog yet (recently migrated from WordPress) but reach out if you’ve got any corrections/questions etc.</p>

<p>Ngā mihi nui<br />
Rhys</p>

<h3 id="references">References</h3>
<ul>
  <li><a href="https://github.com/kopia/kopia/issues/1067">https://github.com/kopia/kopia/issues/1067</a></li>
  <li><a href="https://stackoverflow.com/a/52891667">https://stackoverflow.com/a/52891667</a></li>
  <li><a href="https://docs.aws.amazon.com/cli/latest/userguide/cli-usage-pagination.html">https://docs.aws.amazon.com/cli/latest/userguide/cli-usage-pagination.html</a></li>
  <li><a href="https://docs.aws.amazon.com/AmazonS3/latest/userguide/versioning-workflows.html">https://docs.aws.amazon.com/AmazonS3/latest/userguide/versioning-workflows.html</a></li>
  <li><a href="https://aws.amazon.com/premiumsupport/knowledge-center/s3-undelete-configuration/">https://aws.amazon.com/premiumsupport/knowledge-center/s3-undelete-configuration/</a></li>
</ul>]]></content><author><name>Rhys Goodwin</name></author><category term="it" /><category term="Kopia" /><category term="s3" /><category term="objectlock" /><category term="WORM" /><category term="ransomware" /><summary type="html"><![CDATA[Kopia is beautiful open-source backup software. This post explores Kopia and AWS S3 configurations which provide immutability and or protection against ransom attacks.]]></summary></entry><entry><title type="html">Disabling IPv6 Also disables Dynamic DNS Registration</title><link href="https://blog.rhysgoodwin.com/uncategorized/disabling-ipv6-also-disables-dynamic-dns-registration/" rel="alternate" type="text/html" title="Disabling IPv6 Also disables Dynamic DNS Registration" /><published>2018-07-02T03:30:42+00:00</published><updated>2018-07-02T03:30:42+00:00</updated><id>https://blog.rhysgoodwin.com/uncategorized/disabling-ipv6-also-disables-dynamic-dns-registration</id><content type="html" xml:base="https://blog.rhysgoodwin.com/uncategorized/disabling-ipv6-also-disables-dynamic-dns-registration/"><![CDATA[<p>Dynamic DNS updates not happening at boot or when doing an ipconfig release/renew. But manual ipconfig /registerdns works fine. Tracked this down to IPv6 being disabled by GPO. I don’t know the reason for this. but Microsfot do state:</p>

<p><em><strong>Important</strong> Internet Protocol version 6 (IPv6) is a mandatory part of Windows Vista and Windows Server 2008 and newer versions. We do not recommend that you disable IPv6 or its components. If you do, some Windows components may not function. We recommend that you use “Prefer IPv4 over IPv6” in prefix policies instead of disabling IPV6.</em></p>

<div class="language-plaintext highlighter-rouge"><div class="highlight"><pre class="highlight"><code>Policy: Computer\Polices\Administrative Templates\Network\IPv6 Configuration
Registry: HKEY_LOCAL_MACHINE\SYSTEM\CurrentControlSet\Services\Tcpip6\Parameters\DisabledComponents(DWORD)=0xff
</code></pre></div></div>

<p><a href="/content/uploads/2018/07/IPv6GPO.png"><img src="/content/uploads/2018/07/IPv6GPO.png" alt="" /></a></p>

<p>Worth noting:</p>

<ul>
  <li>Reboot is required for the change to take effect (at least for the dynamic registration behavior to change)</li>
  <li>De-scoping this policy (or setting it to not configured) doesn’t revert IPv6 to enabled. Instead you need to configure the setting “Enable all IPv6 components” and then de-scope the policy after the change as taken effect</li>
  <li>Ticking <em>“Use this connection’s DNS suffix in DNS registration”</em> causes dynamic registration to <strong>work as normal</strong>, even when IPv6 is disabled. In my testing the primary and the connection specific DNS suffix was the same</li>
  <li>Consider using <em>‘Prefer IPv4 over IPv6</em>‘ instead of disabling IPv6 as this does not impact Dynamic DNS updates</li>
  <li>I’m only talking about DHCP clients here not static clients. The behavior may be different for static clients</li>
</ul>

<p><a href="/content/uploads/2018/07/NicDNSSettings.png"><img src="/content/uploads/2018/07/NicDNSSettings.png" alt="" /></a></p>]]></content><author><name>Rhys Goodwin</name></author><category term="Uncategorized" /><category term="DNS" /><category term="dns registration" /><category term="dynamic update" /><summary type="html"><![CDATA[In Windows 7 and Windows 10 disabling IPv6 also disables dynamic DNS registration. I guess it's a bug?]]></summary></entry><entry><title type="html">Panasonic Strada CN-MW250D USB Pinouts</title><link href="https://blog.rhysgoodwin.com/electronics/panasonic-strada-cn-mw250d-usb-pinouts/" rel="alternate" type="text/html" title="Panasonic Strada CN-MW250D USB Pinouts" /><published>2018-01-16T19:43:02+00:00</published><updated>2018-01-16T19:43:02+00:00</updated><id>https://blog.rhysgoodwin.com/electronics/panasonic-strada-cn-mw250d-usb-pinouts</id><content type="html" xml:base="https://blog.rhysgoodwin.com/electronics/panasonic-strada-cn-mw250d-usb-pinouts/"><![CDATA[<p>In case there was any doubt that you really can find the most ridiculously obscure information on the internet….here are the pinouts for the Japanese Panasonic Strada CN-MW250D Navi Headunit (and probably most other models in the range). With a USB extension cable, some header cables and a soldering iron you can make your own cable. The unit works fine with a 16GB flash drive. Not sure what the max size is.</p>

<p><a href="/content/uploads/2018/01/Pinouts.jpg"><img src="/content/uploads/2018/01/Pinouts.jpg" alt="" /></a></p>

<p><a href="/content/uploads/2018/01/CableConnected.jpg"><img src="/content/uploads/2018/01/CableConnected.jpg" alt="" /></a></p>]]></content><author><name>Rhys Goodwin</name></author><category term="Electronics" /><category term="car audio" /><category term="CN-MW250D" /><category term="electronics" /><category term="panasonic" /><summary type="html"><![CDATA[Panasonic Strada USB Cable Pinouts]]></summary></entry><entry><title type="html">Inca 342 186 Bandsaw</title><link href="https://blog.rhysgoodwin.com/woodwork/inca-342-186-bandsaw/" rel="alternate" type="text/html" title="Inca 342 186 Bandsaw" /><published>2015-12-16T07:41:18+00:00</published><updated>2015-12-16T07:41:18+00:00</updated><id>https://blog.rhysgoodwin.com/woodwork/inca-342-186-bandsaw</id><content type="html" xml:base="https://blog.rhysgoodwin.com/woodwork/inca-342-186-bandsaw/"><![CDATA[<p>Here’s a quick video on my “new” Inca Bandsaw.</p>

<iframe width="560" height="315" src="https://www.youtube.com/embed/mLgSoyvMWTo" frameborder="0" allow="autoplay; encrypted-media" allowfullscreen=""></iframe>

<p>A few facts I missed in the video:</p>

<ul>
  <li>Model: 342 186 04</li>
  <li>Manufactured: 1986</li>
  <li>Motor: Leroy Somer LS80P 230v</li>
  <li>Relay Start</li>
  <li>Work done:
    <ul>
      <li>General clean/de-rust</li>
      <li>Replaced thrust bearings</li>
      <li>Fixed lose neutral in wall plug</li>
      <li>Stripped motor, checked for dust and bearing condition. Ok</li>
      <li>Replaced capacitor</li>
      <li>Cleaned dust from start/stop buttons</li>
      <li>Tracked and tensioned blade</li>
    </ul>
  </li>
</ul>

<p>I had an issue with the motor occasionally not starting, it would just hum. I replaced the capacitor and the problem seems to have gone away.</p>

<p>I’m not 100% sure what kind of induction motor this is. When I opened it I excepted to find a centrifugal switch inside but I didn’t. Is it a permanent split capacitor motor? Please comment if you know how it starts/runs. I made this simple wiring diagram. (To the best of my understanding).</p>

<p><a href="/content/uploads/2015/12/Wiring-Drawing.png"><img src="/content/uploads/2015/12/Wiring-Drawing.png" alt="Wiring Drawing" /></a></p>

<p>The next thing I’ll need to do is build a fence.</p>]]></content><author><name>Rhys Goodwin</name></author><category term="Woodwork" /><category term="342 186" /><category term="bandsaw" /><category term="euro 260" /><category term="inca" /><summary type="html"><![CDATA[Here’s a quick video on my “new” Inca Bandsaw.]]></summary></entry><entry><title type="html">Brasilia Espresso Machine Restoration and PID Upgrade</title><link href="https://blog.rhysgoodwin.com/fabrication/brasilia-espresso-machine-restoration-and-pid-upgrade/" rel="alternate" type="text/html" title="Brasilia Espresso Machine Restoration and PID Upgrade" /><published>2015-07-04T06:29:57+00:00</published><updated>2015-07-04T06:29:57+00:00</updated><id>https://blog.rhysgoodwin.com/fabrication/brasilia-espresso-machine-restoration-and-pid-upgrade</id><content type="html" xml:base="https://blog.rhysgoodwin.com/fabrication/brasilia-espresso-machine-restoration-and-pid-upgrade/"><![CDATA[<p>I’ve been working on this project on and off for a few years. It started off as a simple restoration of a second hand Italian espresso machine which quickly got out of control, as most of my projects seem to do. Here’s a video showing the finished project and then a bunch of photos showing the build. I should have done the video with the camera turned the other way, sorry about that but I couldn’t be bothered re-doing it.</p>

<iframe allowfullscreen="true" class="youtube-player" height="390" src="https://www.youtube.com/embed/OJqH6CJR3TU?version=3&amp;rel=1&amp;fs=1&amp;autohide=2&amp;showsearch=0&amp;showinfo=1&amp;iv_load_policy=1&amp;wmode=transparent" style="border:0;" type="text/html" width="640"></iframe>

<p>The Brasilia ‘Lady’ is a very simple single-group, single boiler machine. It has a 300ml brass boiler with a 3-way solenoid valve. It has a simple bimetallic thermostat which means the temperature swings wildly (although some models do have more complex thermostats). My model had no micro controller and was purely AC driven and controlled by the buttons on the front and the thermostat.</p>

<p>When I started restoring the machine I quickly decided that I wanted to do a PID modification to maintain a constant temperature. At the time I had just started playing around with Arduino so I thought why not just take all of the AC buttons on the front down to an Arduino and control everything through software with solid state relays for the pump, boiler and solenoid. The pictures and captions below should explain each part of the build sufficiently.</p>

<p>TLDR: Final assembly photos are at the bottom of the post.</p>

<h3 id="machine-housing">Machine Housing</h3>

<p><a href="/content/uploads/2015/07/Case01.jpg"><img src="/content/uploads/2015/07/Case01.jpg" alt="Case01" /></a>This is how the machine started out. This isn’t actually mine but I didn’t take a photo before I started. Mine was in much worse condition.</p>

<p><a href="/content/uploads/2015/07/case00.jpg"><img src="/content/uploads/2015/07/case00.jpg" alt="Very simplistic internals." /></a>Very simplistic internals.</p>

<p><a href="/content/uploads/2015/07/Case02.jpg"><img src="/content/uploads/2015/07/Case02.jpg" alt="Case02" /></a></p>

<p><a href="/content/uploads/2015/07/Case03.jpg"><img src="/content/uploads/2015/07/Case03.jpg" alt="Case03" /></a></p>

<p><a href="/content/uploads/2015/07/case04.jpg"><img src="/content/uploads/2015/07/case04.jpg" alt="case04" /></a></p>

<h3 id="top-panel">Top Panel</h3>

<p><a href="/content/uploads/2015/07/TopPanel01.jpg"><img src="/content/uploads/2015/07/TopPanel01.jpg" alt="TopPanel01" /></a>Template for top panel created in SketchUp</p>

<p><a href="/content/uploads/2015/07/TopPanel02.jpg"><img src="/content/uploads/2015/07/TopPanel02.jpg" alt="Template printed onto toner transfer paper" /></a>Template printed onto toner transfer paper</p>

<p>Thanks to Katt for the great idea of using [PCB transfer paper.</p>

<p><a href="/content/uploads/2015/07/TopPanel03.jpg"><img src="/content/uploads/2015/07/TopPanel03.jpg" alt="TopPanel03" /></a>Template pressed onto 3.5MM aluminium plate with an old sandwich press</p>

<p><a href="/content/uploads/2015/07/TopPanel04.jpg"><img src="/content/uploads/2015/07/TopPanel04.jpg" alt="TopPanel04" /></a></p>

<p><a href="/content/uploads/2015/07/TopPanel05.jpg"><img src="/content/uploads/2015/07/TopPanel05.jpg" alt="TopPanel05" /></a></p>

<p><a href="/content/uploads/2015/07/TopPanel06.jpg"><img src="/content/uploads/2015/07/TopPanel06.jpg" alt="TopPanel06" /></a>Milling the display aperture and a recess so that the display is very close to the surface of the panel.</p>

<p>This Sieg SX3 mill is proving to be very useful. It’s the same as the <a href="http://www.amazon.com/gp/product/B000M66WKO/ref=as_li_tl?ie=UTF8&amp;camp=1789&amp;creative=9325&amp;creativeASIN=B000M66WKO&amp;linkCode=as2&amp;tag=blogrhysgoodw-20&amp;linkId=TKR5NWA77KKILAS6">Grizzly G0619</a><img src="https://ir-na.amazon-adsystem.com/e/ir?t=blogrhysgoodw-20&amp;l=as2&amp;o=1&amp;a=B000M66WKO" alt="" /></p>

<p><a href="/content/uploads/2015/07/TopPanel07.jpg"><img src="/content/uploads/2015/07/TopPanel07.jpg" alt="TopPanel07" /></a></p>

<p><a href="/content/uploads/2015/07/TopPanel08.jpg"><img src="/content/uploads/2015/07/TopPanel08.jpg" alt="TopPanel08" /></a></p>

<p><a href="/content/uploads/2015/07/TopPanel09.jpg"><img src="/content/uploads/2015/07/TopPanel09.jpg" alt="TopPanel09" /></a></p>

<p><a href="/content/uploads/2015/07/TopPanel10.jpg"><img src="/content/uploads/2015/07/TopPanel10.jpg" alt="TopPanel10" /></a>Polishing compounds in various grades</p>

<p>The polishing compounds came in a <a href="http://www.amazon.com/gp/product/B00N5HAPV4/ref=as_li_tl?ie=UTF8&amp;camp=1789&amp;creative=9325&amp;creativeASIN=B00N5HAPV4&amp;linkCode=as2&amp;tag=blogrhysgoodw-20&amp;linkId=IJHEYMY3NWSSCEBY">set of 12 syringes</a><img src="https://ir-na.amazon-adsystem.com/e/ir?t=blogrhysgoodw-20&amp;l=as2&amp;o=1&amp;a=B00N5HAPV4" alt="" /></p>

<p><a href="/content/uploads/2015/07/TopPanel11.jpg"><img src="/content/uploads/2015/07/TopPanel11.jpg" alt="TopPanel11" /></a>Shiny!</p>

<h3 id="oled-display-module">oLED Display Module</h3>

<p><a href="/content/uploads/2015/07/Display02.jpg"><img src="/content/uploads/2015/07/Display02.jpg" alt="Display02" /></a></p>

<p><a href="/content/uploads/2015/07/Display03.jpg"><img src="/content/uploads/2015/07/Display03.jpg" alt="Display03" /></a></p>

<p><a href="/content/uploads/2015/07/Display04.jpg"><img src="/content/uploads/2015/07/Display04.jpg" alt="Display04" /></a></p>

<p><a href="/content/uploads/2015/07/Display05.jpg"><img src="/content/uploads/2015/07/Display05.jpg" alt="Display05" /></a></p>

<p><a href="/content/uploads/2015/07/Display06.jpg"><img src="/content/uploads/2015/07/Display06.jpg" alt="Display06" /></a></p>

<p><a href="/content/uploads/2015/07/Display07.jpg"><img src="/content/uploads/2015/07/Display07.jpg" alt="Display07" /></a></p>

<p><a href="/content/uploads/2015/07/Display08.jpg"><img src="/content/uploads/2015/07/Display08.jpg" alt="Display08" /></a></p>

<p><a href="/content/uploads/2015/07/Display09.jpg"><img src="/content/uploads/2015/07/Display09.jpg" alt="Display09" /></a></p>

<p><a href="/content/uploads/2015/07/Display95.jpg"><br />
<img src="/content/uploads/2015/07/Display95.jpg" alt="Display95" /></a></p>

<p>This <a href="http://www.amazon.com/gp/product/B00LWFO5R6/ref=as_li_tl?ie=UTF8&amp;camp=1789&amp;creative=9325&amp;creativeASIN=B00LWFO5R6&amp;linkCode=as2&amp;tag=blogrhysgoodw-20&amp;linkId=UJXILHYO63TSNWXB">3M Double-sided tape</a><img src="https://ir-na.amazon-adsystem.com/e/ir?t=blogrhysgoodw-20&amp;l=as2&amp;o=1&amp;a=B00LWFO5R6" alt="" /> is super strong.</p>

<p><a href="/content/uploads/2015/07/Display10.jpg"><img src="/content/uploads/2015/07/Display10.jpg" alt="Display10" /></a></p>

<p><a href="/content/uploads/2015/07/Display11.jpg"><img src="/content/uploads/2015/07/Display11.jpg" alt="Display11" /></a>The clear acrylic lens is sealed to the display module with 3M double sided tape.</p>

<p><a href="/content/uploads/2015/07/Display12.jpg"><img src="/content/uploads/2015/07/Display12.jpg" alt="Display12" /></a></p>

<p><a href="/content/uploads/2015/07/Display13.jpg"><img src="/content/uploads/2015/07/Display13.jpg" alt="Display13" /></a></p>

<h3 id="pcb-and-controller">PCB and Controller</h3>

<p><a href="/content/uploads/2015/07/PCBKiCad.png"><img src="/content/uploads/2015/07/PCBKiCad.png" alt="PCB design created in KICAD. Such an awesome piece of software!" /></a>PCB design created in KICAD. Such an awesome piece of software!</p>

<p><a href="/content/uploads/2015/07/Controller01.jpg"><img src="/content/uploads/2015/07/Controller01.jpg" alt="Controller01" /></a>12 double layered PCBs delivered for $14 USD from DirtyPCBs.com. I’m not complaining!</p>

<p><a href="/content/uploads/2015/07/Controller02.jpg"><img src="/content/uploads/2015/07/Controller02.jpg" alt="Controller02" /></a></p>

<p><a href="/content/uploads/2015/07/Controller03.jpg"><img src="/content/uploads/2015/07/Controller03.jpg" alt="Controller03" /></a></p>

<p><a href="/content/uploads/2015/07/Controller04.jpg"><img src="/content/uploads/2015/07/Controller04.jpg" alt="Controller04" /></a></p>

<p><a href="/content/uploads/2015/07/Controller05.jpg"><img src="/content/uploads/2015/07/Controller05.jpg" alt="Controller05" /></a></p>

<p><a href="/content/uploads/2015/07/Controller06.jpg"><img src="/content/uploads/2015/07/Controller06.jpg" alt="Controller06" /></a></p>

<p><a href="/content/uploads/2015/07/Controller07.jpg"><img src="/content/uploads/2015/07/Controller07.jpg" alt="Controller07" /></a></p>

<h3 id="power-box">Power Box</h3>

<p><a href="/content/uploads/2015/07/PowerBox01.jpg"><img src="/content/uploads/2015/07/PowerBox01.jpg" alt="PowerBox01" /></a></p>

<h3 id="front-led">Front LED</h3>

<p><a href="/content/uploads/2015/07/Led01.jpg"><img src="/content/uploads/2015/07/Led01.jpg" alt="Led01" /></a></p>

<p><a href="/content/uploads/2015/07/Led02.jpg"><img src="/content/uploads/2015/07/Led02.jpg" alt="Led02" /></a>The led holder is made from stainless steel. A piece of fiber optic plastic is glued in as a lens.</p>

<h3 id="water-tank">Water Tank</h3>

<p><a href="/content/uploads/2015/07/Tank01.jpg"><img src="/content/uploads/2015/07/Tank01.jpg" alt="Tank01" /></a></p>

<p><a href="/content/uploads/2015/07/Tank02.jpg"><img src="/content/uploads/2015/07/Tank02.jpg" alt="Tank02" /></a></p>

<p><a href="/content/uploads/2015/07/Tank03.jpg"><img src="/content/uploads/2015/07/Tank03.jpg" alt="Tank03" /></a></p>

<p><a href="/content/uploads/2015/07/Tank04.jpg"><img src="/content/uploads/2015/07/Tank04.jpg" alt="Tank04" /></a></p>

<p><a href="/content/uploads/2015/07/Tank05.jpg"><img src="/content/uploads/2015/07/Tank05.jpg" alt="Tank05" /></a></p>

<p><a href="/content/uploads/2015/07/Tank06.jpg"><img src="/content/uploads/2015/07/Tank06.jpg" alt="Tank06" /></a></p>

<p><a href="/content/uploads/2015/07/Tank07.jpg"><img src="/content/uploads/2015/07/Tank07.jpg" alt="Tank07" /></a></p>

<h3 id="water-inlet">Water Inlet</h3>

<p><a href="/content/uploads/2015/07/WaterInlet01.jpg"><img src="/content/uploads/2015/07/WaterInlet01.jpg" alt="WaterInlet01" /></a></p>

<p><a href="/content/uploads/2015/07/WaterInlet02.jpg"><img src="/content/uploads/2015/07/WaterInlet02.jpg" alt="WaterInlet02" /></a></p>

<p><a href="/content/uploads/2015/07/WaterInlet03.jpg"><img src="/content/uploads/2015/07/WaterInlet03.jpg" alt="WaterInlet03" /></a></p>

<p><a href="/content/uploads/2015/07/WaterInlet04.jpg"><img src="/content/uploads/2015/07/WaterInlet04.jpg" alt="WaterInlet04" /></a></p>

<p><a href="/content/uploads/2015/07/WaterInlet05.jpg"><img src="/content/uploads/2015/07/WaterInlet05.jpg" alt="WaterInlet05" /></a></p>

<p><a href="/content/uploads/2015/07/WaterInlet06.jpg"><img src="/content/uploads/2015/07/WaterInlet06.jpg" alt="WaterInlet06" /></a></p>

<p>I’m not sure why I made such an elaborate nut for this considering it’s hidden inside the machine. Never mind it was fun.</p>

<p><a href="/content/uploads/2015/07/WaterInlet07.jpg"><img src="/content/uploads/2015/07/WaterInlet07.jpg" alt="WaterInlet07" /></a></p>

<p><a href="/content/uploads/2015/07/WaterInlet08.jpg"><img src="/content/uploads/2015/07/WaterInlet08.jpg" alt="WaterInlet08" /></a></p>

<h3 id="final-assembly">Final Assembly</h3>

<p>Before the final assembly I had the machine casing stripped and powder coated in flame red.</p>

<p><a href="/content/uploads/2015/07/Assembly01.jpg"><img src="/content/uploads/2015/07/Assembly01.jpg" alt="Assembly01" /></a>Group head temperature probe</p>

<p>The group head temperature probe is held on with <a href="http://www.amazon.com/gp/product/B0049KTI8W/ref=as_li_tl?ie=UTF8&amp;camp=1789&amp;creative=9325&amp;creativeASIN=B0049KTI8W&amp;linkCode=as2&amp;tag=blogrhysgoodw-20&amp;linkId=6NQUBFXV7V2QNUOW">High temperature Kapton tape</a><img src="https://ir-na.amazon-adsystem.com/e/ir?t=blogrhysgoodw-20&amp;l=as2&amp;o=1&amp;a=B0049KTI8W" alt="" /></p>

<p><a href="/content/uploads/2015/07/Assembly02.jpg"><img src="/content/uploads/2015/07/Assembly02.jpg" alt="Assembly02" /></a></p>

<p><a href="/content/uploads/2015/07/Assembly03.jpg"><img src="/content/uploads/2015/07/Assembly03.jpg" alt="Assembly03" /></a></p>

<p><a href="/content/uploads/2015/07/Assembly04.jpg"><img src="/content/uploads/2015/07/Assembly04.jpg" alt="Assembly04" /></a></p>

<p><a href="/content/uploads/2015/07/Assembly05.jpg"><img src="/content/uploads/2015/07/Assembly05.jpg" alt="Assembly05" /></a>The tube wrapped around the boiler is a pre-heat tube that I added so that the water being drawn into the boiler is not stone cold.</p>

<p><a href="/content/uploads/2015/07/Assembly06.jpg"><img src="/content/uploads/2015/07/Assembly06.jpg" alt="Assembly06" /></a></p>

<p><a href="/content/uploads/2015/07/Assembly07.jpg"><img src="/content/uploads/2015/07/Assembly07.jpg" alt="Assembly07" /></a></p>

<p><a href="/content/uploads/2015/07/Assembly08.jpg"><img src="/content/uploads/2015/07/Assembly08.jpg" alt="Assembly08" /></a></p>

<p><a href="/content/uploads/2015/07/Assembly09.jpg"><img src="/content/uploads/2015/07/Assembly09.jpg" alt="Assembly09" /></a></p>

<p><a href="/content/uploads/2015/07/Assembly10.jpg"><img src="/content/uploads/2015/07/Assembly10.jpg" alt="Assembly10" /></a></p>

<p><a href="/content/uploads/2015/07/Assembly11.jpg"><img src="/content/uploads/2015/07/Assembly11.jpg" alt="Assembly11" /></a></p>

<p><a href="/content/uploads/2015/07/Assembly12.jpg"><img src="/content/uploads/2015/07/Assembly12.jpg" alt="Assembly12" /></a></p>

<p><a href="/content/uploads/2015/07/Assembly13.jpg"><img src="/content/uploads/2015/07/Assembly13.jpg" alt="Assembly13" /></a></p>

<p><a href="/content/uploads/2015/07/Final.jpg"><img src="/content/uploads/2015/07/Final.jpg" alt="Final" /></a></p>

<h4 id="parts-list-thanks-china">Parts List: (Thanks China!)</h4>

<ul>
  <li>Top plate: 3.5mm Aluminium (from HP Server blanking panels)</li>
  <li>Display module: Cut from a block for 101 x 50mm Aluminium (New, local)
    <ul>
      <li>Display: Hide.HK I2C 1602 LED display. (via eBay ~20USD)</li>
      <li>Display glass: Plexiglass 1.5mm (via ebay)</li>
      <li>Display Tape: 3M 300LSE 9495LE Double Sided Adhesive (sheets via AliExpress)</li>
    </ul>
  </li>
  <li>PCB printed by DirtyPCBs.com
    <ul>
      <li>Arduino Clone: Nano 3.0 clone (via AliExpress)</li>
      <li>2x Temperature sensor chip: MAX6675ISA SPI Interface (via AliExpress)</li>
      <li>Connectors (via local JayCar Electronics)</li>
    </ul>
  </li>
  <li>PCB Box (via AliExpress)</li>
  <li>Power Box – Aluminium (via local JayCar Electronics)
    <ul>
      <li>Solid-State relays (Can’t remember had bunch in a parts box for years)</li>
      <li>DC power supply: From a Samsung USB charger</li>
      <li>Rubber grommet kit (via AliExpress)</li>
    </ul>
  </li>
  <li>LED holder: From some stainless rod I had lying around</li>
  <li>Water Take outlet: Stainless M10 Bolt
    <ul>
      <li>Silicon seal for water inlet – from a kit (via AliExpress)</li>
    </ul>
  </li>
  <li>Water inlet: 22mm Aluminum rod (New, local)</li>
  <li>Silicon tube: 6x9mm food grade (via AliExpress)</li>
  <li>Pre-Heat tube: 6.4mm (I think) copper (New, Local)</li>
</ul>

<p>Thanks for stopping by. Feel free to ask questions.</p>

<p>Here is the source code and PCB schematic designs if anyone is interested. I’d be happy to have critique on either.</p>

<p><strong><em>Update 2022-10-22</em></strong></p>
<ul>
  <li>If I were to do the PCB design again (i.e. I suggest you do this), use a separate IO pin for each button, don’t try to economise with 4 buttons off a single pin like I did. I’ve sometimes had issues with buttons being mis-read. It should be possible to make it more robust in the code but using separate inputs is going to make things less complicated.</li>
  <li>
    <p>Below is the code from the original post (0.75) and the latest code (0.78) which I’m currently running. You’ll notice in the current code that I’ve commented out a lot of code related to forced heating. I was previously disabling the PID while water was being pumped and setting the heater to a pre-set power level. This is because when we’re pumping in cold water, we don’t need to wait for the PID to realise and start adjusting. However, all this starting and stopping of the PID introduced a bug somewhere and sometimes the PID would just go haywire and overheat the boiler. Since commenting out all this code and just letting the PID do it’s thing, it’s been rock-solid. I’m sure the code could be improved a lot – I’m just a wannabe developer!  At some point I should get this into a repo. Or if you make improvements feel free to do so and I’ll post a link to your repo here.</p>
  </li>
  <li><a href="/content/uploads/downloads/2015/07/uCespresso-PCB.zip"> uCespresso PCB </a></li>
  <li><a href="/content/uploads/downloads/2015/07/uCespresso-0.75-Code.zip"> uCespresso Arduino Code 0.75 </a></li>
  <li><a href="/content/uploads/downloads/2015/07/uCespresso-0.78-Code.zip"> uCespresso Arduino Code 0.78 </a></li>
</ul>]]></content><author><name>Rhys Goodwin</name></author><category term="Fabrication" /><category term="arduino" /><category term="brasilia" /><category term="hack" /><category term="lady" /><category term="lathe" /><category term="milling" /><category term="PID" /><summary type="html"><![CDATA[Brasilia 'Lady' coffee machine restoration and modification with oLED display and Arduino PID.]]></summary><media:thumbnail xmlns:media="http://search.yahoo.com/mrss/" url="https://blog.rhysgoodwin.com/wp-content/uploads/2015/07/Assembly13.jpg" /><media:content medium="image" url="https://blog.rhysgoodwin.com/wp-content/uploads/2015/07/Assembly13.jpg" xmlns:media="http://search.yahoo.com/mrss/" /></entry><entry><title type="html">Outdoor Bench from Demolition Wood</title><link href="https://blog.rhysgoodwin.com/woodwork/outdoor-bench-from-demolition-wood/" rel="alternate" type="text/html" title="Outdoor Bench from Demolition Wood" /><published>2014-12-23T02:43:20+00:00</published><updated>2014-12-23T02:43:20+00:00</updated><id>https://blog.rhysgoodwin.com/woodwork/outdoor-bench-from-demolition-wood</id><content type="html" xml:base="https://blog.rhysgoodwin.com/woodwork/outdoor-bench-from-demolition-wood/"><![CDATA[<p>My parents were staying with us a few weeks ago. Dad and I had talked about building an outdoor bench for a weekend project but hadn’t been able to source any suitable timber. The next day Dad came across some wood being thrown out on the side of the road while taking a morning walk. It was from an old house that was being renovated. We took the station wagon down and picked up as much as we thought we’d need. We actually ended up going back again for more, this time the builders were there and they let us go around the back and pick through what they had.</p>

<p><a href="/content/uploads/2014/12/Wood.jpg"><img src="/content/uploads/2014/12/Wood.jpg" alt="Wood" /></a></p>

<p>To the untrained eye this would probably just look like a pile of rubbish on the side of the road but it is in fact gorgeous Rimu. A New Zealand native tree which takes ~450 years to grow to maturity.</p>

<p><a href="/content/uploads/2014/12/Planing.jpg"><img src="/content/uploads/2014/12/Planing.jpg" alt="Planing" /></a></p>

<p>I wish I’d taken more photos but after much de-nailing, planing, cutting, drilling and screwing this is what we came up with. To be fair, Dad did most of the planing. All by hand using a trusty <a href="http://www.amazon.com/gp/product/B0001IW4W8/ref=as_li_tl?ie=UTF8&amp;camp=1789&amp;creative=9325&amp;creativeASIN=B0001IW4W8&amp;linkCode=as2&amp;tag=blogrhysgoodw-20&amp;linkId=RTHRRR4I34OAC4UK">Stanley No.7</a><img src="https://ir-na.amazon-adsystem.com/e/ir?t=blogrhysgoodw-20&amp;l=as2&amp;o=1&amp;a=B0001IW4W8" alt="" /></p>

<p><a href="/content/uploads/2014/12/Bench1.jpg"><img src="/content/uploads/2014/12/Bench1.jpg" alt="Bench1" /></a></p>

<p><a href="/content/uploads/2014/12/Bench2.jpg"><img src="/content/uploads/2014/12/Bench2.jpg" alt="Bench2" /></a>After gluing and screwing the top planks down I used a belt sander to flatten and smooth the top. The screw holes were filled with plugs cut out of Rimu using a <a href="http://www.amazon.com/gp/product/B0014A450G/ref=as_li_tl?ie=UTF8&amp;camp=1789&amp;creative=9325&amp;creativeASIN=B0014A450G&amp;linkCode=as2&amp;tag=blogrhysgoodw-20&amp;linkId=KAOLZDPSJ5N3Y6PP">plug cutter</a><img src="https://ir-na.amazon-adsystem.com/e/ir?t=blogrhysgoodw-20&amp;l=as2&amp;o=1&amp;a=B0014A450G" alt="" /><br />
.</p>

<p><a href="/content/uploads/2014/12/Bench3.jpg"><img src="/content/uploads/2014/12/Bench3.jpg" alt="Bench3" /></a>The bench was coated twice with a basic decking oil to protect it.</p>

<p><a href="/content/uploads/2014/12/Bench4.jpg"><img src="/content/uploads/2014/12/Bench4.jpg" alt="Bench4" /></a></p>

<p><a href="/content/uploads/2014/12/Bench5.jpg"><img src="/content/uploads/2014/12/Bench5.jpg" alt="Bench5" /></a></p>

<p>Free wood <strong>+</strong> many hours of manual labor <strong>=</strong> one mighty solid Rimu bench! The design is based on this <a href="http://ana-white.com/2012/04/plans/providence-bench">providence bench.</a></p>]]></content><author><name>Rhys Goodwin</name></author><category term="Woodwork" /><category term="outdoor bench" /><category term="recycling" /><category term="Rimu" /><summary type="html"><![CDATA[A solid Rimu outdoor seat made from demolition timber.]]></summary></entry><entry><title type="html">Brass Hammer with Oak Handle</title><link href="https://blog.rhysgoodwin.com/creations/brass-hammer-with-oak-handle/" rel="alternate" type="text/html" title="Brass Hammer with Oak Handle" /><published>2014-11-30T07:07:21+00:00</published><updated>2014-11-30T07:07:21+00:00</updated><id>https://blog.rhysgoodwin.com/creations/brass-hammer-with-oak-handle</id><content type="html" xml:base="https://blog.rhysgoodwin.com/creations/brass-hammer-with-oak-handle/"><![CDATA[<p>I made this small brass hammer to tap things down on the parallels in the milling vice. I may also use it for driving chisels. The idea of a stubby but weighty brass hammer was inspired by <a href="http://www.davidbarronfurniture.co.uk/david_barron_tools.asp?pg=1&amp;id=4">David Barron’s brass hammers</a>. I like his a lot more but overall I’m happy with how it came out and it was a good chance to combine lathe, mill and wood work.</p>

<p><a href="/content/uploads/2014/11/Hammer1.jpg"><img src="/content/uploads/2014/11/Hammer1.jpg" alt="Hammer1" /></a></p>

<p><a href="/content/uploads/2014/11/Hammer2.jpg"><img src="/content/uploads/2014/11/Hammer2.jpg" alt="Hammer2" /></a></p>

<p><a href="/content/uploads/2014/11/Hammer3.jpg"><img src="/content/uploads/2014/11/Hammer3.jpg" alt="Hammer3" /></a></p>

<p><a href="/content/uploads/2014/11/Hammer4.jpg"><img src="/content/uploads/2014/11/Hammer4.jpg" alt="Hammer4" /></a></p>

<p>I designed the handle in sketchup, printed the design, then cut it out and traced around it. I then cut it out with a coping saw. My wife finished the handle with a dye stain and <a href="http://www.amazon.com/gp/product/B001E4AQHS/ref=as_li_tl?ie=UTF8&amp;camp=1789&amp;creative=9325&amp;creativeASIN=B001E4AQHS&amp;linkCode=as2&amp;tag=blogrhysgoodw-20&amp;linkId=H2ULVKIGZUTS4AJJ">Briwax</a><img src="https://ir-na.amazon-adsystem.com/e/ir?t=blogrhysgoodw-20&amp;l=as2&amp;o=1&amp;a=B001E4AQHS" alt="" />
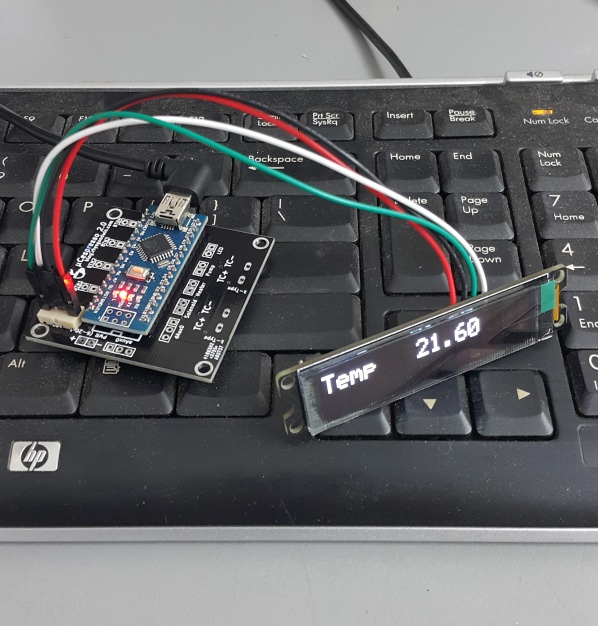
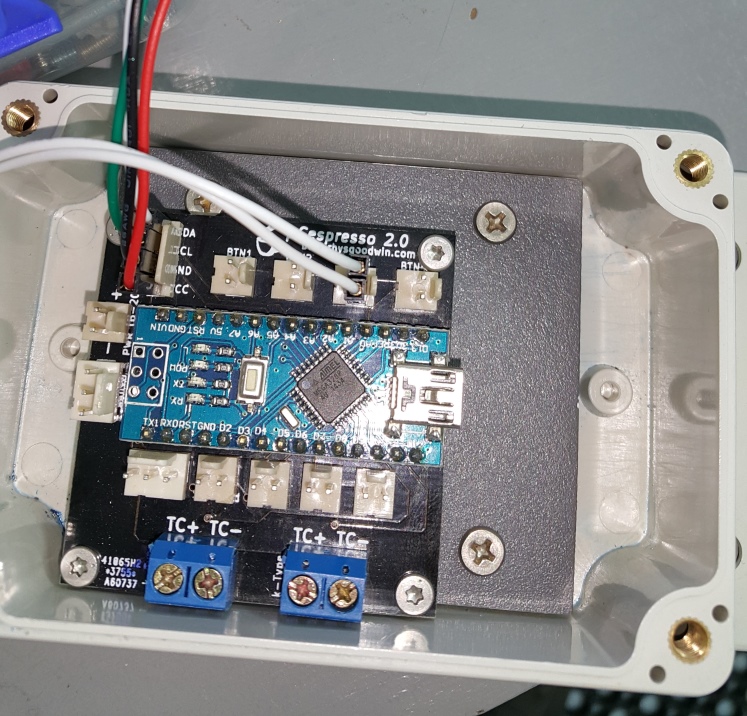
. She has way more skill and experience with wood finishes than I do.</p>

<p>The slot in the brass screw was cut on the mill with a <a href="http://www.amazon.com/gp/product/B00AUBEM6M/ref=as_li_tl?ie=UTF8&amp;camp=1789&amp;creative=9325&amp;creativeASIN=B00AUBEM6M&amp;linkCode=as2&amp;tag=blogrhysgoodw-20&amp;linkId=ZTHWYORMDRQO67CK">2mm end mill.</a><img src="https://ir-na.amazon-adsystem.com/e/ir?t=blogrhysgoodw-20&amp;l=as2&amp;o=1&amp;a=B00AUBEM6M" alt="" /></p>

<p><img src="/content/uploads/2014/11/Hammer5.jpg" alt="Hammer5" /></p>

<p><a href="/content/uploads/2014/11/MakingHammer1.jpg"><img src="/content/uploads/2014/11/MakingHammer1.jpg" alt="MakingHammer1" /></a></p>

<p><a href="/content/uploads/2014/11/MakingHammer2.jpg"><img src="/content/uploads/2014/11/MakingHammer2.jpg" alt="MakingHammer2" /></a></p>

<p><a href="/content/uploads/2014/11/MakingHammer5.jpg"><img src="/content/uploads/2014/11/MakingHammer5.jpg" alt="MakingHammer5" /></a>Using a simple mandrel to make the locating pins out of 3mm stainless steel screws</p>

<p><a href="/content/uploads/2014/11/MakingHammer3.jpg"><img src="/content/uploads/2014/11/MakingHammer3.jpg" alt="MakingHammer3" /></a></p>

<p><a href="/content/uploads/2014/11/MakingHammer4.jpg"><img src="/content/uploads/2014/11/MakingHammer4.jpg" alt="MakingHammer4" /></a></p>

<p><img src="/content/uploads/2014/11/Materials1.jpg" alt="Materials1" /></p>

<p><strong>Materials Used</strong></p>

<ul>
  <li>A piece of oak that I found lying around, cut into 3 pieces and laminated</li>
  <li>28mm A.F. brass hex bar</li>
  <li>12mm mild steel (probably a roller from a printer)</li>
  <li>2 M3 stainless screws</li>
  <li>20mm brass bar used to make the screw at the bottom of the handle. (Not shown)</li>
</ul>

<p>p.s. Thanks to Steve for the use of his brand new <a href="http://www.amazon.com/gp/product/B00G6UIUEG/ref=as_li_tl?ie=UTF8&amp;camp=1789&amp;creative=9325&amp;creativeASIN=B00G6UIUEG&amp;linkCode=as2&amp;tag=blogrhysgoodw-20&amp;linkId=VSZTWR62DXKKDGO6">light tent!</a><img src="https://ir-na.amazon-adsystem.com/e/ir?t=blogrhysgoodw-20&amp;l=as2&amp;o=1&amp;a=B00G6UIUEG" alt="" /> Very cool.</p>]]></content><author><name>Rhys Goodwin</name></author><category term="Creations" /><category term="brass hammer" /><category term="lathe" /><category term="milling machine" /><category term="woodwork" /><summary type="html"><![CDATA[A small brass hammer with oak handle. Made from scratch.]]></summary><media:thumbnail xmlns:media="http://search.yahoo.com/mrss/" url="https://blog.rhysgoodwin.com/wp-content/uploads/2014/11/Hammer2.jpg" /><media:content medium="image" url="https://blog.rhysgoodwin.com/wp-content/uploads/2014/11/Hammer2.jpg" xmlns:media="http://search.yahoo.com/mrss/" /></entry></feed>