SalesForce SSO with ADFS 2.0 – Everything you need to Know
Updates
-14/01/2013 – Workaround for iPads and SSO!</span>
Rohan writes to tell us that:
“If you activate Touch in your Org and set touch to be used for Browser access then an iPad will via Safari use the mobile touch interface. You’ll need to have http redirect set, and (As below) you are limited to the touch “app” so no chatter app or dashboards app.
That said, dashboards are meant to be coming to touch shortly so perhaps touch via the browser is enough.”
Cheers Rohan!
– 15/10/2012 – ADFS 2.0 / SalesForce + iPad/Safari Working!
</span>SalesForce have added a new option to change the SAML binding method from HTTP POST to HTTP REDIRECT. Using HTTP REDIRECT seems to fix the issue with ipad/Safari and ADFS 2.0. You can find this in the SSO settings.
</span>
Intro
In my last post I went over the basic concept of federation using SAML 2.0, today I’ll show you how to configure single sign-on for SalesForce using ADFS 2.0. This is a really nice solution because it’s easy to set up and doesn’t cost you anything except the Windows 2008 OS licence.
ADFS 2.0 is Microsoft’s answer to federation – it includes their own implementation of SAML 2.0. It runs on Windows Server 2008 [R2] and is installed from a separate downloadable package. It is not the ADFS ‘role’ which can be enabled in Windows Server 2008 R2, that’s ADFS 1.0 (not cool).
If you don’t feel you have a good grasp of SAML 2.0 I suggest that you set up ADFS 2.0 (as IdP) and Shibboleth (as SP) in a lab environment. There’s no better way to learn about a particular technology than to interface Microsoft’s implementation with its open source counterpart! There’s a great MSDN blog post that walks you through the set up. I really learnt a lot by doing this.
Overview
Let’s first take a look at an overview of the process then we’ll dive into the configuration. The diagram below shows the process for an IdP-initiated login into SalesForce – later we’ll look at SP-initiated login.

- The user authenticates to the ADFS server using Kerberos and requests login to SalesForce
- ADFS returns a SAML assertion to the user’s browser
- The browser automatically submits the assertion to SalesForce who logs the user in
Install
- Start with Windows Server 2008 [R2] – Domain Joined
- Create a friendly DNS name for ADFS and point it to your adfs server. e.g adfs.testzone.local
- Download and install ADFS 2.0. Federation Server role. This will install all pre-requisites
- In the IIS manager create an SSL certificate for your friendly DNS name or use SelfSSL from the IIS 6.0 resource kit to create a self-signed certificate
- Run through the ADFS Server configuration wizard
- Create a new federation Service
- Stand-alone server
- Select the certificate that you created for your friendly DNS name
- Create an SPN for the DNS name so that Kerberos authentication between the browser and the ADFS IIS instance works correctly
setspn -a HOST/adfs.testzone.local testzone\ADFSSVR01
setspn -a HOST/adfs testzone\ADFSSVR01
For more info on Kerberos SPNs see my Active Directory and Kerberos SPNs Made Easy post
Configuration
To build a federation between two parties we need to establish a trust by exchanging some metadata. The metadata for our ADFS 2.0 instance is entered manually into the SalesForce configuration. SalesForce metadata is downloaded as an XML file which ADFS 2.0 can consume.
SalesForce Configuration
In the ADFS 2.0 MMC snap-in select the certificates node and double click the token-signing certificate to view it.

Go to details and “Copy to File”. Save the certificate in DER format.
On the ADFS server browse to your federation metadata URL which can be found in the ADFS MMC\Endpoints|Metadata|Type:Federation Metadata. In my case: https://adfs.testzone.local/FederationMetadata/2007-06/FederationMetadata.xml

Copy the entityID. In my case http://adfs.testzone.local/adfs/services/trust
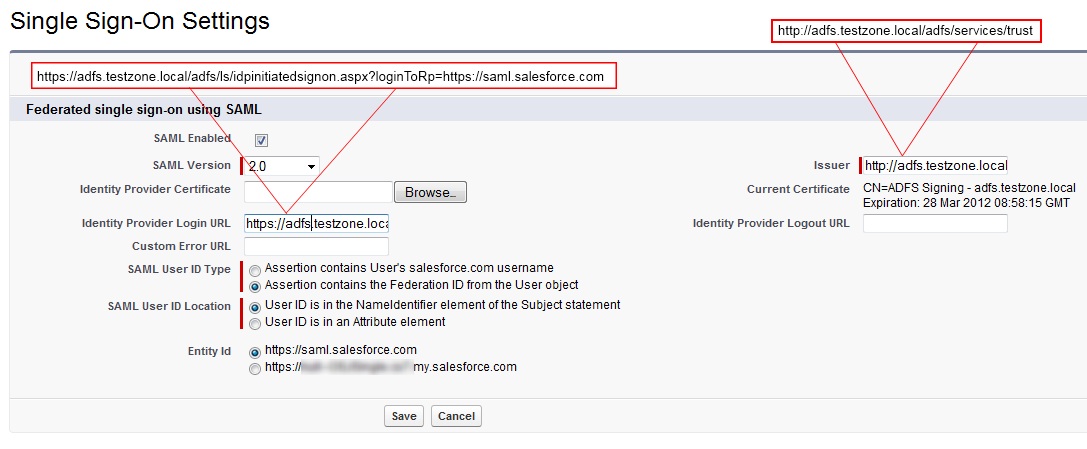
Go to SalesForce Setup\Security Controls\Single Sign-On Settings\

- SAML Enabled: Ticked
- SAML Version: 2.0
- Identity Provider Certificate: Browse and select the token-signing certificate you exported earlier
- Issuer: Paste your entityID in here
- Identity Provider Login URL: This is the URL of your ADFS SAML endpoint where SalesForce will send SAML requests for SP-initiated login. This can be found in ADFS MMC\Endpoints|Token Issuance|Type:SAML 2.0/WS-Federation (In my case: https://adfs.testzone.local/adfs/ls/ )
- SAML User ID Type: To log a user on we can either match against their SalesForce username or we can match against their federation ID which would need to be populated in the profile of every user. For testing select federation ID. If your users currently use their email address as their SalesForce username then when you come to roll out SSO into production you can switch to sending the username.
- SAML User ID Location: To log the user on we can either use the NameID in the SAML assertion or we can use some other attribute. NameID should suffice.
- Entity ID: This is how our ADFS IdP will identify the SalesForce SP. I just left it as https://saml.salesforce.com. If you were supporting multiple SalesForce instances from the same ADFS instance then you’d want to use the more unique name. This is also the identifier we use when we do a IdP-initiated login with ADFS
Save the settings and download the Metadata xml file.
ADFS 2.0 Configuration
Now that we have the metadata for SalesForce we can create the trust on the ADFS side.
Open the ADFS 2.0 MMC snapin and add a new “Relying Party Trust”:
- Select Data Source: Import data about a relying party from a file. Browse to the XML you downloaded from SalesForce
- Display Name: Give the trust a display name e.g. ‘SalesForce Sandbox’
- Choose Issuance Authorization Rules: Permit all users to access this relying party
- Open Edit Claim Rues Dialog: Ticked
In the claim rules editor select the “Issuance Transform Rules” tab
Add a new rule:

- Claim Rule Template: Send LDAP Attributes as Claims
- Claim Rule Name: For testing we’ll send the UPN as NameID so call the rule: “Send UPN as NameID” In production you might send the user’s email address or employee ID *
- LDAP Attribute: User Principal Name
- Outgoing Claim Type: Name ID
*Update:See my post on choosing you’re attributes wisely. There’s a potential security pitfall here.
SP-Initiated Login
With IdP-initiated login you would typically set up a link on the company intranet that users would click to get access to SalesForce. SP-initiated login happens when a user clicks a direct link to SalesForce. For this to work we need to set the secure hash algorithm to SHA1 instead of the default SHA-256. This is set in SalesForce relying party trust properties under advanced.
If you don’t set this you’ll get the following message in to the ADFS event log:
Event ID: 378
SAML request is not signed with expected signature algorithm. SAML request is signed with signature algorithm http://www.w3.org/2001/04/xmldsig-more#rsa-sha256 . Expected signature algorithm is http://www.w3.org/2000/09/xmldsig#rsa-sha1

With My Domain
It’s best practice to implement the “My Domain” feature at the same time as implementing SSO if you haven’t already done so. “My Domain” gives you your own subdomain on SalesForce. e.g. MyCompany.my.salesforce.com. When you click a “My Domain” link SalesForce will know to redirect you to your Idp (ADFS) to be authenticated.
Without My Domain
As long as the user has performed at least one IdP-initated login from a given browser SalesForce will have set a cookie so in future it knows to redirect the browser to the IdP with a SAML request. The IdP will in turn issue a SAML response for the browser to pass back to SalesForce.
You might find some SalesForce documentation that mentions the ssoStartPage attribute which can be set in the SAML assertion. I found that this wasn’t necessary, and if you look at the cookie you get after an IdP-initiated login you’ll see that ssoStartPage is set to the IdP login URL you specified in the SalesForce SSO configuration.
LogoutURL
You can specify a URL to redirect to when the user logs out by creating a custom claim rule which sends an additional logoutURL attribute.
The custom rule is as follows:
=> issue(Type = "logoutURL", Value = "http://intranet.youcompany.com", Properties["http://schemas.xmlsoap.org/ws/2005/05/identity/claimproperties/attributename"] = "urn:oasis:names:tc:SAML:2.0:attrname-format:unspecified");

Testing
Alright, so that should be about it. We can now go and set the Federation ID of a SalesForce user to the UPN our own AD user account and see if it all works.

Point your browser to your ADFS IdP-initiated login URL and specify the loginToRp parameter as the SalesForce SAML entity ID.
E.g. https://adfs.testzone.local/adfs/ls/idpinitiatedsignon.aspx?loginToRp=https://saml.salesforce.com
This should redirect you and sign you into SalesForce. If you get a SalesForce login error use the SAML assertion validator tool on the SalesForce single sign-on configuration page. It will display the results of the last failed SAML login.

If you get an error from ADFS then check the ADFS logs in Server Manager\Diagnostics\Applications and Services Logs\ADFS 2.0\Admin. There is also a very good MSDN blog post on ADFS 2.0 diagnostics.
Once you have IdP-initiated login working try SP-initiated. Copy a link from deep inside SalesForce then log out. Reload your browser and paste the in the URL. You should be seamlessly redirected to your IdP, authenticated and then redirected back to the link you requested.
Portal SSO and JIT Provisioning
There’s plenty of good info in the Force.com literature for portal SSO and just-in-time provisioning but here’s some ADFS 2.0 specific stuff. I’ve only been playing with this for a couple of weeks but I’ve had requests for the info so here’s what I’ve got so far. Let me know if I’ve missed something or I’ve got something wrong.

Portal SSO
To do a Portal SSO login you need to send the portal ID and the Org ID as claims using custom claims rules. There is significant caveat though, if you’re using ADFS to do SSO for both full-License and portal users. If you send the Portal ID and the Org ID for a full-license user SalesForce will assume you are trying to log into a portal. This will result in a SAML error because a full-license user can’t also be a portal user. To overcome this you can use a condition in the custom rule so the portal ID and Org ID are only sent if the user is a member of a given Active Directory group. The rules below use the AD group SID which you can find using pstool psgetsid.exe. The advantage of using an SID is that if the group is renamed the SID stays the same.
Send Portal ID
c:[Type == "http://schemas.microsoft.com/ws/2008/06/identity/claims/groupsid", Value =~ "^(?i)S-1-5-21-1458536374-0499464381-951853424-103426$"]
 => issue(Type = "portal_id", Value = "033G00000002a1P");
Send Org ID
c:[Type == "http://schemas.microsoft.com/ws/2008/06/identity/claims/groupsid", Value =~ "^(?i)S-1-5-21-1458536374-0499464381-951853424-103426$"]
 => issue(Type = "organization_id", Value = "01GK00000004ra2");
I haven’t found a way to send send a claim only if a user is not a member of a group, and the ADFS 2.0 claims rules language reference is non-existent! If someone works this out please let me know.
JIT Provisioning
Just-in-time provisioning allows you to create users on the fly with a SAML assertion as they attempt to login. All you need to do is enable JIT in your SSO settings and then send the required attributes. JIT custom claims rules are just like the portal ones above. The SalesForce Single Sign-On Implementation Guide has all the details on what attrbiutes to need to be sent. Here’s a few things to keep in mind:
- You can provision and update users into specific profiles or rolls based on Active Directory groups just like with the portal logins above, but you’ll need to manage the AD groups carefully – you couldn’t have a user in multiple groups which represent different SalesForce profiles or rolls
- You can provision and update users but you can’t un-provision them. Again you’ll need to use Active directory security groups to determine who can be JIT provisioned and you’ll have to manage your licensees and account De-activations outside JIT
JIT can’t be used to provision Portal accounts!*Update* It looks like this has changed and it is now supported. Thanks Tim for pointing this out!
https://login.salesforce.com/help/doc/en/sso_jit_portal_requirements.htm
- I found that I couldn’t JIT provision users if chatter wasn’t enabled – still waiting for the word on this from SalesForce
Further Analysis
In case you’re wondering how the browser collects and passes these SAML requests and responses around, we’ll take a closer look at the entire process.
We’ll go over the SP-Initiated login because it has the most steps and really demonstrates SAML and federation at its best. I’ll use screen shots of Fiddler2 to show you exactly what’s happening at each step.
Note* Fiddler messes with Windows integrated authentication to IIS so you’ll need to turn off extended protection on the /adfs/ls/ virtual directory if you want to try this. Otherwise your browser won’t authenticate with ADFS and you’ll see event 4625 with error 0xc000035b in the Windows security log on the ADFS server.
Step 1
The user clicks a direct link to a SalesForce page. The browser connects and SalesForce reads the ssoStartPage attribute from the user’s cookie. SalesForce uses JavaScript to redirect the browser to the SalesForce SAML request generator. The SAML request generator creates a SAML request for the IdP by sending an invisible HTML form with hidden fields back to the browser. It then uses JavaScript to automatically submit the form to the IdP SAML endpoint.

Step 2
The browser submits the HTML form which contains the SAML request to the ADFS SAML endpoint. Since we are using Windows integrated authentication, ADFS redirects the browser to the /auth/ingetrated/ directory at which point a 401 (User must authenticate) is sent. Finally, the user is authenticated using Kerberos and ADFS serves up a SAML response. Again, the SAML message is returned to the browser in an HTML form which is then submitted to the SalesForce SAML endpoint using JavaScript.

Step 3
The browser submits the HTML form which contains the SAML response to the SalesForce SAML endpoint which verifies the SAML assertion, logs the user in and redirects the browser to the original requested URL.

Common Issues & Troubleshooting
Here are some of the issues you might com across. Thanks to everyone who has commented and shared their experience – I’ll keep updating this section.
Federation ID is case sensitive
One thing to watch out for is the Federation ID is case-sensitive. So if this is your organizational email, be sure to enter it exactly as AD FS sends it, or Salesforce won’t be able to find the matching user.
I’ve looked into writing a custom claim rule to normalize the case the lase of the LDAP attribute before sending it but it looks like it’s not possible the claims language doesn’t seem to have any string manipulation except a basic regex replace.
Assertion Expired
An assertion’s timestamp is more than five minutes old.
Note: Salesforce does make an allowance of three minutes for clock skew. This means, in practice, that an
assertion can be as much as eight minutes passed the timestamp time, or three minutes before it. This amount
of time may be less if the assertion’s validity period is less than five minutes.
So make sure your clock as sync’d to a good internet time source.
Preventing Users Using Their old Username/Password
It doesn’t seem to be possible to prevent users from logging in using the standard method which is a bit of a pain. There is an idea you can promote here to get this feature implemented:
http://success.salesforce.com/
Conclusion
Well that’s it! Everything you need to know about SalesForce WebSSO with ADFS 2.0.
Federation is really cool, so make sure you encourage its use in your organisation instead of older methods involving clunky tightly coupled links and horrible things like allowing your cloud vendor to do LDAP authentication against your domain controllers over VPNs etc!
Thanks for reading and please ask questions, make comments and corrections. I’ll continue to update this post as we go.
Updates
2011/07/30
- Added JIT and Portal SSO info
- Updated SP-initiated login with “My Domain” info – Thanks to Pat over at SalesForce for helping out this this